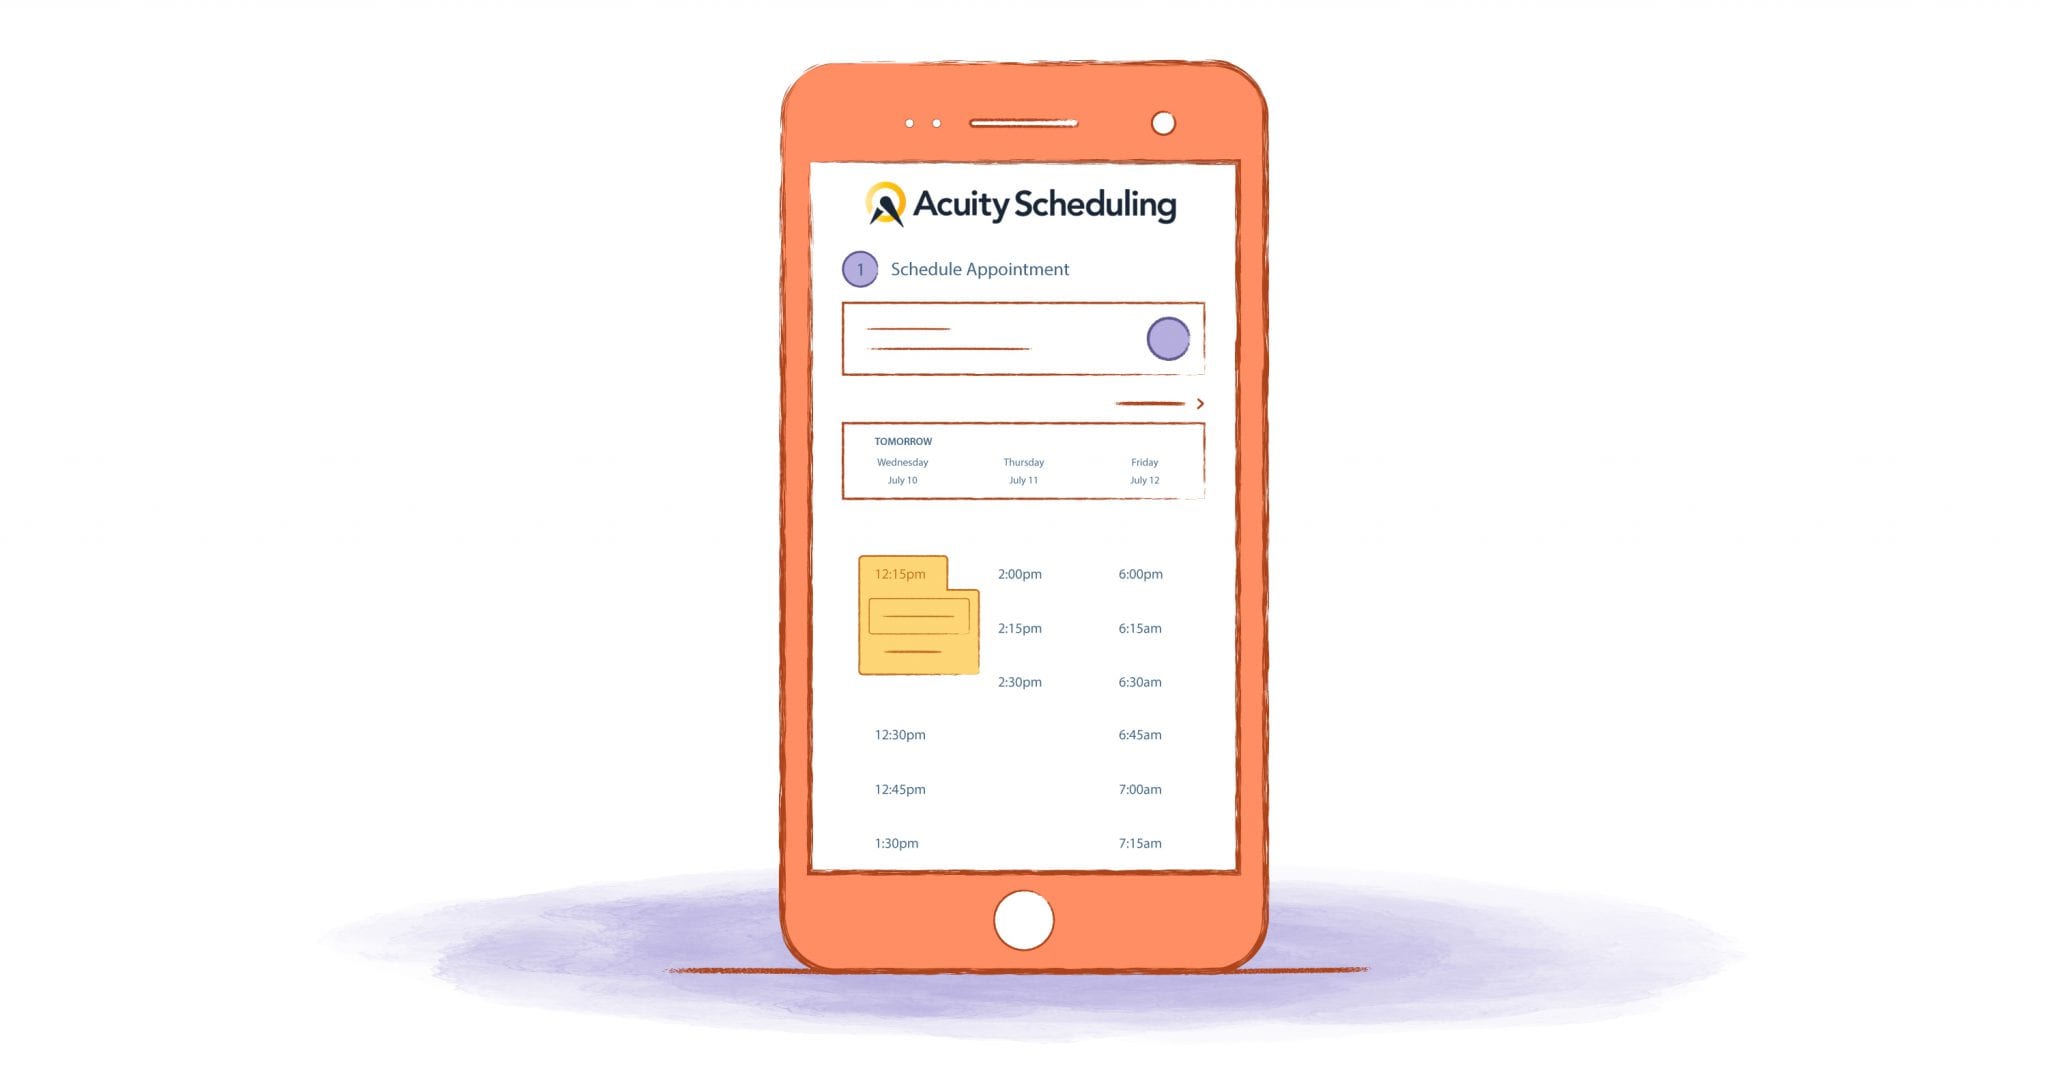
Squarespace is best known for its website building. Visit the company’s website, and you’ll be shown all sorts of templates that will let you present your ideas online, show off your portfolio, or build an online store. Here is a complete guide to Acuity Scheduling.
It’s all very professionally done, but it’s also no better than the services offered by other similar companies, like Wix or Moonfruit. Select the ‘Menu’ option at the top of the page, though, and you’ll see something slightly different. In addition to links to domain purchases and templates, it is an option for “scheduling.”
The scheduling is a bit different. What the company offers in this section of the site is a product made by Acuity. Foursquare bought the firm in April 2019, enabling it to provide its clients a time management tool that’s often lacking on other websites—and is extremely useful.
In this guide, we’re going to look at how to use Acuity Scheduling — and how to make the most of it.
1. Getting Started with Acuity Scheduling
Acuity is a digital calendar on steroids. The kinds of digital calendars that come free with a Google, Yahoo, or Apple account allow users to add events and share their schedules. They can set up notifications, and the calendars can even add events automatically when they appear in the user’s email account.
Receive a confirmation email for a flight, for example, and Google will add the booking to your Google Calendar automatically.
Those calendars let you share some of your schedules with other people. They can even allow those people to add events to your calendar. But what they can’t do is help people find times that also match their own availability. Nor do they let anyone book times in someone else’s schedule.
Someone who wants to make an appointment at a beauty salon, for example, is still expected to call the salon and ask for a time. The customer and the salon owner will then bat times backward and forwards until they find an hour that suits both.
Some restaurant websites can use systems that allow diners to make reservations, but they often provide few choices and have limited features. Acuity, and its competitors, aim to fill the gap. It offers a much more complex system that allows businesses to embed calendars into their websites so that anyone can make bookings.
The companies can even create multiple calendars for different branches of the business, or different agents. They can offer different kinds of appointments, and they can charge and make money at the time of booking. It’s a hugely powerful tool that brings a whole new level of functionality to any commercial website. But setting it up and making the most of it does take a little thought and effort.
Setting Your Availability on Acuity
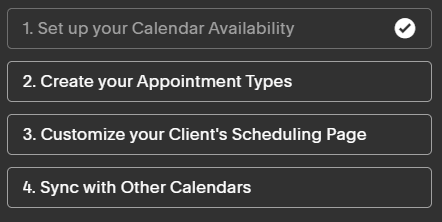
When you register with Acuity Scheduling, the site offers a four-step walkthrough. The first step is to set up your calendar availability. The availability tells people when you’re available to receive appointments.
That should be straightforward, and setting the availability is simple enough. But before you can get there, Acuity will first show you the “Default Client Scheduling Limits.”
Limits aren’t about when you’re free to take bookings. It’s about when you want your clients to be open to making bookings.
The default setting is that the calendar start time will depend on the appointment type. As we’ll see, you can offer different kinds of appointments. A beauty salon, for example, could provide appointments with three different stylists, two manicurists, and a cosmetician. If the cosmetician is only available in the afternoon, there’s no point in presenting a calendar for those appointments that include morning times.
The default setting also allows clients to reschedule their appointments, cancel their bookings, and even edit the forms—at least after the scheduling. Clients can’t book less than twelve hours in advance or more than a year ahead, and they can’t cancel or change appointments with less than twelve hours’ notice.
You can edit those default limits. Press the “Edit Default Limits” button, and you’ll get a big pop-up filled with a range of different options.
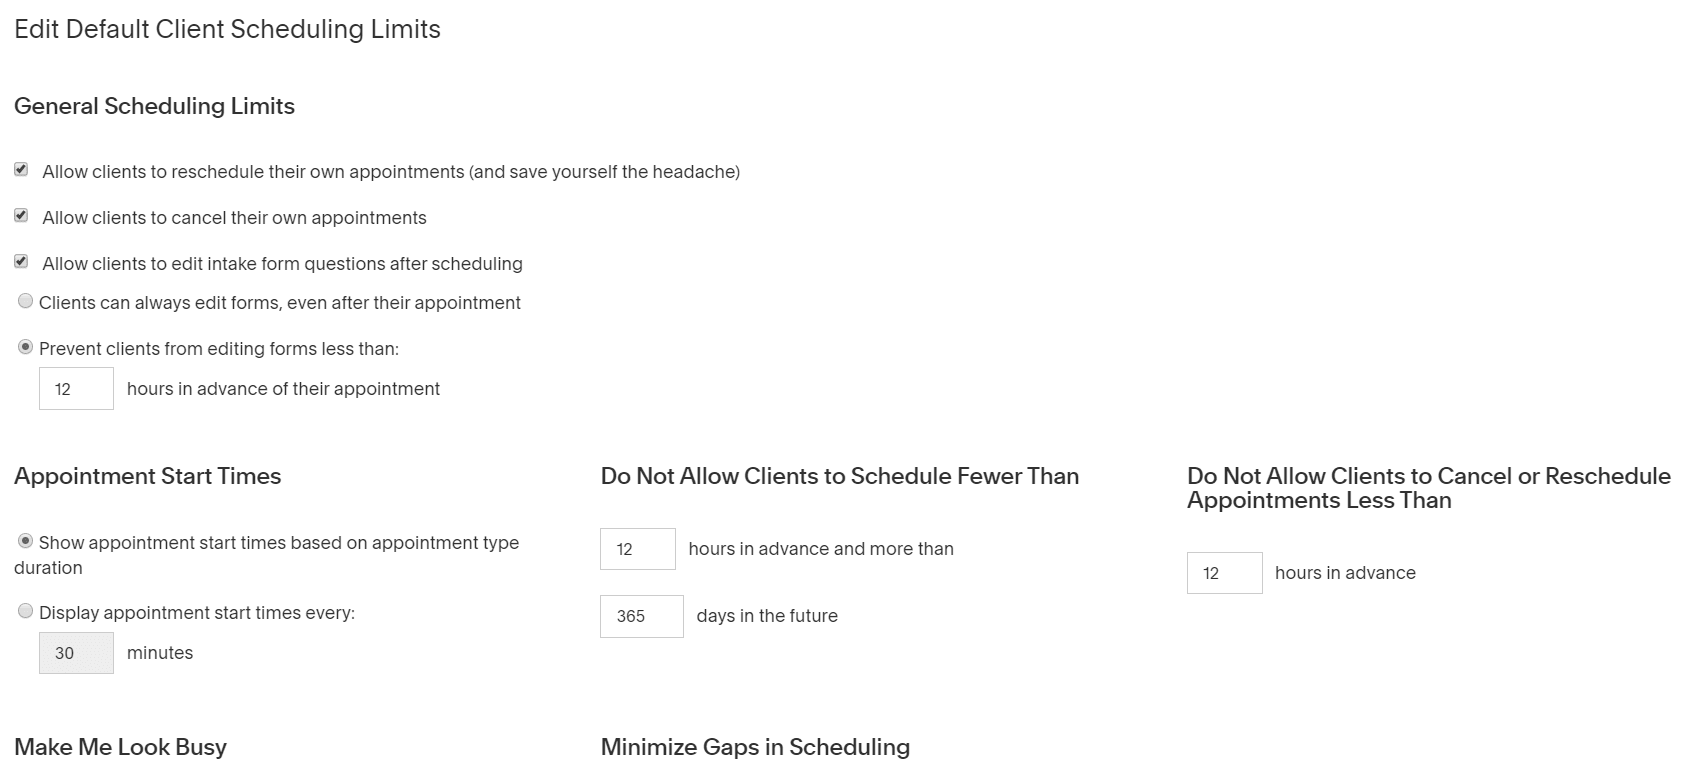
Each of those options deserves some attention.
Letting clients reschedule their own appointments might save you a headache, but it could also leave you with gaps in your calendar. If you want to make it easy for clients to change their bookings, then check the first box but also take a look at the last box on the right.
The last box limits the time when clients can cancel or reschedule. The default is twelve hours in advance. You’ll want to change that limit to match the time you need to fill a canceled appointment.
Bear in mind that the closer to the appointment time you can offer clients, the more flexibility they’ll enjoy, and the more comfortable you’ll find it to make sales. On the other hand, you’ll have less time to replace a rescheduled appointment with someone else.
If you think that twelve hours is enough, then keep to that. But if you feel that you’ll need at least a day to replace a cancellation—and a day won’t put off too many sales—then change those hours to 24.
If you don’t allow clients to reschedule or cancel their appointments themselves, they’ll have to contact you first. That will give you more work, but it might also reduce the chances that they’ll cancel and allow you to keep their business.
Look Busy
At the bottom of the form are a couple of particularly exciting options. The first is called “Make Me Look Busy.”
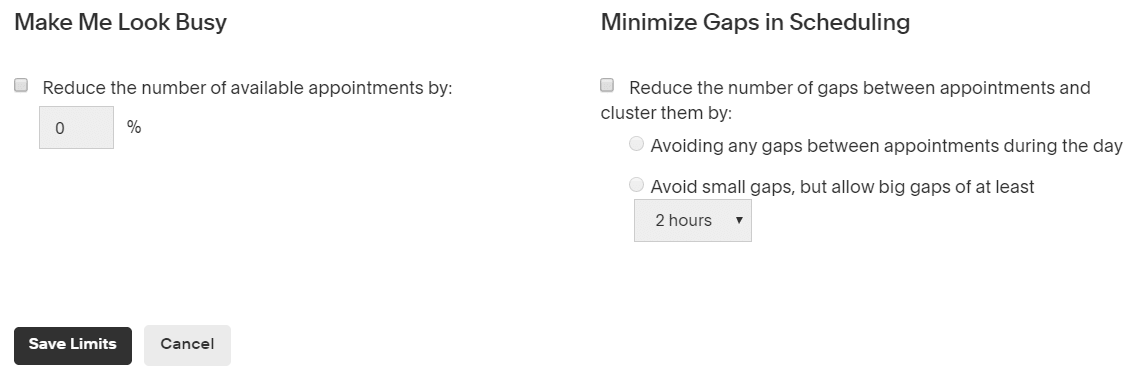
This option lets you set a percentage by which to reduce the number of available appointments. It’s the same principle that buskers use when they toss a few coins into their own hat to encourage others to hand over money. No one wants to be the first.
If you’re starting and don’t yet have any appointments—or only have a few—it’s worth checking that box and reducing your own availability by at least 10 percent. Once you start to fill up, you can uncheck that box and fill up the rest of your schedule.
Close the Gaps Between Appointments
The last part of this form does the opposite—and it’s essential. Acuity lets you reduce the size of gaps between the appointments by either avoiding any time between meetings during the day; or by preventing small gaps but allowing significant breaks when needed.
In general, you want to have small gaps between appointments. Although starting a new meeting as soon as an old one ends gives you maximum efficiency, it can be so tiring that your productivity will flag. You want to leave at least ten minutes between appointments—or at least between some appointments—so that you can take breaks and allow meetings to run late without ruining your entire day.
Block off Time
Once you’ve dealt with the Client Scheduling Limits, you’ll be able to start creating your appointment types. Or rather, you’ll first have to choose whether you want to block off time.
It looks like an odd time to be asked. You haven’t yet set up your schedule, and you’re already being asked whether you want to take a vacation. Despite the timing of the question, it’s still useful—not for holidays but for controlling when you want to be available.
Acuity asks you to choose an hour range and a date. But once you’ve clicked the “repeat” button, you’ll be able to select the days and the hours you don’t want to be available.
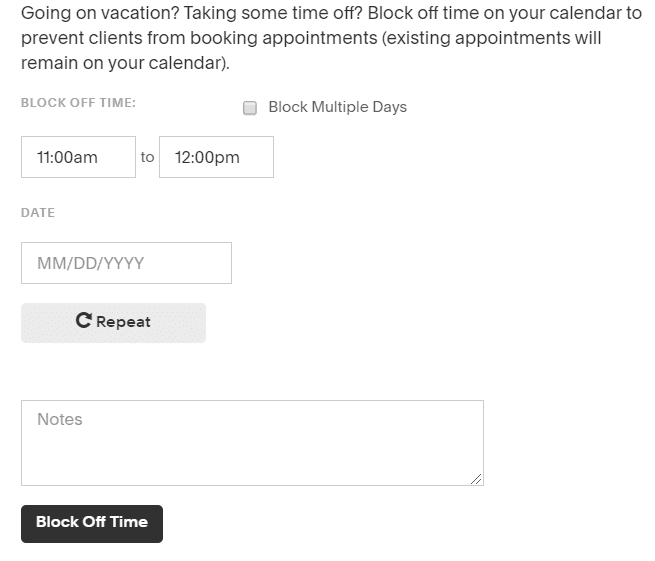
That is useful. It means that if you’re working part-time or you only want to take appointments on particular days every week, you can begin by blocking off the hours and days when you’re not available. It’s an excellent place to start.
Set Your Availability
Finally, you do get to set the hours of your availability.
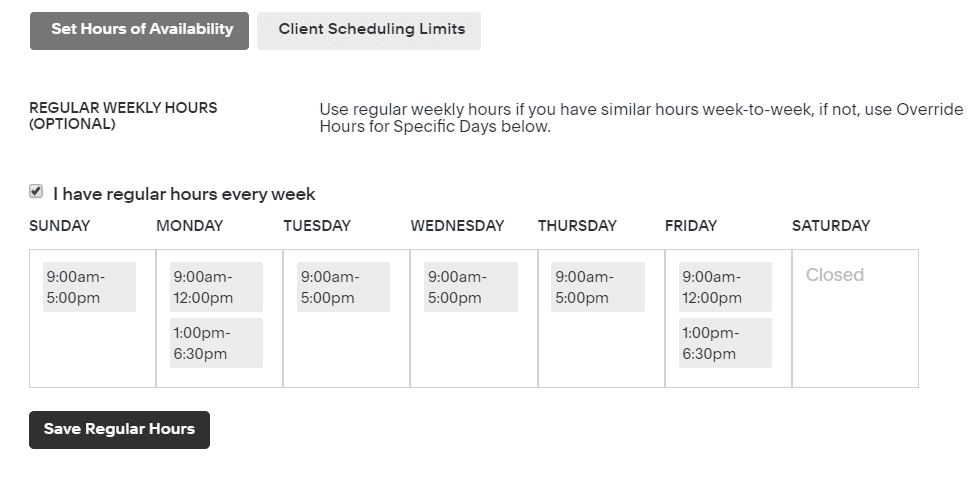
Acuity’s default is to check the box mark, “I have regular hours.” That gives you a list of days from Sunday to Saturday, with some hours already marked. You can change those hours, but Acuity Scheduling assumes that you have regular hours every week.
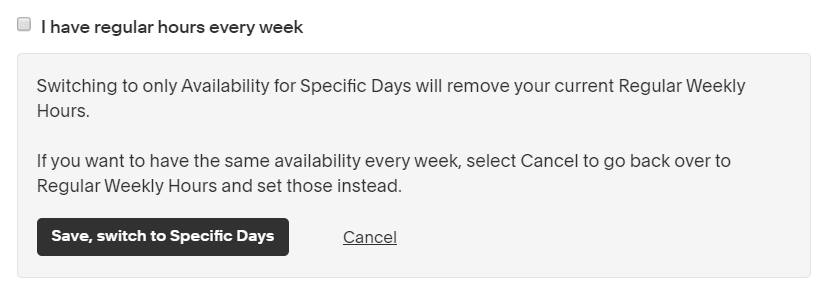
Uncheck that box, and you’ll be given the option to remove the current weekly hours and add your own hours manually.
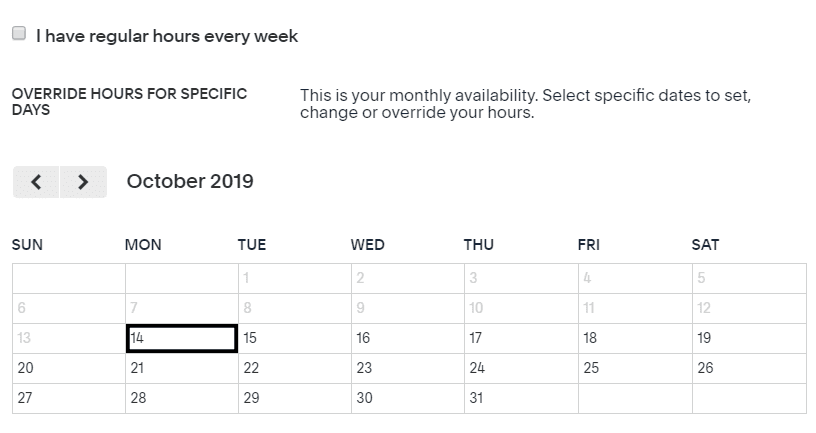
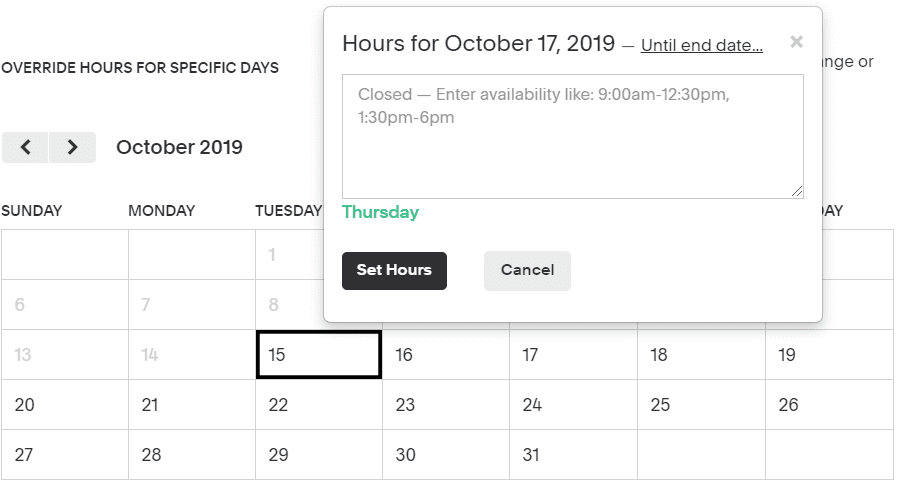
If your schedule varies from week to week or from month to month, this will take a bit of time. Keep your calendar next to you. Forget about blocking hours if you don’t have a vacation coming up. Uncheck the box and plug in the hours that you’re available. To set those hours, click the day in which you want to set those hours, and enter your availability on that day in the following format: “9:00 am-12.30 pm.”
If those hours are the same day after day, you can make things a bit easier for yourself by clicking the link marked “Until end date…” and entering the next day; you won’t be available.
How to Make Yourself Available at the Same Times Each Week on Acuity (with Exceptions)
Acuity is all complicated stuff. Acuity throws a bunch of options at users right at the beginning and expects them to be able to figure it out. While all of the features might be useful, some are likely to get in the way, especially at the beginning.
Let’s focus on what you’re most likely to want to do: set the regular hours that you’re available each week for appointments.
Uncheck the box marked “I have regular hours every week” and agree to remove all the current weekly hours. That will clear your calendar and give you a blank slate.
Now re-check the box marked “I have regular hours every week.”
Next, enter the times you’re available on each day using the “9:00 am-12.30 pm” format. You can copy and paste the hours from one day to the next to make filling the schedule more manageable. Those will be the hours you’ll have every week on the days you’ve marked.
If you know that you’re not going to be available on particular days—perhaps you’re away at a conference or feel like lying in bed all day and watching television—then you can scroll down to the section marked “OVERRIDE HOURS FOR SPECIFIC DAYS.” Select a day and state that you’re “closed.”
You might have to do a bit of scrolling to get there, but that will be the easiest way to arrange your appointment availability schedule.
2. Creating Appointment Types
Creating that schedule, though, will only give an appointment calendar for one kind of appointment. The default is a 50-minute consultation, which comes with a prepared, localized fee. But you can also create different types of meetings or consultations.
You could categorize your consultations by time, for example. Some clients might need a full hour with you. Others won’t need more than half an hour, allowing you to pitch your services at different price ranges.
Or could categorize them by type. A tax consultancy might want to offer one kind of appointment for individual filings, and another kind for commercial filings. You could create both of those types of schedules on Acuity, then paste them into different parts of your website. Each of those types of appointments could have their own availability schedule. You might want to focus on individual clients on Mondays and Wednesdays and companies for the rest of the week, for example.
Whether you’ll need just one kind of appointment or many, you are likely to want to change the default setting that Acuity gives you for appointment types.
Click the big button marked “Create your Appointment Types” in the top left corner.
In the middle of the page, you’ll see a tab for a “New Type of Service” and another tab for a “New Type of Group Class.”
Beneath those tabs, you’ll also see the default appointment that’s already been created. To edit that appointment type, select “Edit” on the right.
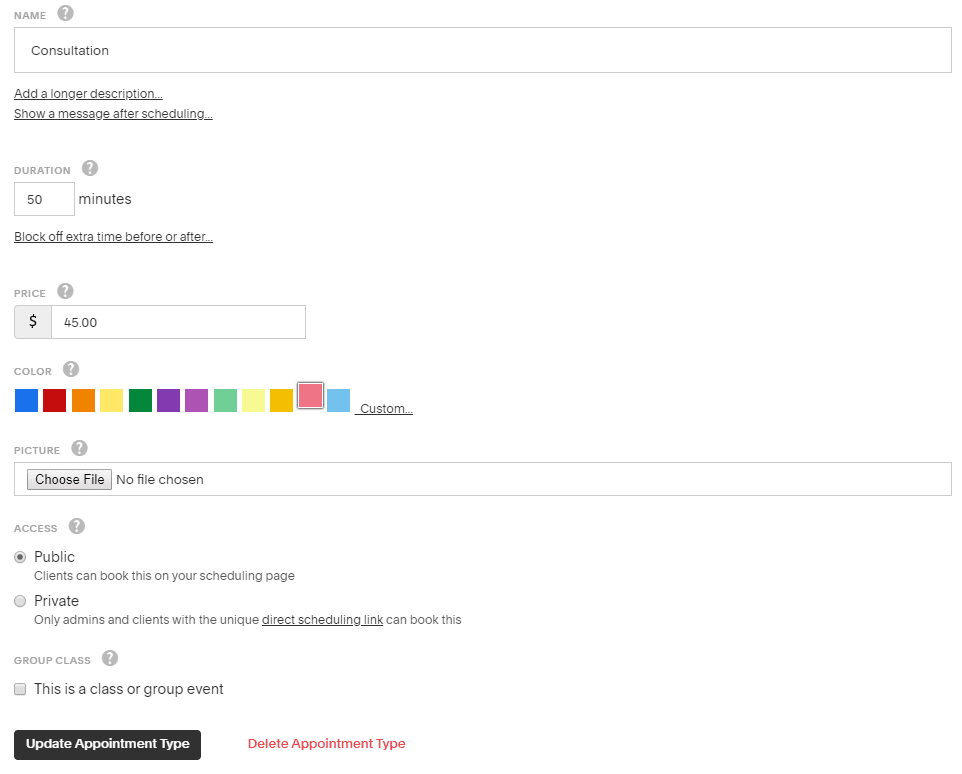
You’ll be given a form with several fields to complete to create your appointment type. Each field comes with an explanation, and it’s all reasonably straightforward. But there are several points you’ll need to bear in mind.
Name Your Appointment
First, the name of the appointment is client-facing. It’s tempting to call the appointment something that will act as a reminder for you—“Top rate meeting,” for example—but a name that works for you might put off a customer. You could even use this space for marketing. The title of the appointment will be the first thing that customers will see. You’ll need to catch their eye and persuade them to read on and make their booking.
A marketing consultancy, for example, could call their appointment “Limited Time Only!— Million Dollar Marketing Strategy”. A B2B firm, on the other hand, might want something a little drier: “Pipeline Maintenance Consultancy.”
Describe Your Appointment
If the name of the appointment is necessary, the field that follows the title is crucial. It’s also easy to miss. The default state of the form doesn’t even show it. Instead, we get a link saying, “Add a longer description.”
Select that link, and you’ll get a field that allows you to describe the appointment. Acuity gives you 512 characters, which isn’t much, but it is enough to write a short paragraph that explains what the date is about.
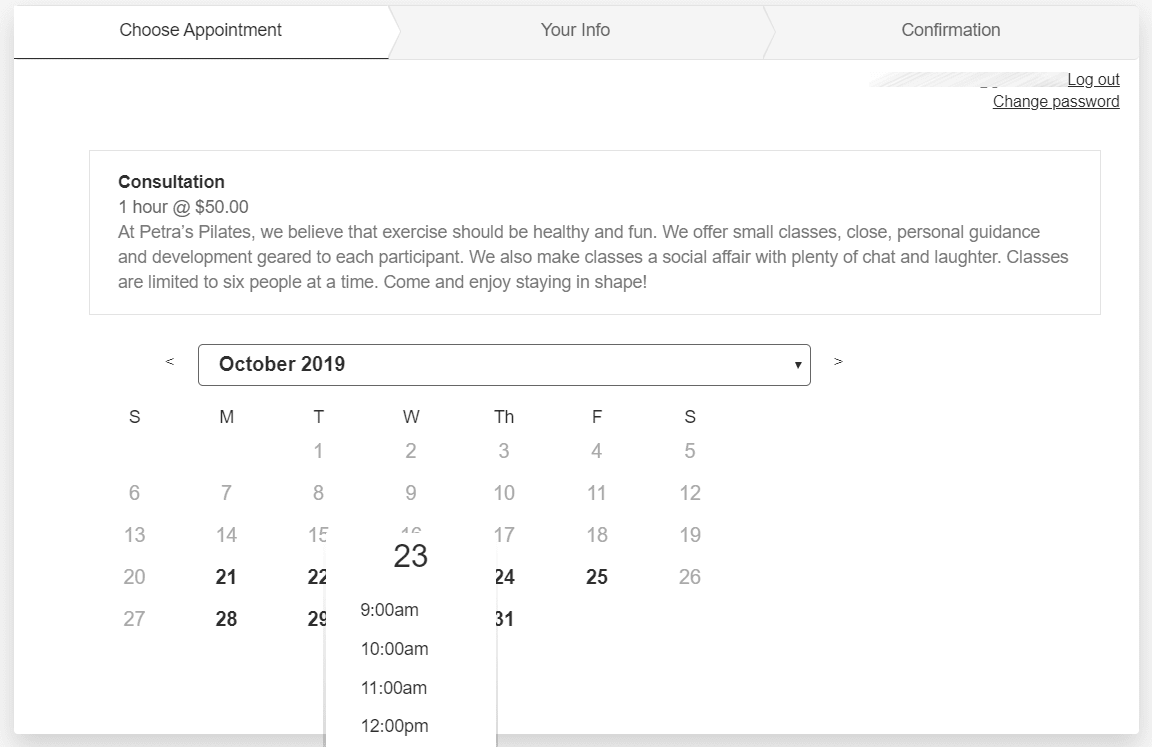
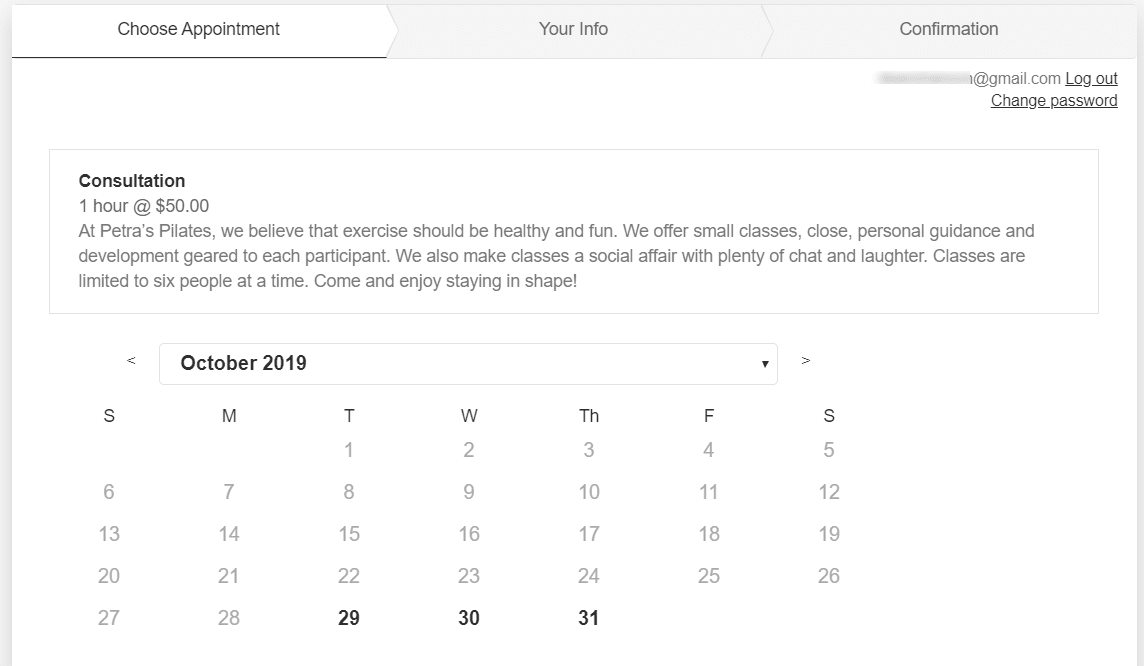
Again, you’ll need to match the tone of this description to the audience. A marketing firm might make big promises that emphasize the value that the appointment would deliver. A Pilates studio would want to choose something more descriptive:
At Petra’s Pilates, we believe that exercise should be healthy and fun. We offer small classes, close, personal guidance, and development geared to each participant. We also make classes a social affair with plenty of chat and laughter. Classes are limited to six people at a time. Come and enjoy staying in shape!
Write your description copy, then show it to someone else to check and read through. You could even test different descriptions. Create two versions of the same appointment whose only difference is the description copy. Run an A/B test and see which lands the most bookings or appointments. This copy is really is that important.
Create Your Confirmation Copy
The next bit of copy you’ll need to pay attention to is the message shown on the confirmation page. Again, this is a field that’s just too easy to miss. You’ll need to press a link to open the field—and it even comes with formatting options.
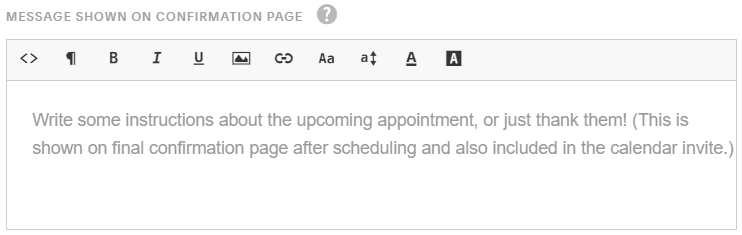
At its simplest, this section is a chance for you to thank your customers and confirm their booking. They will appreciate that. When customers make a booking, they will want to be sure that you’ve taken their money and received their order.
But you can go even further and explain to clients how they should prepare for the meeting. People coming for a tax consultancy, for example, might need to be reminded to bring their payslips or their bank account details.
It’s worth remembering that the copy you put in this confirmation will only appear on the page when someone books an appointment. It won’t be included in the confirmation email. If you want people to receive this information in their inbox—where they can keep it—you’ll need to open Business Settings, then Email Settings. In the Initial Confirmation, the template adds the tag %typeconfirmationmessage%.
Be sure to check how the email appears, and make sure that the addition of the confirmation text doesn’t damage the copy in the email.
Set the Duration of the Appointment
The length of the meeting may well be its most important characteristic. A business that offers services is selling blocks of time. The number of minutes you place in this box represents the value of the offer you’re making.
The default is fifty minutes, which counts as a professional hour. That makes for easy calculations, but you can enter a different amount here. Bear in mind that the only way to offer appointments of different lengths is to create multiple appointments, each with their own duration.
You can also block off several minutes both before and after the appointment. Again, that’s useful if you want to take a break between appointments. Acuity says that time after a meeting is “great for bathroom breaks, sandwich gobbling, and power napping.”
So if your appointment is 50 minutes and you added ten minutes of padding after the appointment, then Acuity would block off an hour when someone books an appointment. That means that if there isn’t enough time for both the appointment and the padding, the calendar will make that time unavailable. If you were selling 60-minute appointments, for example, that came with twenty minutes of padding, then each meeting would need 80 minutes to appear as “available” on the calendar.
Set the Price
One of the most significant benefits of Acuity Scheduling and its rivals in comparison to standard digital calendars is that clients can pay for the time they book. You can decide how much someone needs to pay for the duration you’ve specified.
There are no standard answers here. To fix your time, you’ll need to review the offers made by competitors and compare their expertise to your own. If you’re making a similar offer, you should be charging a similar amount. It’s always better to charge high then offer discounts for limited periods or special offers or as rewards to particular groups of customers. That lets you keep the appearance of the value of your proposal while still allowing your customers to feel special. They’re getting a bargain.
Treat this field with great care. Take time to review your market, and know precisely what you should be charging at each appointment.
Pick a Color and Upload a Picture
After the hassling of setting rates and dealing with money, choosing a color and uploading a picture will let you have a bit of fun. The color choice applies to space on the calendar. You could test different colors to see which stand out most and bring in the most bookings. (In general, expect bold colors to perform best.) But you could also just choose the colors you like the most.
The picture appears on the schedule page, but Acuity doesn’t go out of its way to give you a draft of design options here. You’re not going to be dragging and dropping elements to create a unique and attractive design that matches your brand.
You can upload an image of up to 1.5 megabytes, and that image will appear to the right of the scheduling block. Acuity suggests that square or rectangular images work best, which tells you much of what you need to know about the platform’s design flexibility.
Set Access
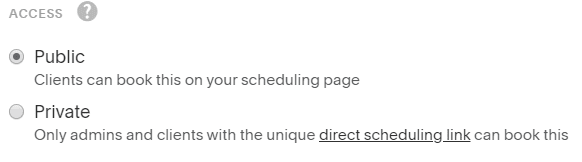
The degree of access you give people to your scheduling page will be a crucial decision. Acuity’s default is that your appointments calendar is public. That means that anyone can reach the page and make a booking. You’ll be able to link to the page from your website and drive traffic from a landing page to a booking page. You’ll be able to take bookings from anyone who manages to reach that appointment page.
The alternative is to make your appointments calendar private. That means that you’ll need to make your bookings yourself. The only clients who can make their own bookings are those who have access to the schedule’s direct link.
The advantage of this approach is that you have more control. You’ll always know who exactly is making the bookings. The disadvantage, of course, is that you can only sell to those people who either contact you directly or who have the calendar URL.
If you want to market your schedule to everyone and you don’t care who makes a booking, keep your schedule public. If you only accept bookings from people who meet specific criteria, then choose “private.”
For example, if you wanted to take bookings from people who attended a conference, then choose “private” and share the URL with attendees. Only attendees who have the URL will be able to take time on your schedule, and you won’t get timewasters blocking your calendar.
Group Class
Finally, one of the most useful features of Acuity is tucked away at the bottom of the appointments type form.
Setting your appointment as a “class or group event” lets you sell the same block of time again and again. Obviously, it’s not going to be the right solution for everyone. But the ability to create classes is hugely valuable. You can either sell seats or give away a class for free and use it as an incentive to lead clients towards a more significant sale.
Check the box, and you’ll first be asked to enter the maximum number of people who can attend the event. The default is eight, but you can adjust the amount to suit the kind of class you’re planning to teach.
The next option is a little tougher. You can choose whether clients need to sign up for all the classes in a series or can pick just one.
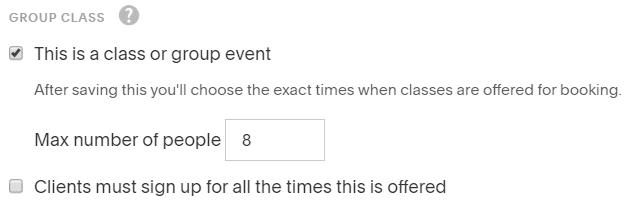
This option means that if you are running a class, you might want to create two kinds of appointments. You could create an introductory class that’s a one-off and can be booked individually. And you could create a second kind of appointment that covers the entire series of lessons. Appointments for the introductory class would be public, while dates for the whole course could be kept private. The URL would only be given out in the class and be used by people with a genuine interest in learning. When you click “Update Appointment Type,” you’ll be asked to set the times for the classes.
Forms
There is one more element on this page before you’re ready to update your appointment type. On the right of the page is a small notification that you haven’t created any intake forms.
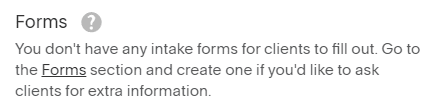
Click the link, and you’ll be taken to a page marked “Intake Form Questions.” You’ll find three tabs: “New Custom Form”; “New Term & Conditions Agreement”; and “New SOAP Notes Form.”
The second tab gives you a place to paste in your terms and conditions so that clients can check that they’ve agreed to them. The third is for the Subjective, Objective, Assessment, and Plan forms used by healthcare providers. If you’re not in the healthcare industry, you can treat that form as a sample.
The first tab—the one that lets you create a new custom form—is the tab you’ll want to pay attention to most.
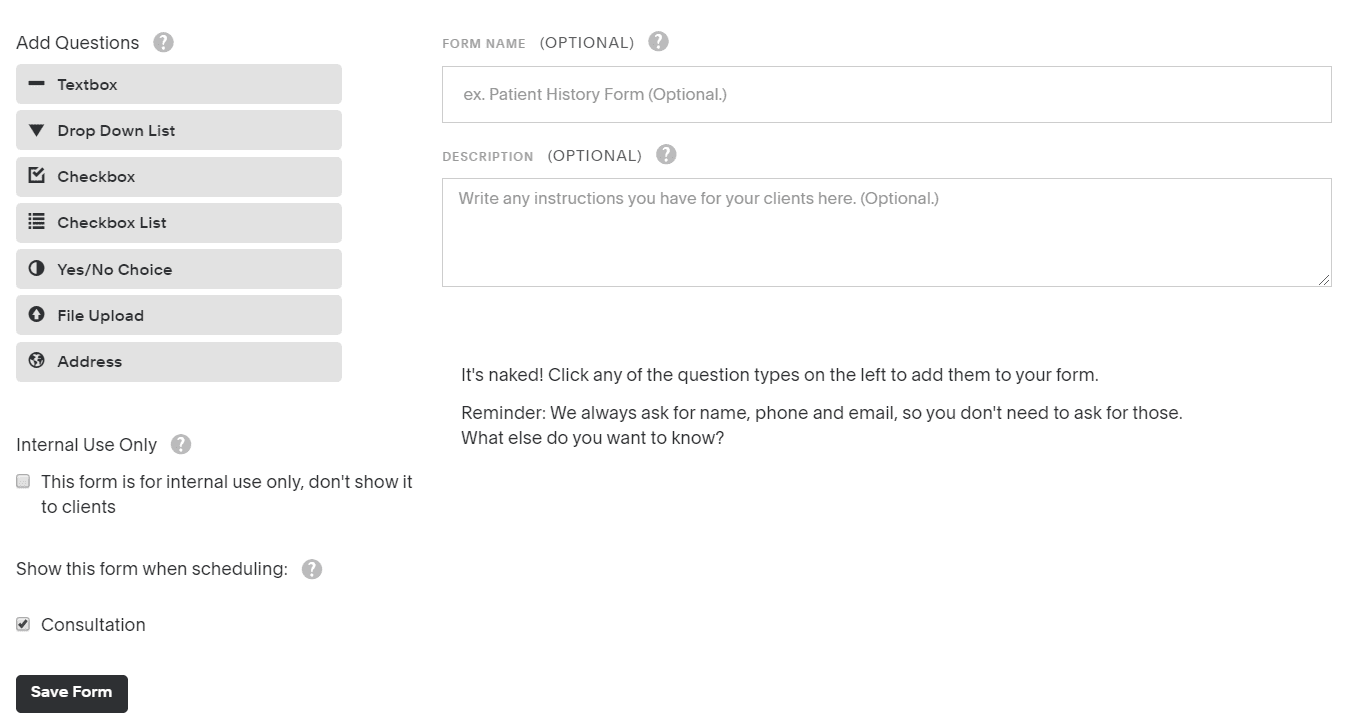
You can have a lot of fun here. Acuity provides a host of different types of questions that you can add to the form, including checkboxes, dropdown lists, yes/no questions, and text boxes. You can check a box of your own to keep the form internal. Clients won’t see the questions, but you’ll be able to save your own records. You can also decide which of your appointments will use this form.
The options give you plenty of opportunities. You can ask all sorts of questions and drag a great deal of data out of your clients in a bunch of exciting ways. But bear in mind that the more you ask from clients at the time of registration, the higher the chance that you’ll put them off and drive them away from the booking. The client wants to give you just enough information to be able to make their booking. They don’t want to tell you anything that you don’t need to know.
So while you can enjoy yourself creating forms, and while you might want to pull a lot of information out of clients, follow the principle of asking no more than you need to. A real estate firm offering appointments for home buyers, for example, might want to ask about the clients’ search area, their budget, and whether they’re looking for a house or an apartment. But they shouldn’t ask for anything they don’t need to know, such as how many homes they’ve already seen or the clients’ occupations. You can pick up that information when you meet.
3. Customize Your Client’s Scheduling Page
The client’s scheduling page is what customers will see when they come to make a booking. The scheduling page must be done well. You need to think of this page as your business’s reception. It’s a place where new clients will have direct contact with your brand. You want them to feel that they can trust you. You want to look professional. And you want to make the experience of booking the appointment as easy and as enjoyable as the appointment itself will be.
Acuity doesn’t provide too many style options here. You’re not going to be wallowing in templates and trying to choose between a page designed for a studio and another page designed for a spa. The operation isn’t Wix, but you’ll have some work to do.
Using Acuity Templates
Acuity gives you a choice of two templates. You can pick a monthly template that lets clients book more than a week in advance. And you can choose a daily model that suits clients who are looking for a convenient hour.
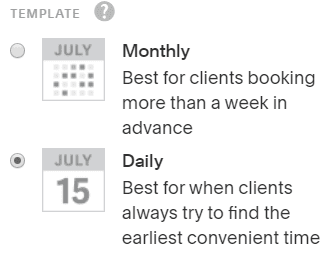
Acuity makes the daily template the default, which is an odd choice. It might be a useful option for a teacher offering appointment times on the two nights of a parents’ evening, but if you’re offering appointments on multiple days, you’ll want to provide an entire month.
In general, you can expect to choose the monthly template. Customers will see a monthly calendar and the description of the appointment. When they click a date, they’ll be offered a dropdown menu of available hours. You can always see a preview on the right of the screen.
The Business Name appears above the calendar, and you can change it if you want. That will be useful if you’re managing several different businesses from the same Acuity account.
You can also choose to upload a logo. If you don’t have a logo, then you can click a link that will take you to SquareSpace’s logo maker. You can enter your company’s name, add a tagline, then choose an icon. It’s free, and you get what you pay for. What you’ll end up with will be a logo that looks like it was worked up in Microsoft Word. Even Fiverr will give you better options. If you’ve got nothing else, it’s worth using SquareSpace’s logo maker to fill the empty space but invest in hiring a professional logo designer.
Scheduling Instructions
The Scheduling Instructions are essential. Acuity states that these instructions for clients before they book an appointment are optional. They shouldn’t be. You should tell your clients what to expect from the meeting and what they need to bring.
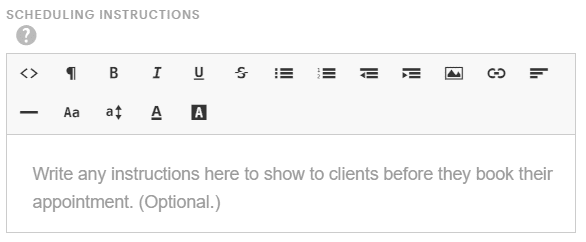
This section also lets you add images, write more information about your business, and even embed a map to your location. It’s flexible and vital.
Do bear in mind, though, that the information you include here will appear on all your appointment types and calendars. Make sure that you don’t make your instructions about any single specific appointment.
The next sections cover the day of the week your calendar will begin (which will be Monday, right?); the time format; language; and time zone.
That last option is technical but essential. If you’re booking appointments with people in different time zones, then do check the box marked “Require clients to choose their time zone when booking.” Otherwise, you won’t know whether they’ve booked time in their time zone or yours, and you’ll inevitably end up missing some appointments.
Finally, once you’ve worked your way through all of these options, you can have some more fun designing the look and feel of the page itself.
Acuity gives you a choice of about a dozen different fonts. You can also change the colors of the body background, the header text; the scheduler background; the scheduler text; and the color of the buttons, and some accents.
The best approach is to match the look and feel of your appointments page with the look and feel of your own website. You want this page to be an extension of your brand so that the trust that customers feel for your brand extends to their willingness to book an appointment.
You’ll then be ready to hit the “Save Changes” button, but beneath that button is another option. Acuity also lets you “Change Wording.” Being able to change the wording is more valuable than it looks.
Hack the Wording of Your Acuity Schedule
Acuity’s wording has been translated into French, German, Brazilian Portuguese, and Spanish. You can select any of those languages from the dropdown menu available in the Customize Appearance section under “Client’s Scheduling Page.”
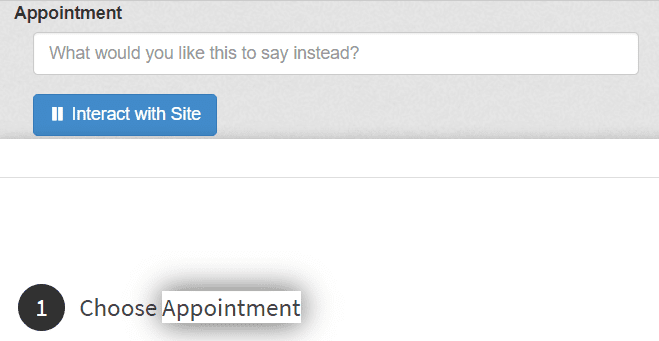
That’s useful if you’re offering appointments to people who speak any of those languages. Acuity also has an option if you’re serving customers who speak other languages. Press the “Change Scheduling Wording” button at the bottom of the page, and you’ll be able to select words and replace them with other words.
So you could swap “Choose Appointment” for “Odaberite Sastanak” if you were pitching to Croatia.
As a linguistic tool, the option is pretty blunt. Acuity doesn’t let you change the words “hours” and “minutes” in the appointment type list. Prepositions like “on” or “at” in dynamic content can’t be changed either. Nor can you translate the notification that customers will receive telling them that they’ll be getting a text message reminder.
But while the feature does give the schedule a certain amount of international flexibility, it also gives you a chance to hack the copy of your schedule page.
The terms that Acuity uses on the schedule page are formal and professional. The eschedul They’re intended to appeal to the broadest possible range of audiences. You can leave them, or you can adapt the copy to your business.
So a surf shop that was offering surfing classes, for example, could swap “Choose Appointment” for “Pick Your Wave.” A flying school could change the copy for “Grab a Flight Time.”
The editing process isn’t user-friendly or straightforward. But if you did want to make your copy match your brand, Acuity’s word changing option does give you a chance.
4. Sync Your Calendars
Once you’ve set up your calendar availability and created your appointment types and built the clients scheduling page precisely the way you want it (complete with unique text), you can sync Acuity with your other calendars.
From the menu on the left, under Business Settings, choose “Sync with other Calendars.”

Acuity lets you sync your appointments with Google Calendar, iCloud, Outlook Office 365, Outlook Exchange, and Outlook.com. This is important. The syncing works in both directions. When someone makes a booking on your Acuity page, that appointment will automatically be added to your other calendar. And when you add a date to your main calendar, that time will be marked as unavailable on your Acuity schedule.
You might want to keep your Acuity schedule and your personal schedule separate. You might think of these schedules as two different things: your Acuity schedule is for your business appointments, and your Google Calendar is for everything else.
But all of those hours are yours, and you need to be able to keep track of them. Fail to sync your calendar, and you increase the chances that you’ll double-book your time or miss an appointment.
If you want to keep your private appointments separate from your personal appointments, open your digital calendar. Create a new calendar (it’s a kind of schedule overlaid onto the calendar) and call it “Acuity Appointments.” Sync that calendar with Acuity.
You won’t automatically block appointments when you add an event to your personal calendar, but you will bring your Acuity appointments to your main digital calendar.
When you choose the calendar to sync, Acuity will also ask whether you want to set reminders before the appointments and hide the event title from people who share your schedule.
Payment Settings
One of the significant benefits of Acuity is that it lets businesses that sell time instead of products make online sales. Clients don’t just take time in your calendar. They can also be required to pay for it.
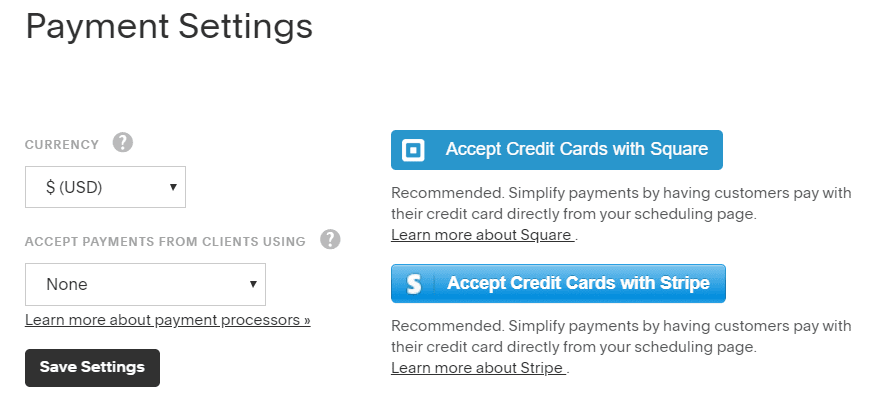
To accept funds, you’ll need to choose “Payment Settings” from the menu on the left. You’ll then have just two options.
You can set a currency—and Acuity offers a much broader range of possible currencies than it offers languages. And you can choose a payment processor. Acuity recommends accepting credit cards with Square and Stripe, but you can also add PayPal.
There are two things to consider here. The first is the fees that you’ll have to pay for each of those processors. Check the prices of those services and estimate how much you can expect to lose from each transaction. Although there’s little difference between them, the services do charge different amounts for cross-border transactions. Know where your bookings are likely to come from, and how much you’ll pay.
The other thing you’ll need to consider is which service clients are most likely to feel comfortable using. Several sellers have complained about PayPal’s customer service, for example. Still, if forcing them to pay with Stripe will put off customers, then you might have to decide to put up with PayPal and its sometimes-annoying refund policies.
5. Email Settings
Most of the activity concerning your Acuity appointments will take place on your website. It’s on your site that you’ll be embedding your appointments calendar and taking the bookings. But once the booking is made, the interaction shifts to email. Both you and the client will receive confirmations, reminders, and other automated messages.
Those messages are part of the process. They’re not marketing emails, but they do have a marketing effect. They each influence the degree of trust the clients feels in your business. The more professional your communications appear—all your communications—the more confidence your business will acquire, and the more comfortable you’ll find it to build a relationship with your customers.
Acuity Scheduling understands that the emails the platform sends are essential, and offers ways to control each of them.
Initial Confirmation
The first email that both you and the client will receive is a confirmation that the appointment has been scheduled.

Like all the emails sent by Acuity, you can change the email subject, and you can change the body of the email. The default subject line looks like this:
New Appointment: %type% (%first% %last%) on %time% with %calendar%
The terms between the percentage signs are variables generated by Acuity itself. “%first%” and “%last%,” for example, are the first and last names of the client. “%type%” refers to the appointment type, and “%calendar%” is the name of the calendar that you’ve created for that appointment type. (Remember the importance of the name you give your calendar? Choose an unprofessional name, and that will be the name that turns up in your clients’ inboxes associated with your brand.)
Keep the name of the client in both the subject line and in the body of the email. Marketers have consistently found that personalized messages with the recipient’s name significantly improve open rates.
The default design also makes the necessary information about the appointment clear. Recipients can see right away what they’ve booked when the appointment will take place, and where it will be.
But there’s much more that you can do.
The first is the email’s subject line copy. The start of the subject line is “New Appointment,” so once the variables are added, the subject line looks like this:
New Appointment: Consultation (Jane McTest) on October 24, 2019 2:24pm with Acme Tax Consultancy
That might contain plenty of variables, but it’s also difficult to read and not very inviting. You can change any of those elements. So you could rewrite this subject line like this:
%first% %last%, you’ve booked with %calendar%! See you for your %type% on %time%
That will give you a subject line that looks like this:
Jane Smith, you’ve booked with Acme Tax Consultancy! See you for your consultation on October 24, 2020, at 2:24 pm.
The difference isn’t huge, but how you play with those subject lines will affect your open rates and influence the number of appointments that are forgotten. It also leaves the client with a better impression when they read it.
The same applies to the body of the email. “Appointment Scheduled for %first% %last%” is sufficient but not particularly enticing. And while “Thank you, your appointment has been successfully scheduled” is polite, it’s also not very personable.
You could rewrite this copy as:
Can’t wait to see you, %first% %last%!
And after the table of details, end with:
Thank you for your booking. If you need to reschedule, do get in touch as early as possible.
Of course, you don’t have to use this specific copy, but neither should you use the default copy supplied by Acuity. It’s functional, but it won’t reflect the personality of your brand—and your copy should always reflect the nature of your brand.
The same is true of the appearance of the email. Above the default content is a formatting ribbon that lets you add more content to the message. You might not want to add more copies outside the table provided, but you can add an image, including your logo. You can also insert fields, and most importantly, you can add your own HTML.
That will let you redesign the email entirely. Changing the background color, for example, will allow you to match the colors of the email to the colors of your brand.
Best of all, you can experiment with the appearance of your confirmation email. Press the “Add New Template” button, and you’ll be able to create another version of your email. While that allows you to assign different confirmation emails to different kinds of appointments and calendars, it also lets you test separate emails to see which have the best open rates.
Reminders
The reminder emails are similar to the confirmation email. Acuity’s default design for reminders also consists of tables that emphasize the appointment’s basic information. It’s equally functional, and could equally benefit from a redesign that matches your brand.
One significant difference, though, is that Acuity Scheduling lets you send up to three reminder emails. The default email is sent 24 hours before the appointment. You can insert a different figure there to change the time the email goes out. You can also send a text message to clients, and you can send a copy of the reminder to your admin to make sure that the person holding the meeting remembers their appointment.
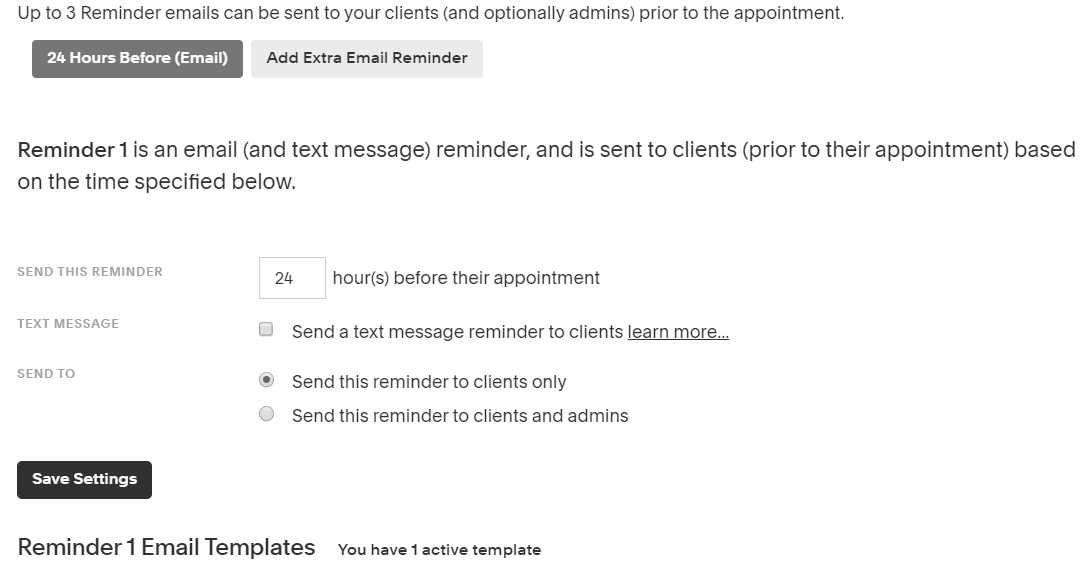
The number of emails you should send will depend on how far in advance you let clients book appointments, but you’ll need to send reminders if clients can book more than a month in advance. For those bookings, you could send the first reminder a month before the appointment, the second a week before the appointment, and the third the day before.
However, many reminders you need, be sure to change the copy in each of them. You want to make sure that each of the reminders is noticed and read. One technique is to add a tip or a recommendation or even a piece of relevant trivia above the table in each reminder. So a reminder for an appointment with a tax consultancy could tell people how much unnecessary tax each taxpayer pays on average. The second reminder could reveal the most common neglected deduction. The third reminder could list the most popular items that people buy with their rebates.
That extra information could be just what you need to encourage opens and reads.
Cancellation
The cancellation email is much more straightforward. Unlike reminders, clients will only get one. But again, like the other emails sent by Acuity Scheduling, it’s worth changing the appearance and the copy of the email to match your brand and connect with your audience.
If someone has booked an appointment with you, it’s because they found your offer interesting. If they’ve canceled, they can’t make the appointment, but they still might want to book with you again in the future. Use this email to encourage them to make that next booking.
Instead of the default “Your appointment has been successfully canceled” message that comes at the end of the email, write something like:
“We’re sorry you couldn’t make it, but we’d love to see you. To make another booking, click here.”
You want to use the copy in the email to take clients from a lost booking to their next booking.
Rescheduling
You can go more comfortably with the rescheduling email. Clients will have already passed through the hassle of recognizing that they won’t be able to make their planned appointment, looked for a new time, then changed their booking. They’ll want to put this experience behind them as quickly as possible.
For this email, you can use Acuity’s default, useful content.
Follow-ups
That Acuity makes its cancellation email so uninviting is strange when you consider that the company does offer the chance to send follow-up emails. These go out automatically at a set amount of time after the appointment. You can choose to send the email after each appointment or only if the client has no more appointments coming up. You can also follow up on the follow-up.
Acuity Scheduling doesn’t offer any default content other than a subject line that states: “%first%, how was your appointment?”
That’s not a bad start, but there’s a lot more that you can do. Start with an understanding of what you want the client to do next. If they’ve completed a single appointment, do you want to lead them to book a series of lessons? Do you want them to download an ebook or recommend a friend?
Produce multiple versions of messages that might lead them to take that action, then test them at various times to see which works best.
Package/Gift Certificate Order
Finally, the “package/gift certificate order” is really just an invoice. You can keep it functional, but do add a note of thanks. Acuity Scheduling leaves that out.
6. Embedding Your Schedule
By now, you’ll have created different kinds of appointments for your business. You might have created appointments for a business tax consultancy and a personal tax consultancy. Or you might have set up one kind of appointment for manicures and another for pedicures. You’ll have defined the payment systems, and created the copy for the notifications and reminders.
What’s left now is to make your calendars available for potential customers to use. One option is to give them a direct link. Open the dropdown menu under Scheduling Page > Scheduling Page Link, and you’ll find a list of different links that you can give to leads.
You can bring them to specific appointment types, to particular calendars, and even to pages where leads can buy gift certificates and subscriptions.
Those links are useful for placing in emails or for shooting out to individual leads, but there is a better way to bring leads to your business: place the calendar on your website.
You want leads who are browsing your site to be able to move smoothly from curiosity to interest to purchase. Having made your marketing effort, you want to be able to land the sale. That means embedding your schedule into your pages. There are several ways to do that—and it’s not as difficult as it sounds.
Embedding Your Acuity Schedule into Any Website
Choose the “Scheduling Page Link” under “Client Scheduling Page” from the menu on the left, and you’ll receive the Client Scheduler page. Select “Embed Scheduler,” and you’ll receive a couple of lines of code.
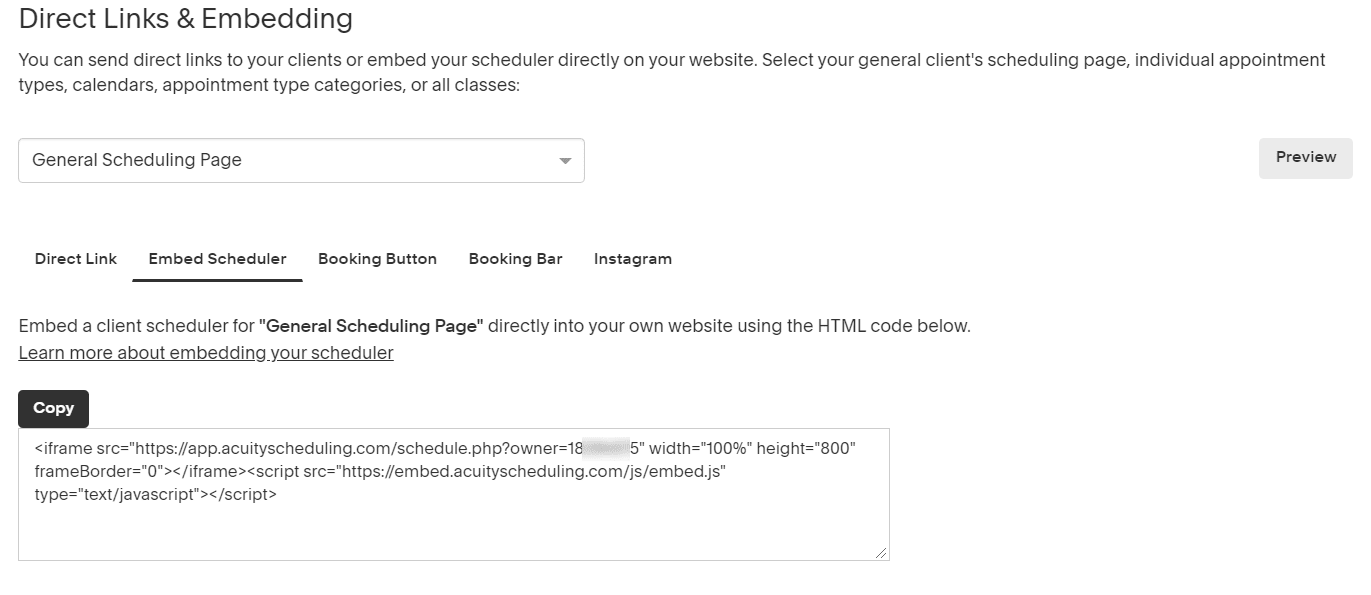
To add your appointments schedule to your website, all you need to do is copy that code and paste it into your website builder. Your page will show the calendar. It will include the copy you’ve written, and it will provide a way for clients to make their bookings.
Embedding Your Acuity Schedule into a WordPress Site
Pasting those lines of code should work for most websites and most website builders. If you’re using Wix or Moonfruit or almost any other site builder, you’ll get the calendar, and you’ll be able to take bookings directly from your site. If you’re using a WordPress site, though, you can also use Acuity’s own plugin.
Open WordPress and look for Acuity Scheduling in WordPress’s list of plugins.
Once you’ve installed the Acuity plugin, select the “Text” button on the right and paste in the tag: [scheduling site=”https://app.acuityscheduling.com/schedule.php?owner=12345678″], replacing the numbers at the end with your own number.
Alternatively, you can just paste in the code used on every other website. Both approaches will put the calendar on your page.
Do bear in mind, though, that embedding won’t work on free sites hosted on WordPress.com. They don’t allow users to embed third-party content. If you’re planning to promote a business and take bookings, it’s time to upgrade your website to a professional service.
Embedding Your Acuity Schedule into Facebook
The embedding page in Acuity Scheduling includes a curiosity. Right at the end is an option to add a booking option to Instagram. Click the menu item, and you’ll receive a URL. If you have an Instagram business profile, you can open your Instagram profile, select “Business Information” and choose “Contact Options.” Press “Add an Action Button” and select “Acuity Scheduling.”
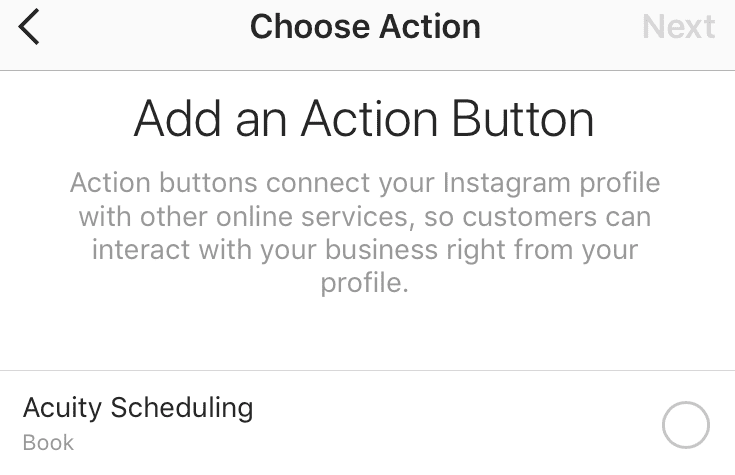
Your business profile on Instagram will then get a booking option.
But while you may be collecting bookings through Instagram (especially if you’re a wedding photographer or a cake designer), businesses are more likely to land appointments through their Facebook business pages.
Under the “Business Settings” menu, choose “Integrations.”
You’ll get a long list of programs into which you can integrate your appointments schedule, including Google Analytics, MailChimp, and ConstantContact. If you’re using any of those services, it is worth checking out what integrating your Acuity account would bring to you. If you’re using MailChimp, for example, Acuity Scheduling will give you a way to add your new clients to a mailing list.
Facebook has two kinds of integration: Facebook Pixel lets you track visitors to your site and retarget them when they move to Facebook; Facebook Business enables you to add a booking option to your Facebook page.
Click the “Set Up” button, connect to Facebook, then choose the business page you want to communicate to Acuity if you have more than one page. Enable the business features on your page, and users will be able to make bookings directly from your Facebook page and even from within your posts.
So if someone were to make a late cancellation, you cold shoot out a post with a booking button and invite people to grab the time. You can run Facebook campaigns and take bookings on the site. If Facebook is part of your marketing strategy, integrating Acuity can be a valuable step.
Booking Bars and Button
Finally, if you don’t want to embed a complete schedule into your website, you can place a button or a bar on your pages. The button will say “Schedule Appointment” although you can change that text if you want, and it will link to your schedule on Acuity.
The benefit is that a button or a bar takes up less space on the page. You can also format the colors so that they fit neatly into your site. It’s a good option if you’re sending leads to a mobile landing page. The button will be more attractive and more likely to convert than a complete calendar on the first impression.
Pros and Cons of Acuity Scheduling
Pros
Acuity integrates very well with other calendars like Gcal. Most customers love that it is easy to use and simple to keep them on top of work or other responsibilities. There are also plenty of tutorials online to help point you in the direction you need if you have an issue.
Cons
Some individuals have complained about double booking from multiple clients due to a bug in the software. There are some other drawbacks, but most of them seem to be just bugs that will likely be fixed soon.
Conclusion
Acuity Scheduling is a valuable calendar tool. Its design isn’t the most user-friendly. Its menus aren’t simple to browse, and its menus can require some scrolling to find the options you want to use. But if you’re prepared to put in the effort, you should find that Acuity lets businesses take bookings—and payments—for their services.
Updated February 6, 2023
John Rampton
John’s goal in life is to make people’s lives much more productive. Upping productivity allows us to spend more time doing the things we enjoy most. John was recently recognized by Entrepreneur Magazine as being one of the top marketers in the World. John is co-founder of Calendar.