In this Calendar guide on how to use Apple Calendar, also known online as iCal, you will learn how to get started using this digital calendar found on your Apple devices. This includes your MacBook calendar, iPhone calendar, iPad calendar, and Apple Watch calendar. Getting started includes learning how to create a calendar on the calendar tool, including multiple versions for work, personal life, and family to use it throughout 2020 and beyond.
You’ll get tips and tricks for customizing these calendars as well as the best way to create events in Apple Calendar. Additionally, the Calendar guide offers suggestions on how to change the view of your Apple Calendar so you can see it by the day, week, or month.
Although Apple Calendar is easy to use, things can go wrong. That’s why this Calendar guide also includes a section on troubleshooting so you can easily fix things that are not working and get the most out of your Apple Calendar.
The concluding section of the Apple Calendar guide gives you ways to use this digital calendar with the Calendar app during 2020 to drive greater productivity and keep pace with the speed of change in business and life.
Table of Contents
A lot of things are easier on a Mac. Apple Calendar is one of those things that works well on a Mac. It’s also easier to keep your files secure, to move work from your computer to your iPad, and to look cool when you’re working in a café. It’s also easier to use to keep your life organized.
Buy a PC, and the default calendar application you use will be Outlook, a part of Microsoft’s Office Suite. For most users that’s overkill. Outlook is the sort of application you want to use if you’re managing the lives of busy executives from the front desk of a large corporation.
A guide to Outlook Calendar would be a pretty big thing.
An Apple iCal Guide, though, is a lot simpler to use and understand because the application that Apple used to call iCal—and now calls Apple Calendar—is a lot simpler.
It’s the kind of application you’d want to use if you need to keep track of your meetings, your deadlines, and your family events. In other words, it’s the kind of application that people rather than corporations use. In this Apple Calendar Guide, we’re going to walk you through everything you need to know about iCal and Apple Calendar and how to leverage this productivity tool in 2020.
1. Getting Started with Apple Calendar
Apple Calendar is easy to find. It’s likely to be sitting in the dock at the bottom of your screen just waiting for you to click. Place your cursor over it, and the app will bounce up to grab your attention. If you can’t find it there, you can bring it up from your Launch Pad.

Apple Calendar in Mac dock
As soon as you open Apple Calendar, you’ll find that you’re thrown right into your current month. That’s an excellent place to begin, but you can change the view. Before you start adding events and creating your calendars, you should change the settings so that Apple Calendar works precisely the way you want.
Open the drop-down menu under “Calendar,” and choose “Preferences.”
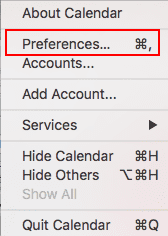
Preferences in the Calendar menu
Apple Calendar will offer a pop-up with four pages. The default page, “General,” has a bunch of fun settings that allow you to personalize your iCal.
Set the Default Calendar App
First, you can set the default calendar app. You could choose a different calendar app here, but Apple Calendar will be good enough to do just about all you want to do, and it’s hard-baked into OS X. The best option is to make sure that the default calendar app is set to “Calendar.”
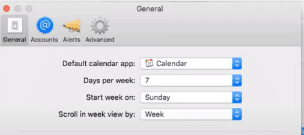
The General tab in Apple Calendar’s Preferences
Set the Number of Days to Show
Next, you can choose the number of days to show in a week. That might sound a little strange. You can’t add—or remove—days from a week, unfortunately. But you can make your calendar only show your working week, or display two weeks or more at a time. “Seven” is the default choice and unless you have a good reason to change it, it’s likely to be the one you keep.
Choose the Start of the Week
You can also change the day to start the week on. Apple thinks that the week begins on Sunday; you might think it starts on Monday or Saturday—or wish it started on Thursday and ended on Friday. iCal lets you change the day that shows first here. You can also change how much of the calendar flies past when you scroll in week view. iCal sets that to a week, and it’s unlikely you’ll want to change it.
Choose When Your Day Begins
The next section is a bit more fun. Just as you can set the first day of the week, so you can also set the time the day starts and ends.
Again, it’s an excellent way to see your work week instead of the entire day. You’re unlikely to be taking appointments at the crack of dawn so you can set your calendar to show times you need most: the hour you fall out of bed until the time you knock off work.
Choose Your Default Calendar
The default calendar is an outstanding choice. Digital calendars are platforms on which you can build multiple schedules. Confusingly, those schedules are also called “calendars.” You can have a calendar for work, for family events, for birthdays, for holidays, and so on. By placing particular kinds of events onto specific calendars, you can share those events with specific groups of people.
You might want your colleagues to have access to your work calendar, for example, so that they can set meetings at times that you’re available. But you might not want to share with them the dates and times of your family events or your children’s soccer matches.
We’ll see in the next section how to create multiple calendars and how to import calendars you’re already using on other platforms. But for now, you have to choose which of your calendars you want to set as the default. The default is the calendar you’ll see when you open Apple Calendar and the one to which new events will be added unless you tell it otherwise.
You can also select other calendars to display by default. Deciding which calendar to show first is useful as a preference setting. If you don’t want to open iCal and see every event on every calendar you’ve created, then you can uncheck some of the calendars here. You won’t see them when you open iCal, but as we’ll see, you can quickly bring back those events when you check your calendar.
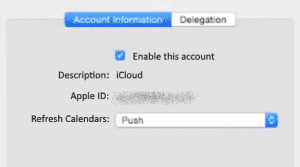
Those are the basic preferences you’ll need to set up in iCal. They’ll determine how you see the calendar. The next tab in the preferences page is “Accounts”. That’s a big issue so we’ll deal with it in the next section.
For now, skip to “Alerts.”
Setting Alerts
The third tab in the Preferences dialog box is “Alerts.” They’re a bit like notifications; they remind you of an upcoming event so that you’ve got no excuse for skipping a dentist’s appointment or forgetting your spouse’s birthday.
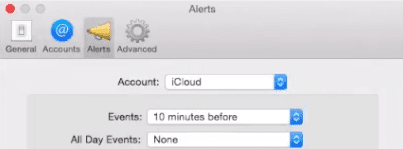
Setting Alerts in Preferences
You can change many settings here.
First, you can select the account. Apple lets you set different alerts for the events shared from your iCloud calendar, or your Google Calendar, or any other calendar.
You can also set different alerts for different kinds of events. So you can be notified of regular events ten minutes before the event begins, for example. For events that last all day, you might prefer to receive an alert the day before. And for birthdays, you might want to have a few days notice so that you have time to buy a gift or organize a party.
A checkbox lets you set these defaults only on this computer—so you can expect different alerts if you’re using your Apple Calendar on a different device. Two other checkboxes let you turn off the shared calendar and invitation messages in Mac’s Notification Center. Check the boxes if you don’t want messages and event invitations to bother you while you’re working.
Advanced Settings
The last tab in the Preferences dialog box is “Advanced.”
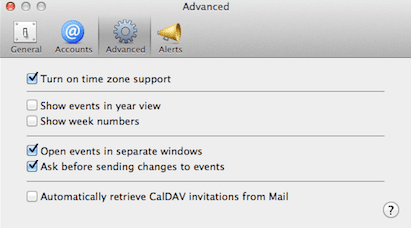
Apple Calendar’s advanced settings
There’s not much about it that’s advanced. There are about half a dozen checkboxes here, and most of them are pretty basic. You can turn on time zone support which is useful if you’re arranging meetings with people in different time zones. When you come to create an event, you’ll be able to choose the time zone of the hours you’re setting.
Choosing is a simple thing, but if you’re arranging calls coast-to-coast, you’ll find that it’s beneficial.
You can opt to show events when you’re looking at the entire year—which might make it a bit hard to read—and you can add the week numbers to the calendar which is nice if you’re counting down.
More important are the options to open events in separate windows and asking before sending changes to events. Those options will enable you to check events without losing your view of the calendar, and they’ll stop you from changing events accidentally.
That option is particularly useful for shared events, but if you’re confident you’re not going to change an event accidentally, you can leave it unchecked and save yourself a click during an event edit.
The final option is the most important. iCal can automatically retrieve CalDAV invitations from Mail.
Check that box, and when someone sends you an invitation to an event from their calendar, you’ll see it automatically in your calendar.
The downside is that it can be a little creepy. If you don’t recall the invitation, you might wonder who put that event in your calendar, but it also makes sure that none of your events gets forgotten. You’re much more likely to forget to add an event to your calendar than forget why an event was added automatically.
Those are the preferences and those are the settings that will determine how your iCal behaves. They’re easy to change and they don’t substantially affect the way you use the application.
There’s one more tab that we haven’t mentioned: Accounts. That concerns the different calendars that you’ll want to create.
2. Creating a Calendar
When you first open iCal, you start with a default calendar. If you don’t already have a calendar on a different platform, then you’ll be ready to go. You’ll be able to create more calendars to suit different kinds of events. We’ll explain how to do that in this section of the iCal Guide.
But you probably already have a calendar. You might have been using Outlook or Google Calendar, for example, and you’ll need to bring your events and entries over from those platforms and from those accounts.
You can bring events from other platforms from within the Preferences sections.
How to Bring Your Google (and Other) Calendars to iCal
Select the “Accounts” tab, then press the “+” icon at the bottom of the screen.
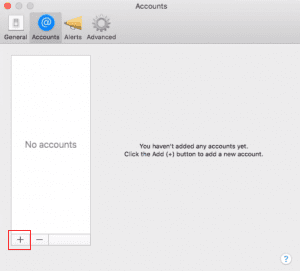
Add calendar accounts to Apple Calendar
iCal will offer you a choice of Calendar account providers, including iCloud, Microsoft Exchange, Facebook, Yahoo, any other CalDAV account, and Google.
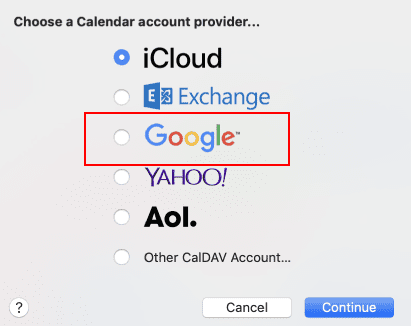
Adding Google Calendar events to Apple Calendar
(You can reach the same screen by choosing the “File” menu, then “Import”).
Choose Google, then enter the email address and password of your Google account.
Google Calendar has access to a ton of information, not all of which you might want to bring to iCal. In addition to your calendar entries, it can also bring over your notes, your contacts, and your messages. Make sure that “Calendars” is checked, mark any other content you want to import, then press “Done.”
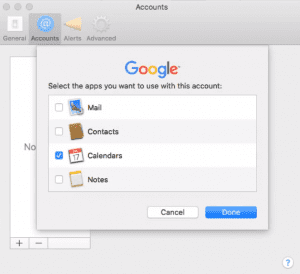
Choose the content to import to Apple Calendar
iCal will now start bringing over all the events you had stored on your Google Calendar. It doesn’t take long. Close the dialog box, and you’ll see the events listed on your Google Calendar listed on iCal.
You can repeat the process for any other calendar you use, selecting iCloud, Yahoo, or Exchange as appropriate and enter your account details. It’s all straightforward. You don’t even have to do it from the “Preferences” dialog box.
Another way is to open the “Calendar” menu and choose “Add Account.”
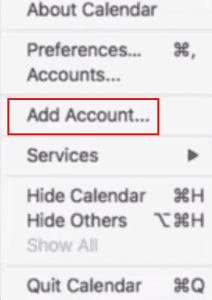
Add calendar accounts to Apple Calendar from drop-down menus
Again, you’ll be offered a list of different calendars that you can import.
How to Create a New Calendar in iCal
Adding accounts lets you import calendars from other platforms. But you can also create additional calendars inside those accounts. You might want to create separate calendars for your sports club, for your family events, or for your family birthdays, for example.
There are two benefits to creating multiple calendars.
The first benefit is that you can share those calendars with others without revealing other events. Your admin manager at work might need to know when you’re available during work hours when he’s planning the sales meeting. He doesn’t need to know about your date night.
Creating different calendars allows you to share some dates but not others, and it keeps certain parts of your life private. The other benefit is that different calendars will enable you to keep different parts of your life organized.
Because you can color code different calendars, you’ll be able to see at a glance the different parts of your life. You can also make some of those events invisible. Unchecking a calendar removes it from view and makes your schedule easier to see.
Bringing that organization to iCal requires multiple calendars.
To create a new calendar, choose “File” then “New Calendar.” If you have more than one kind of calendar account, you’ll need to choose an account in which to place the calendar. Otherwise, select “On My Mac.” Bear in mind that if you’re trying to add a calendar to your Google account, it won’t work.
You’ll need to go to your Google Calendar at calendar.google.com, add the calendar there, then export it and import it to iCal. It’s a lot easier if you want to add a new calendar to your Mac or iCloud accounts. A new calendar will be added to the list on the left of the screen. Enter a name for the calendar.
Apple then automatically assigns your calendar a color. To change the color, click on the calendar’s name and pick a different color.

Color your Apple Calendar
That new calendar will now appear on the left after you press the “Calendar” button at the top of the screen.
How to Delete a Calendar in iCal
After you’ve added a calendar, you might want to delete it. Bear in mind that when you delete a calendar, you lose all of its events. Be sure that you want to delete it and not just hide it. That will let you keep the events even if you can’t see them.
To delete a calendar, select it from the list of calendars on the left.
Open the Edit menu, then choose “Delete.”
The selected calendar will now be deleted — unless it isn’t.
Some calendars you can’t delete.
If you’ve delegated access to a calendar account, for example, then you’ll first have to remove that delegation before you can delete it.
Open “Calendar” then “Preferences,” and choose “Accounts.” Select the calendar account you wish to remove. Click the people who are sharing your calendar, then press the “-” icon at the bottom of the page. When the account is no longer shared, you’ll be able to go back and delete it.
How to Delegate an iCal Calendar
The benefit of creating new calendars is that you can share your schedule with other people. There are two ways to do that. One way is to delegate an entire account.
Open “Calendar” then “Preferences” followed by “Accounts.”
On the left, you’ll see a list of the calendar accounts that you’ve brought into iCal. You might see your iCloud account here, for example, and your Google account.
How to delegate an Apple Calendar account
The big space on the right shows information about that account. It also provides an option to delegate that account.
Click “Delegation” then “Edit” then select the “+” icon.
Enter the name of the person you wish to grant access to your calendar account then select their name from the contact list. What they will be able to do with your account will depend on the nature of the account.
If it’s a CalDAV account, then selecting “Allow Write” will allow the person you’re sharing the calendar with to create events on your behalf. If it’s an Exchange account, then the Calendars column will offer a complex series of access levels.
How to Share an iCal Calendar
You’ll only want to delegate an account if you want other people to be able to create events in your calendar on your behalf. It’s more likely though that you’ll only want people to be able to see your schedule.
You’ll want them to be able to see when you’re busy and when you’re available but not be able to create events. There’s an easy way to do that. Next to each calendar in the list on the right is a broadcast icon. Click that icon and you’ll be offered the chance to share that calendar.
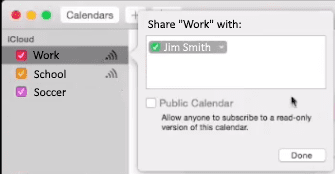
How to share an Apple Calendar
You’ll have two options. The easiest is to enter the names or email addresses of the people you want to share your calendar with. The person you’re sharing with will receive an email inviting them to join your calendar. When they click the “Join Calendar” button in that email, you’ll receive a notification that they joined your calendar.
If you don’t want them to be able to change the calendar entries, control-click their name or email address in the “Shared With” list, and select “View Only.” The other option is to make the calendar public.
Check the box marked “Public Calendar,” and you’ll receive a link that anyone can use to see that calendar. Bear in mind that If that link is spread around, your events won’t be private. Unless you want to share your calendar with lots of people, you’re more likely to be choosing the first option.
How to Add Holiday Calendars to Apple Calendar
So you can import the calendar accounts you’ve already created on other platforms. You can create new calendars. But you can also subscribe to calendars that other people have created and made available. The benefit of this feature is that it lets you quickly add a set of events that you might need, such as national holidays or sports schedules.
Those events will be laid over your calendar. You can remove them from view at will, but you’ll have all the events you need on your calendar without having to enter them yourself.
First, you’ll need to find the URL of the calendar you want to subscribe to. A quick search should lead you to it. Next, choose “File” then “New Calendar Subscription.” Enter the calendar’s Web address and click “Subscribe.” You’ll need to give the calendar a name and a color, then choose “OK.”
You can add as many of these calendars as you want, set the frequency with which they refresh, and add alerts and attachments.
3. Creating Events in Apple Calendar
Once you’ve set your preferences, brought over your calendar account and set up any other calendars you want, you’re ready to start creating events. Apple makes that pretty easy.
How to Create a Quick Event
At the top of the calendar, next to the “Calendars” button, you’ll find a “+” icon. Press that button and you’ll be offered the option of creating a quick event.
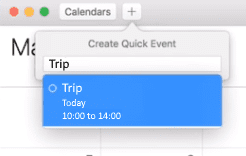
Create an event in Apple Calendar
This option is a lot cleverer than it looks. Start describing the event, and Apple will try to turn it into a calendar entry. Type “dinner tomorrow at 7,” for example, and Apple calendar will automatically place that event in the calendar.
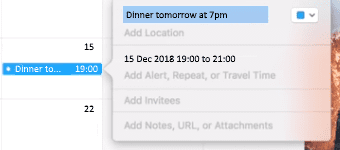
Edit an event in Apple Calendar
You could leave that event as it is or you can click the event in your calendar and add more detail:
First, you can change the calendar to which the event has been assigned. The box in the top right-hand corner isn’t just for color-coding. Select it, and you’ll be able to pick a different calendar. You can change the start and end times, or mark the event as lasting all day.
You can also click to add a location, which might automatically attach a map to the event’s details. Apple illustrates it well:
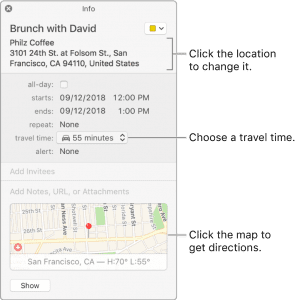
Apple Calendar automatically adds maps
Image: Apple
It’s likely that you’ll know exactly where the event is taking place but if you enter a general location, such as “coffee shop” or “pizza restaurant,” Apple will offer you a list of relevant locations near you. Choose one of those locations and the map will even come with weather information. (That sometimes happens when you enter a location manually too, but not always.)
Apple Calendar gets even more clever. If your event does include a map, Apple will figure out how much time you need to reach the venue based on traffic and transit conditions from your likely location before the start of the event. It will send you a notification before you need to leave, at the time you need to leave, and again if you’re running late and should have left already.
The time is based on information in the Maps application on your iPhone, if you have one, and the starting location is drawn from events listed in your calendar up to three hours before the event is supposed to start. If Apple Calendar can’t find a location, it will use either the home address or work address listed in your Contacts, and it will base its choice on the times you chose in the “Day start at” fields and “Day ends at” fields in the Preferences.
In short, don’t depend on Apple getting you where you need to go on time. Instead, figure out how much time you’ll need to get there, select “travel time” in the Event information window and set the notification manually.
How to Invite People to Events in Apple Calendar
You can use your calendar to keep track of your own schedule, but you can also use it to alert other people to events that they’re all attending. If the event has already been created, double click it to bring up the event’s details. Alternatively, if you’re creating the event, click the day on which the event will be held.
Apple will offer you a small window containing details of the event. Beneath the time and date of the event is an option to “Add Invitees.”
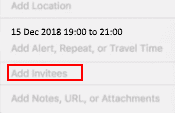
Add invitees to an Apple Calendar event
Click that option and enter the name or email address of each person you want to invite. As you begin typing, Apple will start searching the entries in your Contacts and Mail apps. It’s a neat trick but be aware that if you press Return before Calendar has found the contact, Calendar won’t add them and they won’t be invited. Make sure that Apple has made the match before you’re done.
Apple’s smartness doesn’t stop there. After you’ve added the first two invitees, it will start suggesting more people based on your previous interactions. So if you usually invite your sales team to your Monday morning meeting, and you’re inviting two of them to an event, Apple Calendar will ask whether you want to invite the rest of the team. It can feel a bit intrusive but it’s also a useful feature.
You can even make this option easier by creating a group in the Contacts app. Instead of typing the names in manually, you can also drag the invitees’ names into the event.
Open the Window menu, then choose “Address Panel.” You’ll now be able to pull over contacts but you’ll first have to scroll down the list to find them. You’ll probably find it easier to start typing and let Apple do the searching for you.
Check the Availability of Attendees
Another useful feature is the ability to check the availability of attendees. If you’re sharing your calendar, you should find that after you invite attendees, you see a button marked “Check Availability.” Click that button and a window will show when the invitees are free or busy.
Move the event by dragging the event block or click the arrows at the top of the window to see a different day, and you can find times with fewer conflicts. If you’re struggling, click the button marked “Next Available Time.” This isn’t an option that’s always going to be available—and it’s more likely to be available in a work environment than for private users. But when it works, it can make arranging events much easier.
The Status of Event Invitations: Who’s Coming?
Once the invitations are sent, you’ll be able to see who’s attending. Above the View buttons, you’ll see icons that tell you whether everyone’s coming, no one is coming, and whether there are mixed responses—or a problem with the invitation. When you click on the event, you’ll also be able to see who’s coming, who’s not, and who still has to answer.

You can see who’s coming to an event on Apple Calendar
Image: Apple
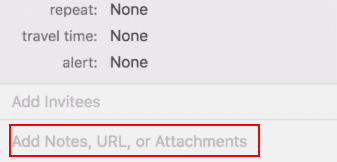
How to Add Notes, Links, and Attachments to Apple Calendar
There’s one more action you can take when you create an event: you can add information to the event. You can add notes, a URL, and attachments. These aren’t options that you’re likely to take very often but they can be beneficial.
You’ll be able to tell people information about the event to which you’re inviting them, or add reminders to an event you’re attending. You can also attach meeting agendas, decorative invitations, powerpoints or anything else you might want to send invitees.
The option to add notes, a URL and attachments are at the bottom of the event window.
Add notes, URLs, and attachments to an Apple Calendar event
4. How to Change the View of Your Apple Calendar
Above the calendar are four buttons representing four different ways of seeing the calendar.
Change the way you see your calendar
The functions of those buttons are relatively clear. Each button changes the view of the calendar, revealing the events of the day, the week, the month, or the year. But how you use Apple Calendar depends in part on the view you’re using.
Apple Calendar’s Day View
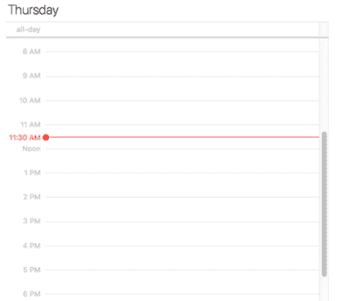
A day in your life on Apple CalendarThe Day view displays the events for a single day. The starting and ending hours depend on the settings chosen in the Preferences. Similarly, the Week view begins on the day selected in the Preferences.
What both those views have in common is that it’s possible to change an event just by clicking and dragging. In the Day view, you can change the time, and in the Week view, you can also change the day. The Month view is likely to be the most useful.
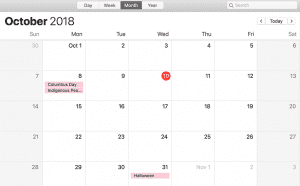
A month in your life on Apple Calendar
Again, the Preferences let you change the day the month begins. The weekend will also be marked in a darker color.
Finally, the year view is often confusing. You’ll probably find it easier to flick through the month display in the bottom left corner one month at a time to see what’s coming up during the year.
Change the Calendars in Apple Calendar
So you can change the view of the time ahead in your calendar, and you can use the Preference settings to adjust the time and days on which the schedules begin. But you can also change the calendars you view. On the left screen, Apple Calendar displays a list of all the calendars that you’ve created and to which you subscribe. Next to the names of those calendars are colored checkboxes.
Uncheck those boxes to remove the calendars from view. Those calendars will still exist. The events will still have been recorded and shared. You’ll still subscribe to them, and they’ll still be updated if they belong to someone else. But as long as the checkbox is unmarked, you won’t see them.
It’s a simple technique, but it is hugely useful. It means that you can subscribe to multiple calendars, including different national and religious holiday calendars, and keep them off until you need them. It makes using the calendar much easier.
5. Troubleshooting Apple Calendar
As this guide to Apple Calendar shows, the time management app on your Mac is pretty simple to use. It doesn’t have anything like the complexity of Microsoft’s Outlook and it’s not Web-based like Google Calendar. You can use it on your Mac without having to search for any other calendar applications—and it’s even got a few clever touches, like the attempt to predict travel time and invitation lists for events.
But it’s not perfect. It does have issues. In this section, we’re going to look at some of the most common problems you’re likely to encounter as you use Apple Calendar.
You Can’t Edit Events or Calendars
Sometimes you’ll find that you see an event in your calendar, but you can’t change it. You might want to change the time or the venue or the title, but Apple Calendar won’t let you make the edits.
There are a few possibilities.
Someone else created the calendar.
You can’t change the contents of calendars to which you subscribe. You can change their names and their colors, and you can adjust the alerts you receive for events on those calendars. But you can’t change the events listed in calendars that someone else manages.
One way to see exactly what you can do on a calendar to which you subscribe is to click the “ ” icon next to the calendar in the list on the left. If the calendar says “View Only,” you can look but you can’t touch.
You were invited to an event; you didn’t create it.
The same applies to events themselves. You can change events that you created, but you can’t change all the details of the events to which you’ve been invited. You can change your attendance and reset the alert. And you can change your status and availability. But if you didn’t create the event, don’t expect to be able to change it for everyone else.
You’re using the wrong email address
Google Calendar has a close and clear connection to Gmail. Apple Calendar’s connection to its mail and contacts apps are much less clear. They exist nonetheless, and they’re important. If Apple Calendar doesn’t let you change an event that you know you created, you might be using an email address in the calendar that isn’t on your Contacts card.
Open Contacts, find your card and make sure that all of your email addresses are listed. It’s a strange problem with an odd fix.
You’re trying to change a birthday
One of the effects of the connection between Apple’s Contacts app and iCal is that Apple Calendar can automatically produce a Birthdays Calendar. You’ll find it listed on the left of the screen. It’s a neat trick that helps to ensure that you don’t forget a birthday even if you didn’t add the birthdays to your calendar yourself.
But it does mean that you can’t change the date of a birthday from the calendar. You’ll need to open the Contacts card of the person whose birthday you want to change and make the edit in the Contacts app. You won’t be able to do it on Apple Calendar.
You can’t change the time zone of an event
A much easier problem to solve is the inability to change the time zone of an event. The problem is likely to be that you’ve turned off time zone support.
Open “Calendar” then “Preferences” and “Advanced,” and select “Turn on time zone support.” That should fix the problem.
You Can’t See Your Events
Not seeing the events you expect to find on your Apple Calendar would be a big problem. It’s also a problem with plenty of possible solutions.
You’ve hidden the calendar from the view
If the colored checkbox next to the name of the calendar is unchecked, then you won’t be able to see that calendar or its events. Events that last all day can also have their own calendar. If that calendar’s box is unchecked, then you won’t be able to see those events. Check the box and Hey Presto! the events will be back.
You’re trying to view a declined event
One of the settings in Apple Calendar lets you choose not to see events whose invitations you’ve declined. If you can’t remember whether you declined it or not, select “View” from the menu then “Show Declined Events.”
The time zone is wrong
One reason you might not be able to see the event in the place you expected to find it is that it might be in a different time zone. If you’ve changed the event’s or the calendar’s time zone, the location of the event on your calendar will move to match the new time zone. Look for the event in its local time zone or open “Calendar” then “Preferences” and make sure that the calendar’s time zone is set correctly.
You’re Not Receiving Alerts
Alerts are intended to make sure that you don’t miss an event. So when you miss the alert, you’re going to be in trouble. Not seeing the alert in the notifications isn’t always an easy problem to fix. You might have to look at a few places before you find the solution.
Check the Calendar preferences
Open the “Calendar” menu then “Preferences.” Click “Alerts” and make sure that “Show shared calendar messages in Notification Center” is checked. If you haven’t been receiving notifications of event invitations, you should also make sure that “Show invitation messages in Notification Center” is also checked.
Make sure that you can be disturbed
Mac’s notifications have a Do Not Disturb feature. If it’s on, you won’t be disturbed by calendar alerts. Open the Apple menu and choose “System Preferences.” Click “Notifications” and make sure that the “Do Not Disturb” setting is switched to “Off.”
While you’re in the Notifications section, you should also click “Calendar” and make sure that the alert style is either “Banners” or “Alerts.” If it’s neither, you’ll get nothing.
Check the event
It’s also worth going back to the event whose alert you missed to make sure that an alert was set. Click the event, and scroll down to “Alerts.” If you hadn’t set an alert, you wouldn’t have received one.
Set your email
If you wanted to receive your alerts by email instead of as a notification in your Mac, then the problem might be that your computer is using the wrong email address. Open Contacts, pull up your card and make sure that your email address is one you check.
Your Invitees Aren’t Getting Their Apple Calendar Event Invitations
If people aren’t answering invitations to your events, and telling you that they never received them, then two things are possible: they’re making up an excuse to explain their laziness, or there’s something wrong with the way you’re sending out the invitations. Here are some suggestions of how you can fix it.
Make sure the email addresses are in Contacts
Apple Calendar uses the email addresses in Contacts to send the invitations. If the addresses are wrong, the invitations won’t go out. Check the Contacts details of anyone who hasn’t received their invitation and make sure that their email addresses are correct and up to date.
You should also make sure that your own email address is correct in Contacts. If the sender’s address is wrong, the invitation won’t go out.
Refresh your calendars
If you’ve made changes to an event or a calendar, Apple Calendar might not have registered those edits. Open the “View” menu, then choose “Refresh Calendars.” If you’ve done both of these and your invitees are still not answering your invitations, then — well, they’re ghosting you.
Pros and Cons of Apple Calendar
Pros:
Apple Calendar is a great option because it is totally free and has a clean and easy-to-use design. Most people looking to schedule basic things such as work meetings and picking up their child from school will be able to get by with Apple Calendar. Additionally, it is great for those that have multiple Apple devices as it integrates smoothly between each of those devices. It will save you some time as you just have to sign into your Apple ID and everything will transition over without having to download another app.
Cons:
While iCal is great for simple tools, it struggles with in-depth features. There are very limited customization features, and it can feel lackluster compared to other competitors. While the ideal Calendar app may look different for everyone, having the option to have multiple features can never hurt. If you’re in the market for a sophisticated business calendar, a calendar for leaders or CEOs, or a trustworthy personal calendar, check out Calendar to see if it’s right for you.
Conclusion
Apple Calendar, or iCal, is a remarkably simple application. For anyone moving to Mac from a PC with Outlook, that simplicity should be refreshing. But it’s also witty and beautifully designed. The process of importing calendars from other accounts is very straightforward. You rarely have to do much more than enter your email address and password to find all of the events from a different platform on your Mac.
Creating events too is quick and easy, and Apple Calendar’s quiet integration with Mail and Contacts does add some surprising additional features. When the automated travel times work, for example, the app can feel very intuitive. At those times, you’re not just putting events on a calendar; it really can feel like you’re working with a personal assistant who will tell you where you’re going, how to get there and remind you that it’s time to leave.
When you add integration with Apple Calendar to iPhone’s Siri, things get even more interesting. Now you can tell Apple Calendar to add events or to change events. The interface becomes personal and natural when you’re on the move, and yet you can still find all the details you need when you’re in front of your screen.
Apple Calendar might not have Outlook’s complexity. It might not have Gmail’s accessibility when you’re away from your own Mac. But it does have a unique simplicity, broad flexibility and a smartness under the hood that’s hard to beat.
What do Users Have to Say About iCal?
Many Users of iCal have reviewed iCals performance on Trust Radius, a site for software reviews.
A Chief Commercial Office of a small business said that “Ical seems very well suited for managing personal calendar, bit not necessarily for more complex professional situations where integration with video conferencing may be necessary, or the need to manage multiple calendars in various time some globally”. The user continued on saying that iCal was great for integration with iPhones, other apps, and is easily accessible. However, the same user mentioned that there was very limited integration with Outlook and Google Calendar, and that there was no integration with Zoom.
A Product Manager for a medium-sized business said, “In our company we have been using this method of Calendar keeping for a few years and it has been of great use to manage our several agendas at the same time, with ease of use between devices. It has also proven to be super useful to manage calendars between team members and their needs and priorities”. This user mentioned that iCal makes it easy to create events and link to multiple calendars. However, the user mentioned that it was difficult for non-iOS users. When comparing iCal to Google Calendar, the user said that “both work just great. Still, having a iOS device based company, iCal has been of great ease of use throughout. Also, the interphase with the user is a bit more comfortable to us.”
Another Manager said, “For Apple users, iCal is usually the go-to calendar management software as it’s an easy and accessible option since it’s already installed on all devices. I consider it a very basic calendar software, it doesn’t have as many features, but it’s straightforward and the nicest feature is that it seamlessly updates across all devices logged into your iCloud account. It’s an effortless way to keep your calendar online/in the cloud, manage schedules, create different calendars (work, personal, family, etc) and keep all updated across devices. An easy way to keep yourself and your team/family organized.” This user continued on, saying that it was super easy to use, but that the layout seems out of date, the features for calendar sharing across organizations are a little too simple, and there is a lack of third-party integration for things like Zoom.
This guide to Apple Calendar will help you to get more out of that application throughout 2020 and beyond.
Updated May 2, 2023
John Rampton
John’s goal in life is to make people’s lives much more productive. Upping productivity allows us to spend more time doing the things we enjoy most. John was recently recognized by Entrepreneur Magazine as being one of the top marketers in the World. John is co-founder of Calendar.