Introduction to Microsoft Calendar
Back in the early days of the Web, there was only one way for a business to organize its communications and its schedules. Employees would find their work stations already set up with Microsoft Outlook, and from the desk at reception the administrative assistant would enter the company’s dates and meetings in Outlook’s calendar. It was never very friendly or particularly convenient but at a time when the best advice on technical knowhow came from an animated paper clip, the system worked—more or less.
The rise of competition from Google Calendar, Apple Calendar, Yahoo Calendar and other companies has given businesses and individuals the opportunity to use different platforms to manage their time and their messages. At the same time the spread of mobile devices has made calendars fixed into an email system on the workplace computer insufficient. Users also need to be able to access their calendars on their phones and tablets. In fact, that mobile access has become more important than the heavy system that Microsoft had for so long been selling to businesses.
When that change arrived Microsoft was at a disadvantage. Google could embed its calendar and its email app into every one of the hundreds of millions of phones and tablets that use its Android system. And because it could make money on the advertising surrounding those products, it could give them away for free. Apple could do the same thing. Always more of a hardware company than a software firm, Apple was happy to toss a free calendar and email program onto its devices if it meant that it could charge a fortune for the devices themselves.
Microsoft has needed to up its game. After years of stasis, the company has revamped its Office suite, switched to a subscription model and offered versions of many of its key products for free. It was a massive change and it means that the calendar that comes with the Office suite is worth another look. It’s both more powerful and in some formats easier to use than you might expect.
In this guide, we’re going to take you through all of the Office 365 Calendar’s functions for 2022.
We’ll start with the free versions then we’ll play with some of the more advanced settings in the version of calendar that comes with the subscription-based Office 365.
Day 1: Setting Up
Enter your Apple account details into your iPhone and when you press the calendar app, you’ll be ready to go. Pull up Gmail on your phone or in your Web browser and as long as you’re signed into your Google account, you’ll be able to browse your schedule and enter your events.
The Office 365 Calendar isn’t quite so straightforward. It won’t be on your iPhone unless you put it there. It won’t be on your Android device unless you download it. And you can’t even find it in your browser unless you type and enter a URL that looks like this: https://outlook.live.com/owa/?path=/calendar/view/Month.
Of course, if you’ve paid for an Office suite, you can always bring up Outlook… but you’ll need to have bought it first and at around seventy bucks a year for an individual subscription, it’s not that cheap.
There are couple of easy—and free—ways though, to reach Microsoft’s Office 365 calendar .
One is to type outlook. com into your browser. The page will open at outlook.live.com—at Outlook Mail. In the bottom left hand corner is a small icon that will take you to the calendar.
![]()
![]()
You can also find an easy way into Outlook Calendar in Bing. At the top of the page is a bunch of menu items, including one marked “Office Online.” Click that to open a drop-down menu of Microsoft apps, including the calendar.
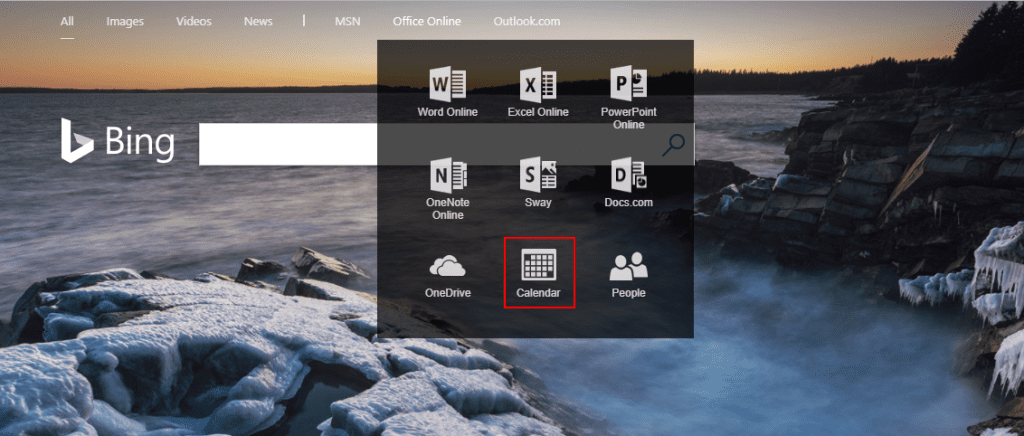

Of course, none of those options is convenient as starting to type “calendar” into your browser then having your browser complete the process for you. That works with Google Calendar whose address is calendar.google.com. And while it might work for the Outlook Calendar, you’ll be better off bookmarking the page.
Outlook Calendar’s Mobile App
There is no Office 365 Calendar mobile app. There is however a free Outlook app which embeds Calendar. At the bottom of the screen is a small icon which will take you straight to it.


That’s not great usability and it probably restricts the growth of the calendar. It means that you can’t use the Office 365 Calendar without also using Microsoft’s Outlook email app. The two programs are entirely linked. So if you prefer Gmail’s email platform but like the feel of Office 365 calendar, you’re out of luck—at least on your mobile device. The best you can do is use Gmail for your messages and Office 365 Calendar on your computer.
Importing Your Office Calendar
If you’re moving from a different calendar platform in 2022, such as Google Calendar or iCloud Calendar, you’ll need to import your dates and events into Office 365 Calendar. Microsoft used to say—and some of its help files still say—that you can’t do it. You can only import a calendar into the paid version of Outlook, using the Import function.
That’s not quite true.
If you have a paid version of Outlook, with its embedded calendar, this is what you do:
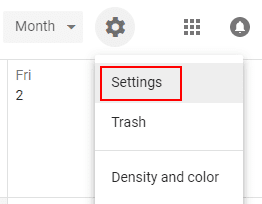
First, open Google Calendar and click the cog icon in the top right corner. Choose Settings.

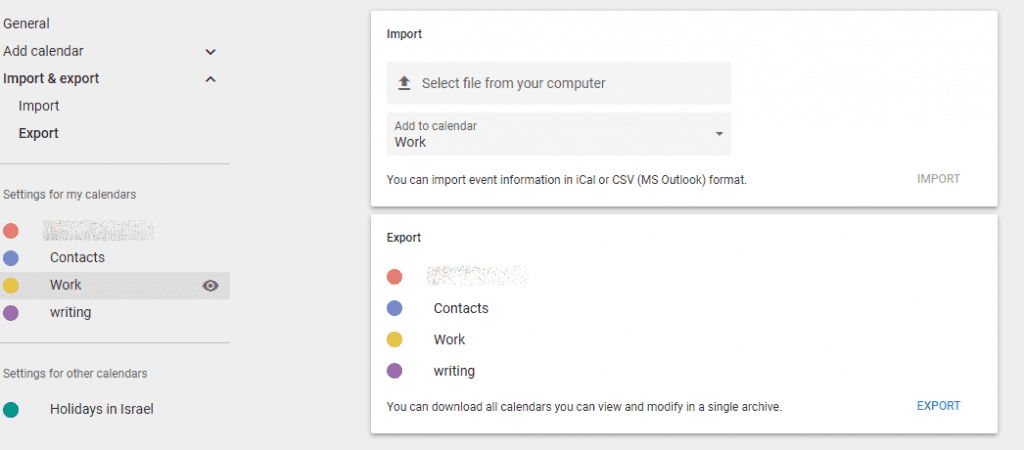
From the menu on the left, choose Import & export. In the Export box, press the Export link. Google will extract your data and ask you to save it as a zipped iCal file. Once it’s downloaded, you’ll need to right-click the file and Extract all to separate the folder’s contents into separate .ics files.

Next, you’ll need to open Outlook on your desktop. Open the File menu, choose Open & Export, then Import/Export.
Select “Import an iCalendar (.ics) or vCalendar file (.vcs)”. Choose the calendar you’ve exported from Gmail and press Import. The data on your Gmail calendar should now appear in your Office 365 Calendar.
That’s one way to do it. It’s a bit fiddly, and you can’t do it for iCloud. Fortunately, there is another method that you can use.
On the Web version of Office 365 Calendar, choose Add calendar and select From file.
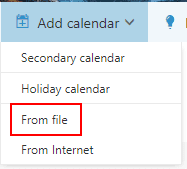

Microsoft will then invite you to Import a calendar. Select one of the .ics files that you unzipped during the export process. If your Office 365 Calendar contains more than one calendar—different schedules that you can use for different purposes—you’ll need to choose the calendar into which you import your events. Finally, press Save.
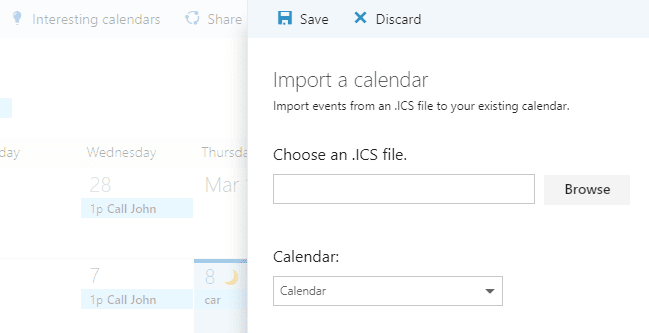

All the data from your Google Calendar will be integrated into your Office 365 Calendar.
While this method is relatively straightforward and can be done by anyone, even people who haven’t paid for Outlook, it has its limitations. If you make any changes to the source calendar—if you add another event to Google Calendar, for example—those changes won’t be updated in your Office 365 Calendar.
Importing only brings in the events already on your calendar, and it only does it once.
It’s also not a method that can be easily used to move from an iCloud Calendar to Office 365 Calendar. Apple’s free calendar doesn’t have an export function. The closest it comes to export is attaching your iPhone or iPad to your computer and using the Sync function to download your calendar data as an iCal file. It’s a method you really want to avoid.
Fortunately, there is a much better way.
Instead of importing your events and appointments from a different calendar platform, you can share them with your Office 365 Calendar.
Sharing Your Old Calendar With Your Office 365 Calendar
From Google Calendar, select one of the calendars under My Calendars by clicking the three buttons on the right and choosing Settings and sharing.
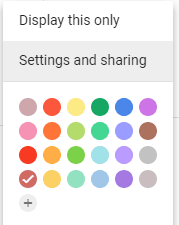

From the menu on the left, chose Integrate calendar. You’ll get list of different kinds of information here. The URL you’re looking for is called “Secret address in iCal format.”
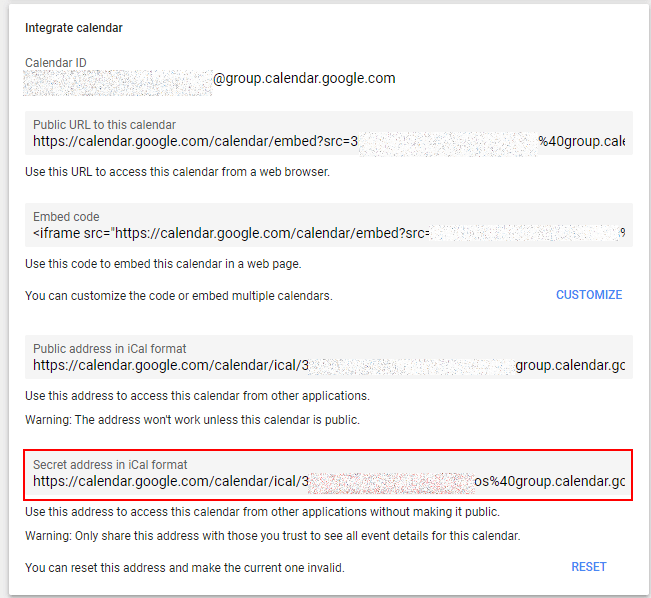

Copy that URL and open Office 365 Calendar. Select Add calendar and choose From Internet.
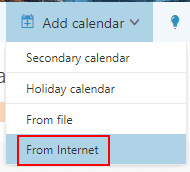

Now Microsoft will invite you to add a calendar to subscribe to. Paste in the URL you copied from Google Calendar, and give that calendar a name. When you press Save, your Office 365 Calendar will take the data from your Google Calendar.
The difference between importing and subscribing is important. Importing is an one-time act. It adds the data that happens to be on your calendar at that time. It doesn’t update itself with new information added to the source calendar later.
Subscribing to the source calendar brings in that data but also keeps it updated. So if you prefer to use Office 365 Calendar but your workplace uses a shared Google Calendar, you could keep that work calendar on Google but by subscribing to it on your Office 365 Calendar, you could also see it on the platform you prefer.
And subscribing also gives you an easy way to bring in your calendar data from iCloud, and keep it up to date.
Open iCloud Calendar on your computer, and click the broadcast icon next to one of your calendars to bring up Calendar Sharing.
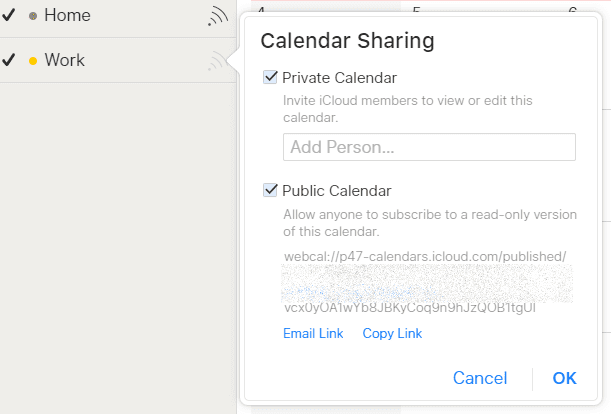

In line with Apple’s minimalism, there are just two options here: Private Calendar and Public Calendar.
Check the box next to Public Calendar, and you’ll see a hashed link that you can copy. Open Office 365 Calendar, select Add Calendar and choose From Internet, and when you paste in the URL, you’ll bring in the data from the iCloud calendar.
But here’s the thing: the subscription only works in one direction. Add an event to your iCloud calendar and you’ll see the change in your Office 365 Calendar. But you won’t be able to make a change to those iCloud calendar events in Office 365 Calendar. The data is read-only.
Importing Your iCloud Calendar… The Workaround
We said you couldn’t export your iCloud Calendar data, and strictly speaking that’s true. Apple doesn’t make it easy.
But there is workaround that lets you import the calendar instead of subscribing to it.
Check the box marked Public Calendar next to one of your iCloud calendars. Copy the URL and paste it into your browser. Before pressing Enter, change the “webcal://” at the start of the address to “http://”. You’ll be prompted to save your calendar data as an .ICS file.
You’ll then be able to open Office 365 Calendar, select Add Calendar and upload the file.
Microsoft Calendar Website Settings
Once you’ve set up your Office 365 Calendar and have brought over the events from any other calendar you might have been using, you can start playing with the settings. Microsoft gives you quite a few options. The settings icon for the Office 365 Calendar website is at the top right of the screen. Click the cog and you’ll produce a drop-down menu:
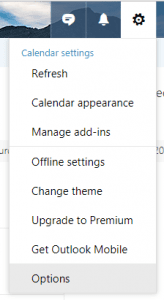
Refresh just reloads the page. If you’ve entered an event on a different platform—such as your mobile phone—and it hasn’t yet turned up on the calendar website, refreshing the page should bring in the new data.
The next option though is more interesting. Calendar appearance lets you change a number of the settings related to the way information on the calendar is presented:
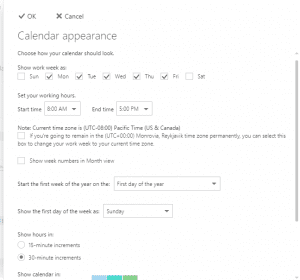

Most of them are fairly self-explanatory. The ability to set the days of the work week applies to a series of options above the calendar. At the top right, you can switch the view between Day, Work week, Week and Month. By checking the days on which you work, you can change the days on display when you choose to see the work week, a useful trick if you’re lucky enough to take a day off. By setting your working hours, you can also determine the hours that calendar displays. Instead of running from midnight to midnight, you can set it to run from nine till five, for example.
Microsoft doesn’t take the time zone from your ISP so if it’s different to your current location, you’ll need to check a box to adjust the hours. You can also show the week numbers when you’re looking at the month view, and you can start the first week of the year on the first day of the year, the first four-day week of the year or the first full week of the year.
You can change the first day of the week—a useful option for countries whose workweek starts on Saturday or Sunday, or shift workers who work on rotas—and you can show each hour in 15-minute increments or 30-minute increments.
That’s not quite as clear as it sounds. It refers to the Day View, and to the number of lines that appear in the space for each hour. Choose to see hours in 15-minute increments, and you’ll see four spaces in each hour; choose to see hours in 30-minute increments, and you’ll just see two spaces.


That’s not just a matter of aesthetics. Clicking on each of those spaces allows you to fill them with an event. We’ll come back to creating events later but understand now that the choice of increments will help to determine the ease with which you can create events in day view.
The last option is pretty cool. You can choose between bright colors and light colors. It doesn’t make a huge difference and it only affects the way events appear in the calendar. It doesn’t affect the font color or the background of the calendar as a whole. But it does give you some control over the appearance of your calendar.
Manage Add-Ins
The ability to extend the functions of your Office 365 website calendar by installing add-ins sounds like a huge benefit. It should allow you to do all sorts of things that Microsoft hasn’t got round to offering.
It doesn’t.
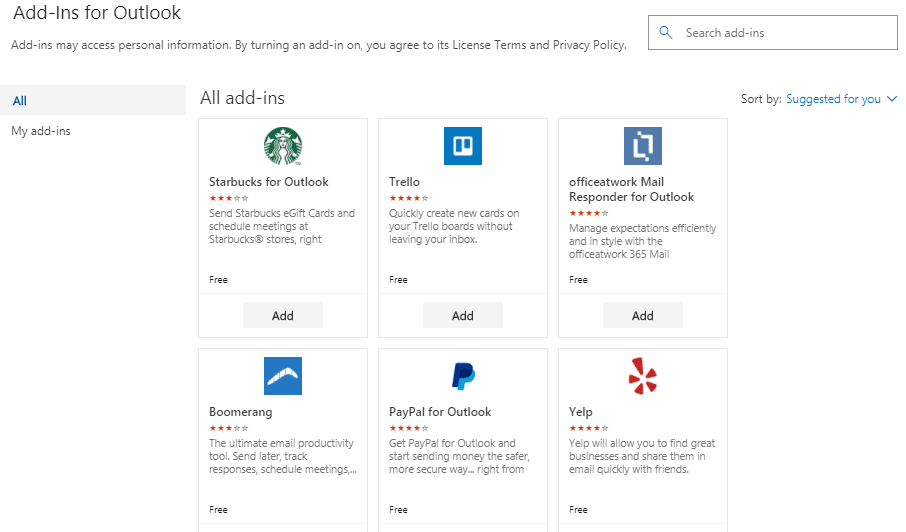

First, most of the add-ins are for Outlook rather than for the calendar alone. They’ll do little for your scheduling. Not all of them work, few that do work have any value—and there’s precious few of them in any case. You might find a useful add-in in Microsoft’s list but don’t bank on it.
Offline Settings
Offline settings are more useful. Your computer might not always be connected to a network. The Internet can fall or you could find yourself working in airport lounge or on an airplane with no connection. Check the box here, and you’ll still be able to see your schedule and check your events.


Change Theme
The ability to change the calendar’s theme should be a killer sales point for Office 365 Calendar. Traditional paper calendars sold themselves on the basis of the image that came with the schedule. When you looked at your dates, you could also see a picture of a fancy car, a beautiful scene or… anything else.
Microsoft’s themes should allow users of their calendars to do the same thing. It doesn’t quite do that.
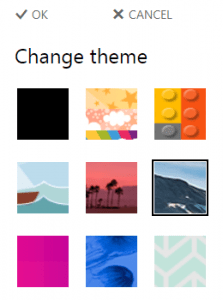

You can choose from as many as fifty different backgrounds, including a batch of solid colors. But you can’t upload your own image… and it doesn’t really matter because that image doesn’t appear as a kind of watermark behind the dates. Instead, it appears only as a narrow strip at the top of the page.


It’s not a huge benefit and it’s not going to make a big difference. But you can pick one of the fifty themes and place one above the dates.
Premium and Mobile
The next two options are little more than advertisements. Microsoft’s hope in offering Office 365 Calendar for free is that users will cough up the seventy-dollar annual subscription fee for the whole Office 365 suite. They even put a link in the Settings menu.
They also encourage users to download the mobile versions of Outlook app. Click Get Mobile Outlook and you’ll be taken to a page where you can enter your phone number. Microsoft will then send your phone a link that you can use to download the app.
It’s easier to open the App Store on your phone and download the app directly. You won’t even have to give Microsoft your phone number.
Calendar Options
The last choice in the calendar’s settings is the biggest. This is actually where most of the settings are hidden, even though some of them are repeats of earlier settings.


There are no fewer than eight different options here, and each one of them plays an important role. The list that the page offers though is less organized than the menu presented on the left of the page. This sorts each of those options into categories that are much easier to follow.
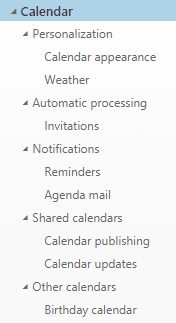

Half of the personalization options have already been covered. We’ve already seen how it’s possible to change the work week, the hour increments and the colors. But it’s also possible to change how the weather appears in the calendar.
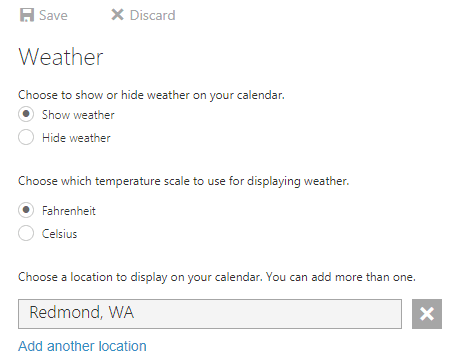

The default is to show small weather icons in the calendar. You can take them out entirely by choosing to hide weather, but they’re pretty useful. Being able to see whether you’re going to need an umbrella at an event the next day is a bonus bit of information. And you can also choose to change and add forecast locations.
The calendar is set by default to the weather in Redmond WA where Microsoft has its headquarters but you can take that off, add more places and hit Save. At first glance it doesn’t seem to make any difference but look a little closer and you can see the change.
![]()
![]()
Click the icon and you’ll get a floating box with more detail. You can edit the location from this box, but you can also click the arrows at the top of the box to scroll through the different places you’ve added. It’s a useful little tool.
Below appearance in the menu is Automatic Processing. It would be great if this option included a whole raft of different processes that the calendar automated. It doesn’t. There are only two processes here that the calendar offers to automate.
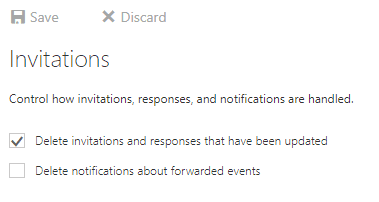

The first is to delete invitations and responses that have been updated. That sounds confusing. What it actually means is that the calendar will automatically remove old meeting requests and responses that are clogging up your Outlook inbox.
The second process is to delete notifications about forwarded meetings. If you invite someone to an event and the person you invite forwards that invitation to someone else, you’ll receive a notification. Checking this box sends that notification directly to the Deleted Items folder.
You’ll want to leave the first box checked, the second unchecked… and not worry too much about either. These are both settings related to Outlook rather than to Office 365 Calendar itself, and they’re not hugely important.
The notifications are more important. There are two of them.
The first are Reminders.
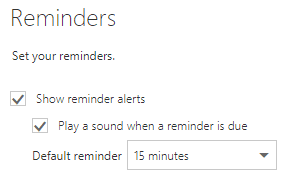

The default setting is that your calendar will show an alert and play a sound before an event you’ve entered in your calendar. You’ll want to keep both of these options if you’re at all likely to forget. But you’ll probably want to change the time of the default reminder. It’s set to fifteen minutes, which doesn’t give you too much time if you have forgotten.
But Office 365 Calendar’s Web calendar actually has a long list of different options, starting at zero minutes, running through five, ten, fifteen and thirty minutes, then a number of hours, a number of days and even one or two weeks. It’s a good range of choices, and while it might have been nice to give the user the option of including a custom amount, there’s plenty of choice here.
The second notification could be fun. Office 365 Calendar can create a daily agenda and send it by email. Like a secretary telling you what you have lined up that day, you’ll start your morning with a list of tasks and appointments.
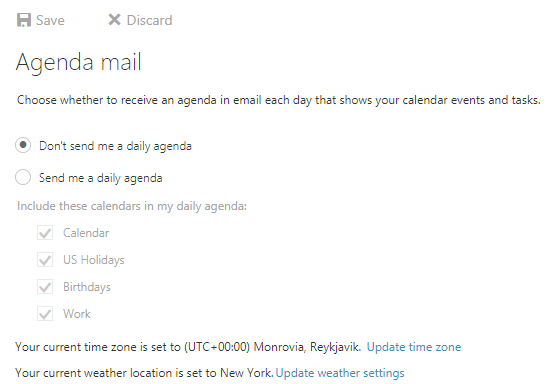

The default setting is not to receive a daily agenda but if you check the second radio button instead of the first, you can choose which of your calendars to draw from to make up the agenda. You might not want your agenda to include birthdays or national holidays, for example.
The section marked Shared calendars is more important. This is where you can let other people see your schedule and know when you’re available. There are three choices to be made here. First you have to choose which of the calendars you’ve created you want to share. You can create a personal calendar and a work calendar, for example, and only share the work calendar with your colleagues and your personal calendar with your family.
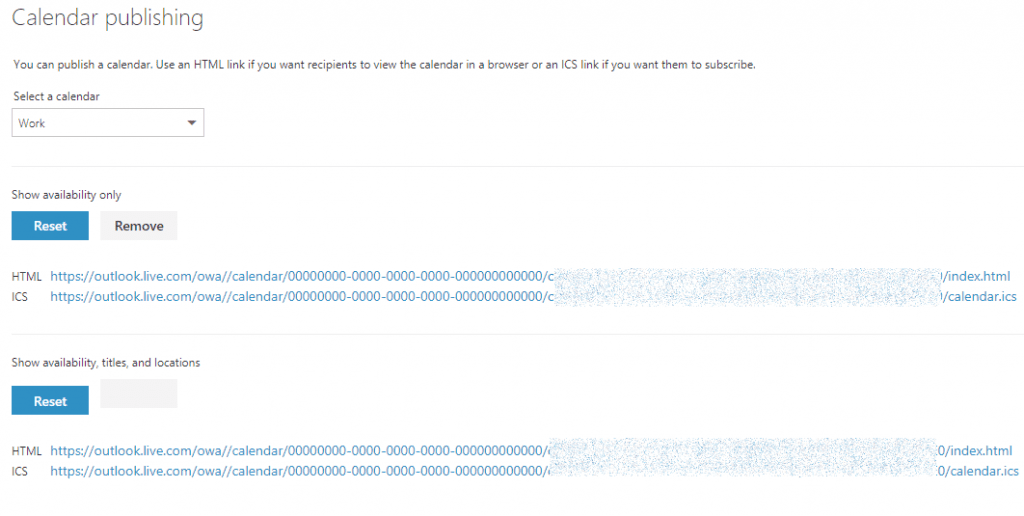

You can also define what people see when they look at your calendars. Microsoft has taken a fairly clumsy approach to setting these definitions. The first option is to show availability only. Anyone looking at your calendar will only see full slots or empty slots that they can fill with their own invitations. They won’t know what you’re doing in those full slots.
Alternatively, you can share a little more information with the people who see your calendar. You can show them not just whether you’re available but where you’ll be and, through the titles of the events, what you’ll be doing.
That’s clear enough. Less clear is how you do the sharing. Each of those options has a Create button. Press that button and each option will create two hashed URLs. The first is an HTML link. Send it to a friend or a colleague and they’ll be able to see your calendar in their Web browser. The other is an .ics file. They can use that to import your calendar into their own. As you update your calendar they’ll see those updates too.
If you don’t really want someone seeing all your events forever, use the first option. Do you think that someone will need to see a particular schedule more than once, give them the .ics and let them subscribe.
If you’re showing people not just your availability but also your location and the event title, those people will also be able to add their own events and update your events. Calendar updates lets you receive email notifications whenever someone makes a change to a shared calendar. It’s hard to see why you wouldn’t want to do that.
Finally, you can also control your other calendars. This is simply a matter of turning on or off. So you can choose whether or not to see birthdays on your calendar, for example.
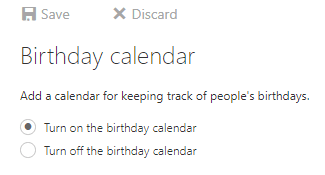

It’s a useful thing if you find that your calendar is getting too clogged up and you want to free some space. Here are a few ineffective ways to share your calendar to help you not make the same mistakes.
Office 365 Calendar Mobile Settings
The Office 365 Calendar website has a lot of settings and a lot of options, though it shouldn’t take you too long to set up your calendar exactly the way you like.
The mobile app has far fewer settings. They’re also harder to reach.
Once you’ve opened the calendar, you’ll need to press the three bars in the top left hand corner
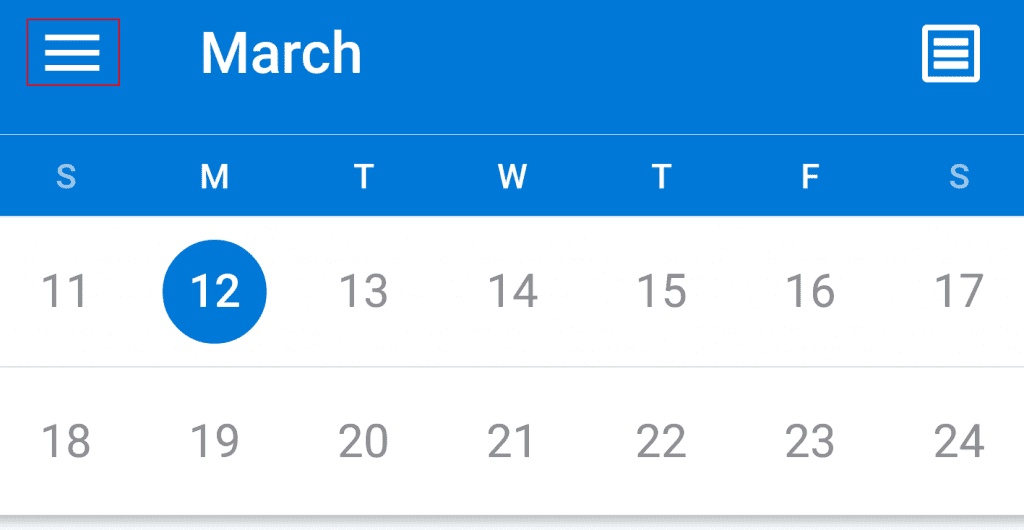

then the cog in the bottom left corner.


That will bring up the settings, but it will be the settings for the Outlook app as a whole rather than for the calendar part of the app. You have to scroll down a page to see the settings for the calendar. There are two of them.
The first concerns Notifications.
By default, the app will issue a notification fifteen minutes before an event but by touching the menu item marked Events, you can change the timing from none to as much as a week before. Again, there’s no option to enter a custom notification time and the option for hours stop at two hours’ notice.
Even stronger limitations apply to all-day events. You can only set four times for notifications here. You can have none; the day of the event at 9am; a day before at 9am; or a week before. That’s all.
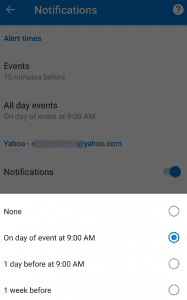

You can also switch the notification on or off by toggling a switch, and you can choose from a long list of ringtones for the notification. Finally, you can set the phone to vibrate when you receive a calendar notification. (The default is that vibrate is set to off.)
The only other option is the day to start the week. You can choose between Saturday, Sunday or Monday.
So there’s no personalization and no sharing options here. All of that you’ll have to do from the website or from the software itself.
There is one more thing that you can do though. Like the website, the Outlook app also lets users use add-ins to expand their calendar’s functions. The app has all of four, although it promises that more are “coming soon.”
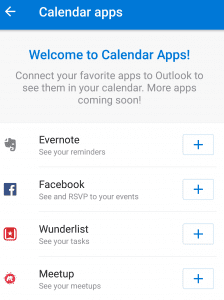

But those four do have real uses. Evernote will add the reminders that you’ve created in that app to your calendar. Facebook will let you see and reply to events on the social media platform. Wunderlist, a list-making app, will add your tasks; and Meetup will add the meetings arranged on that platform.
If you’re using those services, the integration could turn out to be quite useful.
Apart from those meagre settings, the only other options that the app offers is to press the icon in the top right corner to switch the view between Agenda, Day and 3 Day. And you can drag the calendar at the top of the page to make it bigger—at the expense of the agenda in the lower half of the screen.
And that’s it! There aren’t a huge number of settings in either the website or the app. Once you’ve brought over the data from any other calendar you might have been using, it shouldn’t take you more than a few minutes to have your Office 365 Calendar running exactly the way you like it. Now you get to use it.
Creating Multiple Calendars
One of the most important features of digital calendars, including Office 365 Calendar, uses really poor nomenclature.
All digital calendars let you add calendars to the calendar.
That makes little sense. It would be so much better if they had said you could add schedules to your calendar. That does make sense and it differentiates between the calendar platform, and the events and other information you place on that platform.
The Web version of Office 365 Calendar lets you add three kinds of schedule—or calendar—to your calendar: your own; a friend’s; and a prepared calendar.
You can only add these new calendars on your computer. It’s not an option included in the mobile app. Fortunately it is fairly straightforward.
How To Add A New Calendar Of Your Own
The first kind of calendar you can create is one of your own. You’re likely to want a personal calendar to keep track of your kids’ school events or your family vacations. But you might want to keep those events separate from your work meetings or your business’s advertising calendar. Creating a separate calendar for each of those kinds of events will make it easier to organize your activities and stay focused.
It’s pretty simple.
At the top of the page is a dropdown menu called Add calendar. Open the menu and scroll down to the first option.
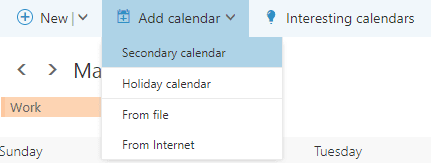

A text field will open at the bottom left of the screen under Your Calendars where you can write the name of the new calendar.
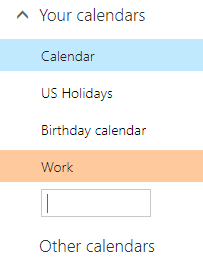

Once you’ve named your calendar it will appear above the calendar itself, like a tab. Those tabs don’t allow you to bring different events forwards and backwards. Unlike a browser, clicking them makes no difference to what you see on the main part of the screen.
Instead, they act as a key for the background colors of events in the calendar. By clicking the Close icon that appears in the corner of the tab when you mouse over, you can prevent those events from appearing in the calendar. Click the calendar on the bottom left and the tab and the events will reappear.


You can also use the calendar title that appears under Your Calendars to adjust each calendar’s settings. Clicking Rename will let you retitle the calendar and Delete will remove it—taking any events you might have added with it. The last option is a simple checkbox that you can use to add or remove the events in that calendar from the agenda email.
More useful is the ability to change the color of that calendar, and to add a charm. These are little icons that appear in the title of the event. They can provide a useful shorthand, allowing you to see at a glance when you’ll be attending parties, meeting people for coffee or heading on a trip. But they’re rarely useful for entire calendars. Set a charm as a default or leave it blank here but change the icon when you create the event.
The last setting here is surprising not very useful. The first item on the list is Sharing permissions. Click that item and you’ll be offered a field in which you can enter an email address. The recipient will then receive an information to share that calendar.
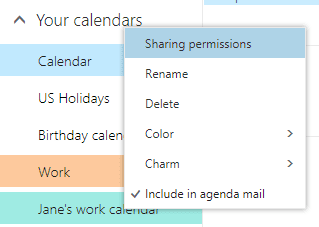

That’s not the only way to share a calendar. The Share Calendar menu at the top of the screen brings up the same text field. But to share the calendar, the email address has to be in your Outlook contact list. To share a calendar with someone who isn’t in your contact list, you’ll need to create the URL or .ics file from the Settings page then send it by email.
How To Add A Friend’s Calendar To Office 365 Calendar
You can only add a new calendar on your computer. It’s not an option included in the mobile app. Fortunately it is fairly straightforward.
Open the Add calendar dropdown menu and scroll down to the last two options.
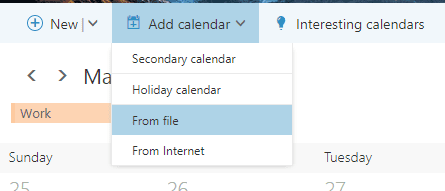

Those two options are two ways to add someone else’s calendar to your own. Click the first and you’ll be able to upload a .ics file. It’s the same process you might have used to import your old calendar to Office 365 Calendar.
But note how the terms change here. Under the “Import a calendar” title is the explanation “Import events from a .ics file to your existing calendar.” You’re not actually creating a new calendar. You’re bringing the data from someone else’s calendar and adding them to one of your own.
If you want to keep your friend or colleague’s events separable from your own, start by creating an entirely new calendar. Give it a name that’s easily identifiable, such as “Jane’s work calendar,” then choose that calendar from the next drop-down menu.
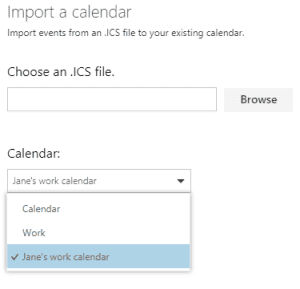

Now when you press Save, you won’t just be importing someone else’s events and spraying them all over your calendar. They’ll be organized and separated into their own calendar.
How To Add An “Interesting Calendar” To Your Calendar
The third kind of calendar you can bring into your own calendar are called… “interesting.” You can add them by clicking the Interesting calendars item at the top of the page.


There’s no dropdown menu here. Instead clicking that item opens a flap on the right with a list of calendars that you could choose to add. The choice is pretty poor. Of the six main categories on offer, five are related to sports. The sixth will let you add television schedules to your calendar.
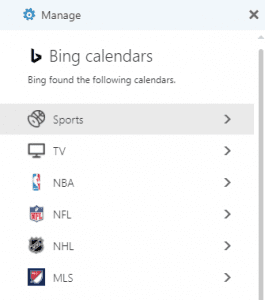

Even the Manage icon at the top of the list offers little benefit. It only lets you remove choices; it doesn’t bring in more interesting new ones. If you’re not into sports and don’t want your calendar clogged up with a studio’s television schedules, you’re out of luck.
There is an alternative to Microsoft’s weak choices though. The Internet is filled with all sorts of useful schedules that you can add to your calendar. CalendarLabs, for example, makes thousands of free calendars available, letting you mark all sorts of religious and other holidays on your calendar.
As long as you can download the .ics file, you can add it to your Office 365 Calendar by importing it.
How To Create A New Calendar In Outlook
Creating a new calendar on the website version of Office 365 Calendar is pretty straightforward. If you’re using Outlook though, you’ll have to work a little harder.
We’ll look at the program in more detail later but for now bear in mind that Outlook stores calendar data in folders. To create a new calendar in Outlook, you’ll first have to create a new folder.
If you’re in Outlook, click the Folder tab, then New, then New Calendar. If you’re in Mail, Contacts, Tasks, Journal or Notes, after clicking New, you’ll need to click New Folder and choose Calendar Items.
A text field will ask you to enter a name for the new calendar and a dropdown menu will ask where you want to place the folder. Give your calendar a name and choose Calendar. That calendar will then appear alongside others in your calendar screen.
The use of folders is important. While it might appear as little more than a technical solution, as we’ll see later, it is possible for some users and calendar sharers to create sub-folders, extending the calendar further.
Sharing Your Own Calendar
The ability to share a calendar with others is one of the most important features of any digital calendar. As we’ve seen, Office 365 Calendar makes the process more complex than it needs to be.
One option is to click the Settings icon, choose Options, then select Calendar publishing. Select a calendar and generate either an HTML file or a .ics file that you can then send to a friend, a relative or a colleague.
You can also press the Shared calendars menu item at the top of the page, choose a calendar then enter the email address of the person you wish the share the calendar with. As we saw, you’ll only be able to share the calendar with someone in your contact list using this method… which isn’t ideal.
Nor is there an easy way to share your calendar with a group.
These limits only apply if you’re using a free version of Office 365 Calendar or using it without Outlook. If you’re using a calendar tied to the paid version of Outlook, then you’ll have a lot more options.
Editing Your Calendar
Once you’ve created your calendar, set it up the way you want it, created different calendars for work and your personal life, either online or by wrestling with the options in Outlook, and shared those calendars with people who might benefit from using them… you can start adding information to them.
Office 365 Calendar lets you make three kinds of entries on its free website: Calendar events, Email messages; and Birthday events.
How To Add A Calendar Event To The Office 365 Calendar Website
Adding a calendar event is likely to be the most common action you take with your calendar. You’ll want to use your calendar to add your meetings, trips and appointments. That will mean completing a form. You can reach that form by double-clicking on the date on which you want to enter the event or by pressing the New button on the top left.
You can also press the arrow next to that New button and choose Calendar event.
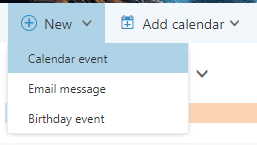

However you pull up the form, you’ll be asked for exactly the same information, and you’ll have the same options to organize and categorize that event.
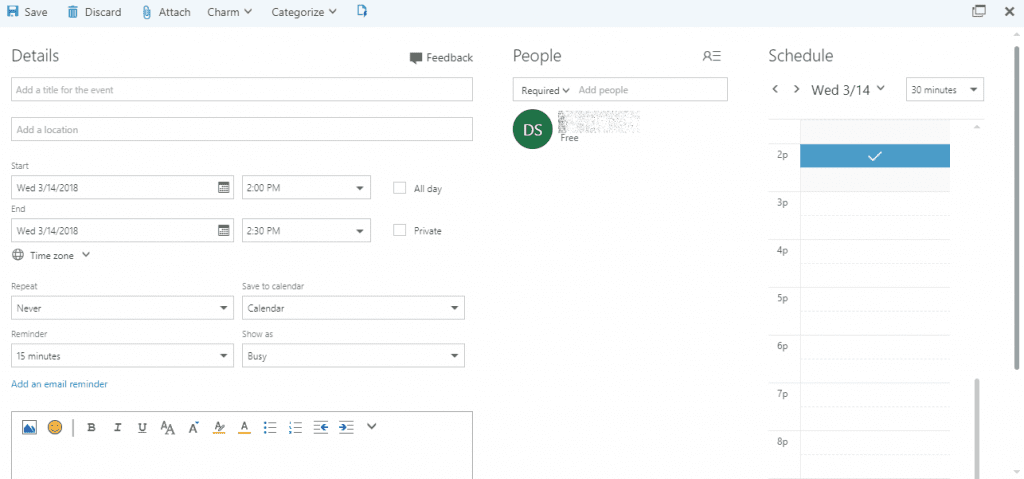
Most of the information that the event form demands is pretty straightforward. The title is the information that will appear in the calendar. Bear in mind that it will also be visible to some of the people sharing your calendar, depending on their permission settings, so mind the shorthand and don’t write anything here that you don’t people sharing your calendar to see.
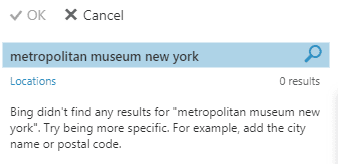
The location is a little smarter than it looks… though not as smart as you might like. Start typing a place into the location field, and Bing will offer you the chance to search for that location.
That should be useful. If you were trying to arrange a meeting in a Starbucks, Bing could give you a choice of different locations, with maps, that you could add to the event. In practice, it just doesn’t work very well.

You’ll then need to enter the date and the time and change the time zone if you want. You can also mark the event as lasting all day, and you can keep it private. That prevents other people who are sharing the calendar from seeing the details of the event.
The next sections are a little more complex. Setting an event to repeat will make sure that you don’t have to enter a regular event, such as a staff meeting, by hand each time. Microsoft offers a bunch of different repeat options, starting with never and running through every day, every day of the week on which you’ve entered the first event, every workday, a particular date each month, every other week, and every year. And if those aren’t enough, you can just create your own repeat pattern.
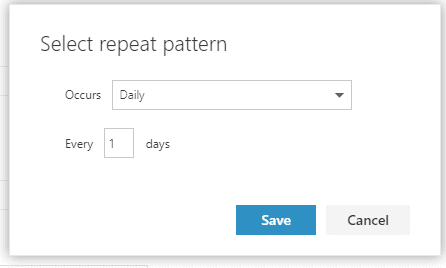

You’ll be able to choose which calendar you add the event to, and you can show people who see your calendar but can’t see all of the details of the events whether you’ll be free, working elsewhere, tentative, busy or away. If you’re not sharing your calendar, this option won’t matter at all.
Finally, you can set a reminder—and here you have two options. The first is simply to choose the amount of time before the event to receive a notification. The choices range from none to two weeks, but unlike the repeat pattern, there is no ability to set your own reminder time.
The second option is to create a reminder email.
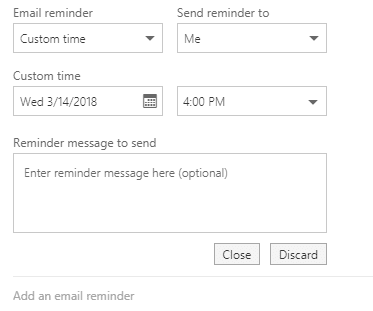

This isn’t something you’re going to want to do for every event but it might be something you want for events that are some way off and are related to work. Press the Add an email reminder link and you’ll open a whole new form. You can choose to send the reminder to yourself or to everyone attending the event and you can choose from six time options to send the reminder—or set a time of your own. You can also write your own reminder message in the email, although you don’t have to.
The last part of the form is a large text field with a host of formatting options. You can really format your content in any way you want. You can place a picture inline, use bold and italics, even insert a table if you want. It feels a bit like overkill; the chances that you’ll want to put a table in a calendar are pretty remote but you can have fun playing around with the appearance of your event details.
To the right of the form is a list of the people who will be attending the event. A small icon on the right loads your contact list but bear in mind that it will only include the contacts in the list available to Microsoft. If you’re not using Outlook, that means your Skype list—and not all of those contacts will have email addresses. You’ll also need to indicate for each attendee whether their attendance is optional or required. The list of attendees appears alongside the event form.
The remaining options appear at the top of the page. Apart from being able to Save or Discard the event, you can also attach a document, add a Charm or Categorize the event.
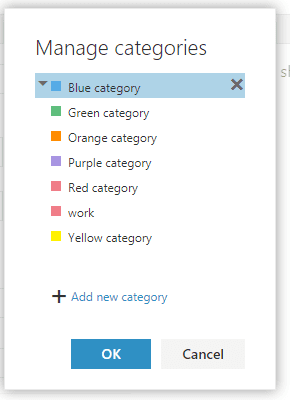

The categories are important. In addition to choosing the calendar on which to post the event, you can also create new categories for each kind of event and assign it a color. So you could mark all your gym appointments in red, for example, or make sure that all your personal appointments are in yellow. As long as you can remember which color is used for which kinds of appointments, you could have a useful shorthand.
Finally, you can use a template to post ready-made text to the event. Click the last icon at the top of the page, and you’ll open a short list of prepared texts. Click the text and it will appear in the body of the event. Pressing the plus icon at the bottom will let you create a new prepared text but you can also edit or delete any texts that you’ve already created.


It’s a pretty useful little tool, especially if you need to add similar events to the calendar or if you need to add information about an event. If you need to tell people about the room number of a meeting or remind participants to bring certain information to particular meetings, those templates could turn out to be real time-savers.
How To Create An Email Message On The Office 365 Calendar Website
The first piece of content you can create on a calendar is an event—and that’s clear enough. The second is a little more confusing. Press the arrow next to the New button and the second item to appear in the dropdown menu is Email message.
That might appear out of place. Other calendars don’t offer the ability to create emails while checking dates. But because Office 365 Calendar is part of Outlook, it has access to contact lists and it can integrate the mailing feature of Outlook.
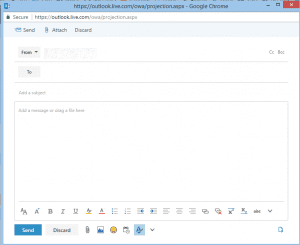

Everything here is familiar. You’ll get a ‘from address,’ a ‘to address,’ a subject line and a big text field. You’ll also have a long list of formatting options. But a couple of options stand out.
The first is the opportunity to show your availability.


Click the little calendar icon, and you’ll be offered a schedule for that day. Click the date at the top of the page and you’ll be able to choose a different month and a different day. To show the times that you’re available, just click the times on the schedule.
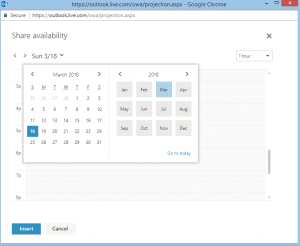
The Office 365 Calendar website then does the job of turning your selection into automated text. It even adds a little note at the top that says, “Here are some times that work for me.”
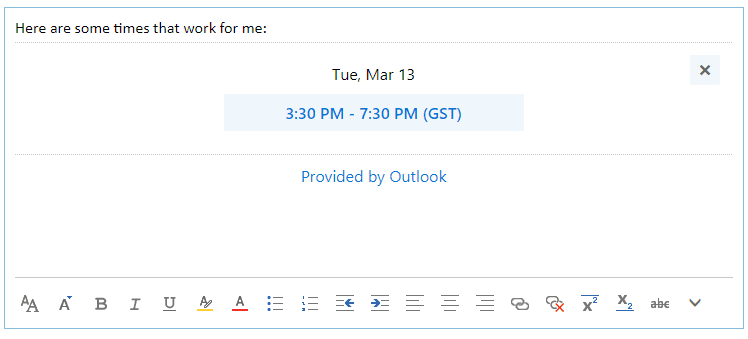

You might not want to send an email while you’re looking at your calendar, but that little icon at the bottom of the email field does provide a quick and useful way to tell people when you can meet.
The other neat feature in the calendar’s email is the ability to insert templates into the text. The last icon on the right brings up the same list of templates that you might have created for your events.
![]()
![]()
That might create a problem. The template feature is pretty simple. You can create as many templates as you want but you can’t categorize them. Start creating long lists of templates for your emails and for your calendar events, you might struggle to find the templates you need quickly enough for the feature to be worthwhile.
How To Add Birthdays To Office 365 Calendar
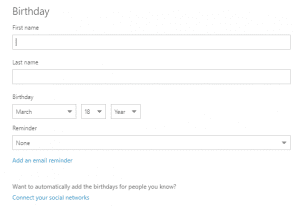
The third type of content that you can add to your Office 365 Calendar might well be the most important… at least for other people. You can add people’s birthdays. The last option in the dropdown menu under New is Birthday event. Click it and you’ll be able to enter first and last names, the date, and choose a time to receive a reminder. (If you need to buy a present, you might want to make that reminder good and long.) You can also write your own reminder text to yourself.

Office 365 Calendar also lets you connect your calendar to your social networks. That’s always a bad idea. You might have hundreds and even thousands of contacts in your social media accounts. You don’t want all of their birthdays in your calendar. Nor are you likely to want to give Microsoft that much information about who you know.
Fortunately, this part of the calendar’s functionality isn’t well done. The list of social media platforms that you can use excludes the biggest sites and includes some you might never have heard of.
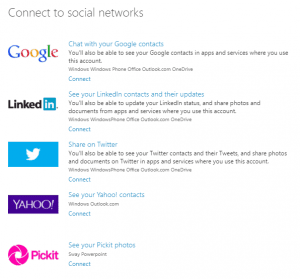
Google and LinkedIn are there, and so are Twitter and Yahoo. But there’s no Facebook, and if anyone has a contact on Pickit, that contact is likely to be feeling pretty lonely.
This feature has a few other quirks that need to be borne in mind as you use it. The calendar is connected to your Outlook contact list so any information you add to the calendar about a contact is automatically added to your list. Add the birthday of a new contact and that contact can appear in your list. You can add a birthday to your contact list and that birthday could appear in your calendar. Add a birthday to your calendar and if the contact is already in your contact list, Outlook will add their birthday data to your contact list. It’s all closely integrated.
How To Create An Event On The Outlook App
If you want to create an event while you’re on the move, you’ll have to use the Outlook app… and here you’ll have fewer options. Events are the only thing you can add to the app. You can’t add birthdays, except as events, and if you want to send an email, you’ll need to move from the calendar back to Outlook.
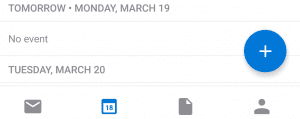
You can bring up the event form either by clicking on an empty space in the calendar or by clicking the plus icon in the bottom right corner.

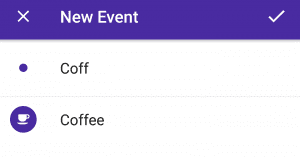
The options here are pretty clear. The title for the event will be the text that you and others with the right permission level will see in the calendar. The Outlook app will even suggest some little icons to go with the type of event you’re creating. Starting typing “meeting,” for example, and it will offer an autocomplete with an icon of a couple of speech bubbles. Try typing “coffee” and you get a little coffee cup.

Adding people to the event works in the same way, though Outlook will offer suggestions from your contact list. You can then mark the event as lasting all day and you can set the duration. You can do that by either dragging edit marks over a space in your schedule, or by tapping the appropriate numbers.
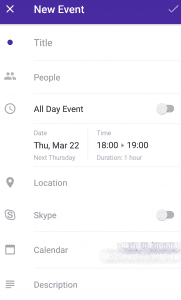
The location can be temperamental. Start entering a popular location, such as an airport, and the calendar will suggest the location. Tap the suggestion and it will autocomplete, even adding a small map. But try entering an address, and the calendar will call it a “custom location” and won’t even bother looking it up on a map. It feels like an easy miss.
Press the Skype switch and the title at the top of the page becomes “Skype call” complete with a little Skype icon. Finally, you can choose a calendar—a schedule—on which to place the event, write a description and set an alert.
Once the event is on the calendar, you can just tap it to make changes, though the first option will only let you change the alert time. You’ll need to press the edit button in the top right corner to bring the entire form back.
How To Add An Event With Cortana
Apple has Siri, Google has its Assistant, Amazon has Alexa, and Microsoft has… you might have to look that up. It’s Cortana. You can find it on Surface, Microsoft’s tablet and on Microsoft’s Lumia phones. It also comes embedded in Windows 10, and you can install it on Android and iOS devices.
Although it’s less well known than other digital assistants, Cortana can be useful, especially on Windows PCs. Power it up and you can ask it for jokes and weather forecasts, and you can also use it to add events to your Outlook Calendar.
Ask it to “schedule a meeting” and tell it where and when, and the assistant will get to work. It will even ask you for any details you forget to include, such as the title of the event. It’s not entirely why you might want to do that on a PC if you can just as easily use the keyboard but if you’d rather use your voice, it’s an option.
On mobile devices, the challenge is a little bigger. Android and iOS devices will try to add the event to their default calendars so you’ll need to make sure that Cortana is talking to your Outlook calendar. It’s another step for you to take.
What You Can’t Do In Office 365 Calendar
Microsoft has done a good at keeping its Office 365 Calendar simple. But the price of that simplicity is a loss of some features that make using other calendars such a treat. Users of Google’s platform, for example, can select a setting in Google Calendar that allows Google to scan their emails for events that could be included in the calendar. The platform then creates and posts events automatically. So if you had ordered a plane ticket from a website, the information in the email confirmation would appear in the calendar.
For users who aren’t aware that a setting in in their calendars allows that cross-posting to take place, the experience can feel a little creepy. But there’s no doubt that it’s also useful, saving time spent copying details from one application to another.
Even though Office 365 Calendar is embedded into Outlook, Microsoft doesn’t offer the same service. If you’re using the Outlook app, you can drag an email to the calendar and create a new event that contains the email’s text. After you’ve created an event, you can choose Insert Item to bring across an email message. But both of those require action. They’re not automatic.
You also can’t use Bing to create an event. Write “Schedule a meeting for next Friday” into Google.com, and the site will ask if you want to add that information to your Google calendar. Click to confirm and Google Calendar will add it automatically. Even though Bing and Office 365 Calendar come from the same company, Microsoft’s search engine doesn’t have the same degree of interaction. It’s not a big loss.
Using The Calendar In Your Subscription-Based Office 365
Until now, we’ve largely been looking at the free versions of Office 365 Calendar. You don’t need to pay to use the Web version of Office 365 Calendar and the app that you can download onto your mobiles devices is free too.
But Microsoft doesn’t have the same business model as Google or Apple. It sells software so those free versions are just tasters. The real deal is in the subscription version of Office where the calendar is embedded in Outlook, Microsoft’s email software. (Buy Office as a one-time purchase and it won’t include Outlook.)
For most home users, Outlook and its calendar are probably overkill. Many of the features that are absent from the free versions and present in the subscription versions are also available for free from Google. The search company’s free calendar will let you create multiple calendars and share schedules at least as easily as the calendar in Outlook that costs seventy bucks a year. But Microsoft does do all of those tasks in a more professional way and with more options. And while you may not need those features, you are likely to need Word and Powerpoint—and if you’re paying for a subscription, you’ll get Outlook, and its function-rich calendar, with it.
This is how to make the most of that calendar.
Understanding The Calendar’s Ribbons
Outlook and its calendar match the rest of Office suite by arranging the functions in a series of ribbons that appear beneath a short list of tabs: File, Home, Send/Receive, Folder, View, and Search.
The File tab relates to your Outlook mail settings. When you’re using Calendar, you can ignore it.
Home is likely to be where you spend most of your time. This is where you can create new content to place in your calendar, and it’s also where you can change how you view your calendar. (The View tab does that too, but you can expect to do it more from the Home Tab.)


Send/Receive is a little more complex. This combines the functions of Outlook’s email software with some of the functions of the calendar. It allows you to download folders from your email addresses. Folders are .pst files that might contain messages. When you’re using the calendar, you’re going to be using them to download appointments that other people have sent you or tasks that you might have created on a different app.


The use of folders here is confusing. You can also organize your emails in Outlook into folders, and the calendar has a tab called Folder which serves a third function. This where you can create and open additional calendars.


Finally, the view tab lets you change the layout of the calendar.


Creating Appointments, Meetings And More
The free versions of Outlook focus on letting you create events and share calendars. The subscription-based Office 365 does the same thing. It just adds a bunch more features and makes the whole process a great deal more complex. So while the free Calendar web page lets users create calendar events, email messages and birthday events, the Outlook program distinguishes between appointments, meetings and more.
Appointments are events that you create for yourself.


You’ll be able to enter a subject and a location, start and end times or indicate that the event is lasting all day, and you can write a large block of text. You can copy the event you’re creating in your main calendar and by pressing the button marked “Calendar,” you can bring up the calendar to check your schedule. Pressing “Scheduling” does much the same thing but brings up your schedule in the window of the event form.
Calendar works with OneNote—or at least it tries to persuade people to combine their Office 365 Calendar activities with OneNote. Clicking the Meeting Notes button will let you bring in notes from OneNote or send notes to OneNote.
Note that this button refers to a meeting, not an appointment. If you press the next button to Invite Attendees, your appointment becomes a “meeting” with more than one person. The remaining options are fairly clear. You can show anyone who shares your calendar your availability status during the periods of the appointment, set a time to give you a reminder, set a recurring schedule for a regular event, change the time zones, and also add a little icon that indicates the priority of the task.
The remaining ribbons let you format any text that you include in the event, and attach files, business cards, or signatures.
Meetings are so similar to appointments that you wonder why Microsoft decided to separate the two. They’re little more than appointments with more than one person participating.


In addition to filling in the subject, time and place, you can also include a recipient so that you can invite someone else to join you. An Attendees block on the Meeting ribbon lets you issue a cancellation, browse your address book for people to invite, check the names and email addresses of people you have included, and allow people to indicate whether or not they’re attending, and to suggest alternative times.
Appointments (which are really events) and meetings (which are events with other people) are the two main kinds of events you’re likely to be adding to your Office 365 Calendar. But Outlook offers even more options. Click the New Items button under the Home tab and in addition to creating new appointments and meetings, you’ll also be able to write an email message and add a new contact to your address book.
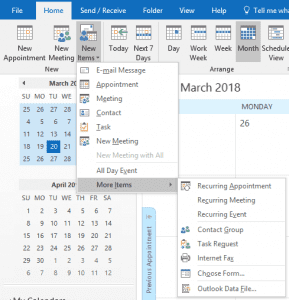

More interestingly, you can also create a new Task.
This is a feature that should probably have greater prominence. As always, you can include a subject, a time, and a reminder. But you can also indicate a percentage of a task to complete. So if you were working on a project that would take ten days to complete, you could set the % complete feature to 10 percent and use the Recurrence button to create ten tasks on ten different days. You can also assign a task to someone from your contact list, and you can create an email message about the status of the task. More usefully, you can create different colors and categories for each of the tasks you create, and you can add a little flag to tell you to do something about this task at some point in the future.


There’s a bunch of other items that you can add to the calendar, including recurring events, requests of a task from someone else and you can even send a fax over the Internet as though the nineties never ended. Mostly you can expect to be creating appointments, setting meetings and occasionally adding tasks.
Creating And Sharing Additional Calendars Office 365 Calendar
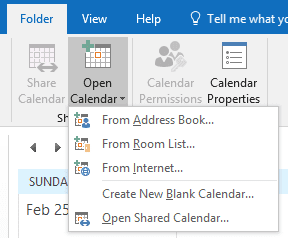
Life would be easier if the Folder tab was called “New Calendar” or something equally clear. But it isn’t so you’ll just need to remember that Facebook likes to call things “folders” even when they don’t really act like folders, and that this is where you come to create additional calendars. Where the “folder” does come in useful is when you come to place the data for that extra calendar. For most users, this is probably a feature too far but bear in mind that when you hit that New Calendar button, you’ll need to pick a place to put the data.
The location matters because you can Open a Calendar that you or someone else has created and placed in the Address Book; in a Room List (so you can see the availability of that room); or from the Internet.

Sharing Calendars From Outlook
Outlook makes things complicated. You have three ways of sharing a calendar from Microsoft’s email software.
The first is simply to click E-mail Calendar from the Home ribbon which sends someone a basic view of your schedule. Not only can you choose a calendar to share, you can also choose a date range. So rather than letting someone see your entire calendar you can show them a particular day or week, giving someone the chance to schedule a meeting when you have a spare moment.
The recipient receives both a snapshot of your schedule and a .ics file that they can use to import your calendar into their own.
The second approach is to hit Share Calendar, the next button in the Share section of the Home tab. You’ll then need to choose the level of detail that you’re sharing with the recipient. There are three options. Availability only reveals only whether you’re free, busy or tentatively available. Limited details will show what you’re doing and who you’re doing it with. Full details lets recipients see exactly what you can see.
But the options don’t stop there. Once you’ve set a privacy level, you can also set a permission level. There are no fewer than nine different levels, including a custom level that lets you create even more options by defining the permissions yourself:
| Owner | Can create, modify, read and delete all items and files in an Outlook calendar folder. They can also create subfolders and change permission levels.
|
| Publishing editor | Can do all of things that an owner can do except change permissions.
|
| Editor | Can create, modify, read and delete all items and files in an Outlook calendar folder but not create subfolders or change permission levels.
|
| Publishing author | Can create and read items and files, create subfolders in an Outlook calendar folder, but can only change and delete events and files that they create themselves.
|
| Author | Can do the same things as a publishing author but without being able to create subfolders.
|
| Contributor | Can create items and files but not the contents of folders.
|
| Reviewer | Can only read items and files.
|
| None | Without any permission, the recipient can’t open a folder or see any items or files. |
You can change those settings at any time, even after someone has started sharing your calendar, by clicking Home, then the Permissions tab. You’ll be able to adjust the permission level and change the individual permissions that make up that level.
And if your email account uses an Exchange server you’ll be able to click Home, then Publish Online and Publish to WebDAV. It’s an option that lets you place your calendar in a WebDAV server.
If all of that sounds complex… it is, and you’re unlikely to use it unless you’re working as a systems administrator. They’ll be the ones who set the permission levels; you’ll just need to understand why you can’t change the files or alter the events.
Changing Your Calendar’s View
Where the paid version of Office 365 Calendar really comes into its own is in its viewing options. The calendar embedded in Outlook offers all sorts of ways to view events and schedules, and they’re often much more user-friendly than Outlook’s web app or even other calendars. Click more than one of the calendars at the bottom left of the screen, for example, and instead of seeing multiple kinds of events laid over the same calendar, you’ll see the different calendars side by side.
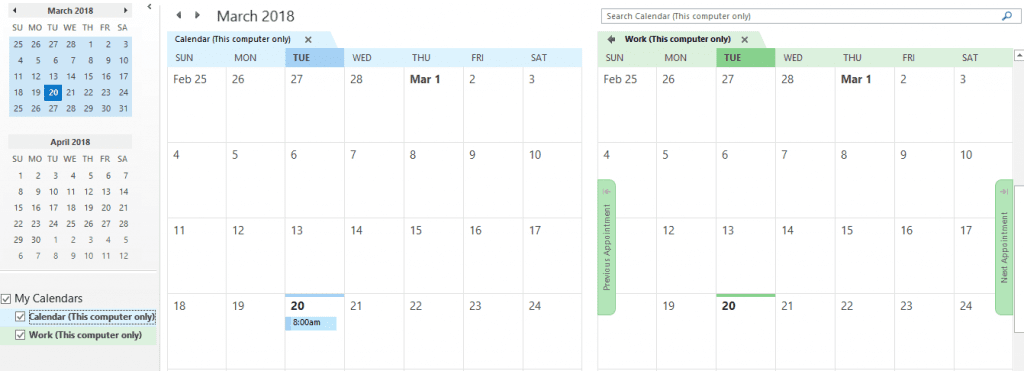

It’s a much more convenient way to compare schedules and look for open spaces, especially if one of those calendars has been shared by someone else.
In addition to looking at multiple calendars at the same time, you can also adjust the time views and timescales, and play a little with the layout of the page itself. The options for changing the appearance of the calendar are particularly flexible.
The calendar embedded in Outlook is powerful—and probably too powerful for most people’s needs. It’s a tool that’s more likely to be used in an office environment than by home users, and the use is more likely to managed by a professional administrator than by most employees. But if you do find yourself using it, you’ll be thankful for the flexibility, especially of the layout, even if you’re not crazy about the confusing use of folders.
Conclusion
Unlike many of Office 365 Calendar’s rivals, Microsoft’s calendar is a broad platform rather than a single tool. You can use it on mobile devices, and you can use it on the Web. Both of those options are available for free. Both of them are also intended to do no more than provide a glimpse of the detailed options available embedded in Office’s Outlook program. Google too has a more in-depth version of its calendar for corporate users. But it doesn’t push that version as heavily as Microsoft does. You can feel the difference. Both Google and Apple give users far more features and far greater functionality. All this without charging their customers or even expecting them to pay.
If you’re looking for a free calendar to use in 2023, you’ll probably find that Office’s free versions, both on the Web and in the App Stores, offer too little to be genuinely useful. Google Calendar’s association with Gmail is much smoother, and provides features as user-friendly as automatic event creation from emails. It feels far less confusing and far more inviting than Office 365 Calendar.
Outlook’s main sales point though is the way it can work with multiple calendars, and that’s a valuable advantage. For an administrative assistant who needs to co-ordinate the schedules of multiple executives, find open spaces, and make assets such as rooms available, the calendar embedded in Outlook is likely to be an essential tool. It offers scheduling options that are much easier than those of its rivals and while the ability to place calendars in different folders in different parts of a file tree is not very clear, for an integrated organization using a linked computer system, it’s a useful feature. Professional users can expect to find themselves digging deeply into Outlook’s features if they’re to get the most out of the calendar that comes with it.
More casual users will need to schedule time to get used to it.
Alternatives to Microsoft Office 365 Calendar
Calendar
Calendar is the new and upcoming calendar software. It will easily integrate with your other calendar software so that you don’t miss anything on your personal schedule or work schedule. You can schedule meetings easily and invite others to those meetings. Calendar can also send out automated emails and track responses. Calendar is trusted by over 80,000 businesses such as Salesforce, Adobe, Oracle, and Amazon. It has slick functionality that saves time.
Google Calendar
Google Calendar is another solid option for those looking for a free calendar software. With Google Calendar you can set event reminders, book slots for appointments, set meetings, and check on coworkers’ status and their calendars. It can connect with many other programs and systems, and provides a simple, easy-to-use software to coordinate and communicate with your team. However, there are some drawbacks as well, such as a lack of higher-level integrations, as well as a mediocre connection with iOS applications. Does not integrate with Office 365
Calendly
Calendly is another growing calendar software that allows you to send invitations to others with availability based on your calendar. They offer a free and premium version as well. One drawback of Calendly is that customer support is not as solid as many other programs. Their customer support is 100% via email, which can be extremely inconvenient and time-consuming. Additionally, some customers have had glitchy experiences where the app will run slow or even crash. Additionally, some find it hard to navigate through the settings.
Here are other best calendar apps that we’ve reviewed
Updated January 2023


John Rampton
John’s goal in life is to make people’s lives much more productive. Upping productivity allows us to spend more time doing the things we enjoy most. John was recently recognized by Entrepreneur Magazine as being one of the top marketers in the World. John is co-founder and CEO of Calendar.