Email comes in two forms. One form is a personal email account, usually obtained through applications and companies like Gmail and Yahoo. These companies let anyone receive and send an email. Registration is fast, and the service is bundled in with the platform’s accounts.
Those accounts also come with a calendar. That calendar can be used on both mobile and desktop devices. You can create events, add reminders, and layer on top of the calendar template different kinds of schedules such as school breaks and national holidays.
But the email address associated with that account will always be [email protected] or [email protected]. It’s a bit like renting a post office box instead of receiving letters at your home. The system works, but you have to go to the post office to collect your letters or check your schedule.
The post office also scans your letters and shows you ads related to the content of those messages. Each of those ads is a reminder that you’re not in a private space. That’s bad enough when you’re reading your email. It’s no better when you’re concerned about the privacy of your calendar.
For individuals, though, those services are usually good enough. We’re prepared to trust companies like Google and Apple and Yahoo to give us email and calendar services. And when they’re free, and the alternative is to own and manage our own servers. Businesses and institutions, though, have more significant demands. They often need to be able to create thousands of dedicated email addresses and calendars, link them together, and to maintain control over the servers.
One alternative to using Google or Yahoo’s servers to collect and access your emails is to use Microsoft’s servers. The company behind Windows runs Microsoft Exchange Servers for businesses and institutions. Like Microsoft Outlook and Gmail, the service provides email and calendar service. The service also gives users a lot more freedom. It gives one small group of users a lot more freedom because regular users are unlikely to notice the difference.
If you’re collecting your email or managing your calendar from a business account in 2020, there’s a good chance that you’re using Microsoft Exchange Calendar. You may not even know it. You’re still able to make appointments, see other people’s schedules, and receive invitations. You’re just doing it with a workplace or college email address.
For administrators, Microsoft Exchange provides both flexibility and control. In this guide, we’ll look at what Microsoft Exchange Calendar can do for you, and we’ll look at a few simple ways to get more out of it. We also have some Microsoft Office 365 Productivity Hacks for your digital calendar to apply in 2020.
What Can You Do With Microsoft Exchange Calendar?
Let’s start with the basics.
When you open your Microsoft Exchange Calendar, you’ll find a refreshingly familiar page. The IT team might have had to work hard to set up your Exchange Calendar behind the scenes. But the front end will look mostly the same as any calendar you’ll find in Microsoft Outlook. If you’ve ever used Microsoft Outlook to organize your emails, you’ll know your way around.
The most important field is the ribbon at the top of the page.

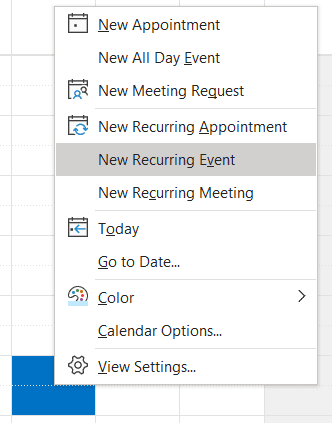
On the ribbon at the top is where you interact with your Exchange Calendar. The “New” section contains three elements.
Create a New Appointment on Microsoft Exchange Calendar
“New Appointment” lets you add an event to your calendar. If you were using Google Calendar or Apple Calendar, you wouldn’t have to do more than press a big “plus” button in a corner. But on Microsoft Exchange Calendar, things are a little more complicated.
When you press the “New Appointment” button, you’ll get a page that looks a lot like an email composition page. You can enter a subject, which is the title of the event, and a location. You can also set a start and end time, and enter any notes you might want to add.
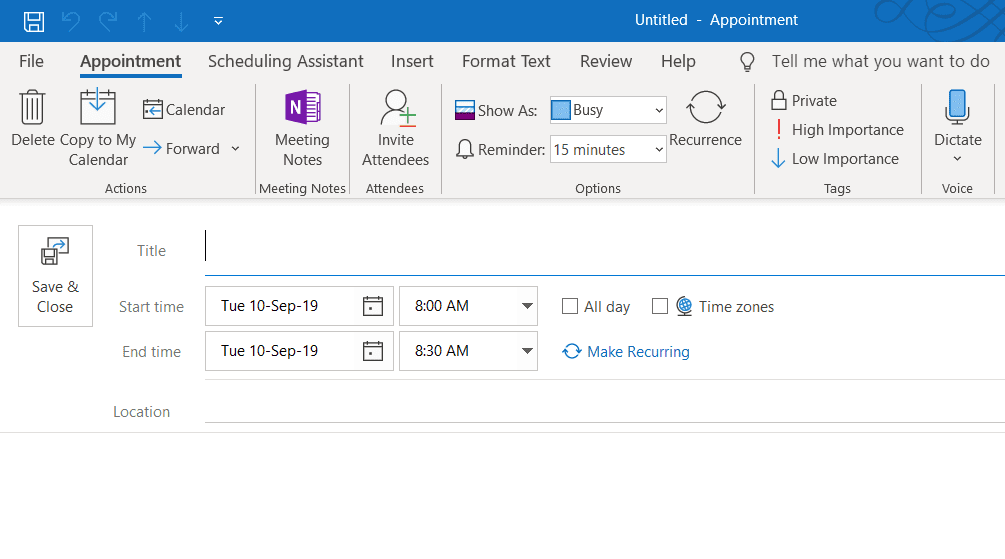
The ribbon at the top of the page lets you add more information to the event—or “appointment.” You can choose whether you appear to other people with access to your calendar in that period as “free,” “tentative,” “busy,” or “out of office.” You can adjust the time zones, and you can set the priority of the appointment. When you’re finished, select “Save and Close.” The appointment will be added to your calendar.
Set a New Meeting on Microsoft Calendar
“New Meeting” is a little more complicated but only because it combines the appointment with Address Book functionality. Above the subject line is a “To” line that allows you to invite members of your address book. You can also set the response options that invitees can use, and you can browse your address book to find more people to invite.
One great feature here is the ability to book a room for your meeting. Your IT staff will have to add room options to your Microsoft Exchange Calendar. The calendar will also compare the schedule of each attendee and suggest times that are available to everyone. That can save a lot of time.
Add a New Item to Microsoft Exchange Calendar
“New Item” can take you out of the calendar. In addition to providing another way of setting an appointment or a meeting, it lets you create a new email message; add a contact, or list a task.

How to See Your Exchange Calendar
The next two sections in the ribbon are both about the way you see the calendar. “Go-To” contains a couple of shortcuts. You can go to “Today,” or you can go to the “Next 7 Days.” It’s useful when you’re browsing through your schedule and want to head back to the current day or week quickly.
There is also an additional feature in this section, which is very useful. Click the unfold icon in the bottom right corner of the “Go-To” section, and you’ll receive a callout box. The box lets you enter a date to head to straight away. You can also decide which of your calendars to use to see that day.
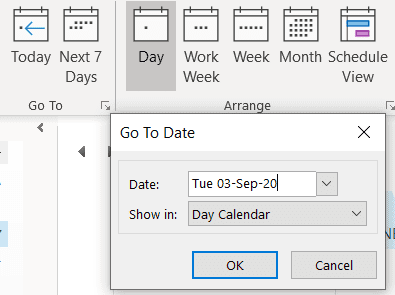
That’s very useful if you need to check what’s happening on a particular day and don’t want to keep scrolling through the calendar until you get there.
The next section lets you arrange how you see your calendar. Microsoft can show you a single day, a workweek, a seven-day week, a month, or a list of the events in your schedule. That’s all very straightforward. Pick the layout you like the most.
What makes this section complex is again, that unfold button in the lower right corner. Click that button, and you’ll get a page full of settings.
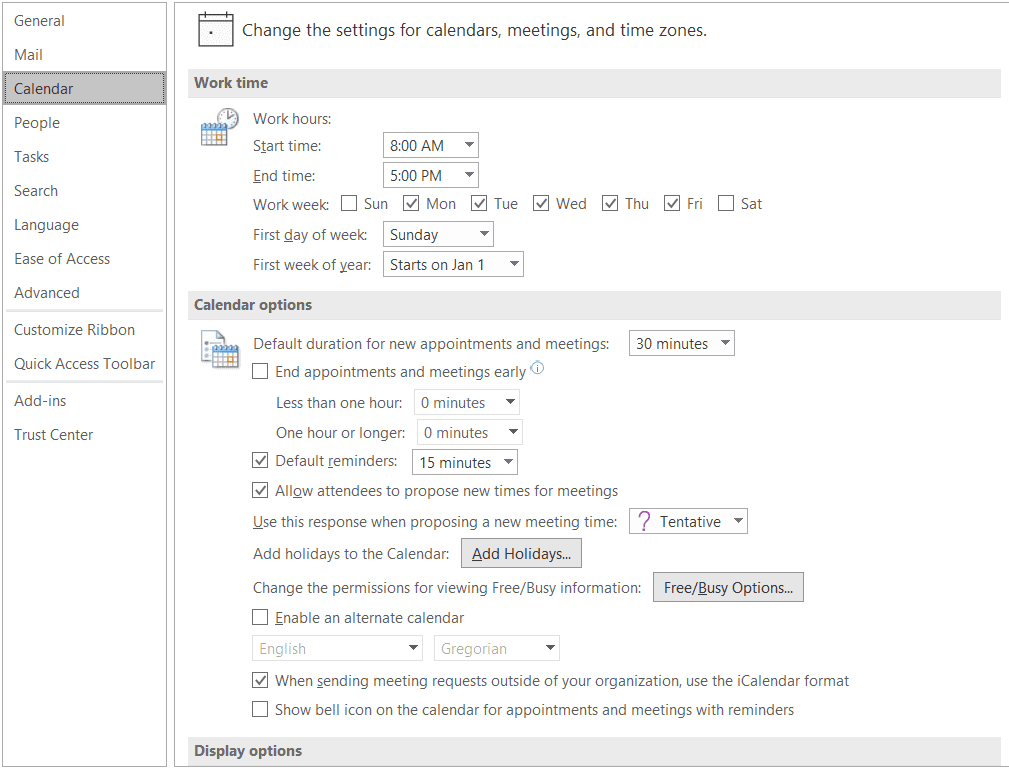
There are a lot of options here, and they don’t all apply to the Microsoft Exchange Calendar. There are also options for the email platform, for people, for tasks, and search. The Calendar section, though, is packed with checkboxes and menus.
You can set the default duration of new appointments and meetings; fix the times for reminders, and allow attendees to suggest new times. You can add holidays, change permission viewing options, and even add a little bell icon to appointments and meetings with reminders.
But that’s not all. Scroll down, and you can also change the display options.
Setting up your display options is more fun than it sounds. You can select the calendar’s default color, for example. While you won’t be able to pick from an ample palette of colors, you will be able to choose from nine different tones. You can also add week numbers to the month view, and decide how many calendars open on the screen changes the perspective from vertical to horizontal.
The time zones section below is useful, too, in that it allows you to place up to three different time zones on the same calendar. Showing tips from the scheduling assistant in a ScreenTip is helpful when you’re trying to find times that work with other people. Showing the weather on the calendar, though, is probably a luxury you can skip if your calendar data is getting a little too full.
But there is one option here that is worth paying attention to. Under “Automatically accept or decline,” you can choose to accept meeting requests and remove canceled meetings automatically; automatically decline meeting requests that clash with existing appointments or meetings; and automatically decline recurring meeting requests.
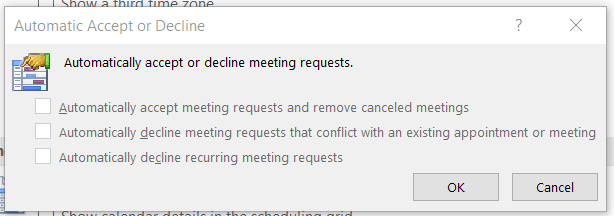
You need to be careful here. Accepting all meeting requests would clearly be dangerous. There may be some events you don’t want to attend. Automatically declining conflicting meeting requests is tempting. If the calendar can see that you can’t attend an event, it should be able to reject it. You might also want to accept some recurring meeting requests, such as a weekly sales meeting or a monthly planning meeting.
One problem that has arisen occasionally with Microsoft Exchange Calendar—as well as other calendars is spam. Spammers have been known to send invitations containing phishing links. If you automatically respond to requests, you’ll be alerting spammers that your email address is active. That could bring you even more spam.
Automatically reject invitations that clash with calendar events, but if you find that spammers are targeting you, turn this feature off.
Managing Multiple Exchange Calendars
The next section in Microsoft Exchange Calendar’s home ribbon is all about managing calendars. The home ribbon is another difference between the multiple schedules available on a Microsoft Exchange Calendar and the handful that you might be expected to use on a personal calendar. Here is some extra information about pros and cons of using multiple planners and calendars. Nowadays, we don’t have much choice — but these are the things to be aware of.
Select “Open Calendar,” and you’ll be offered no fewer than five different places from which you can open that calendar.
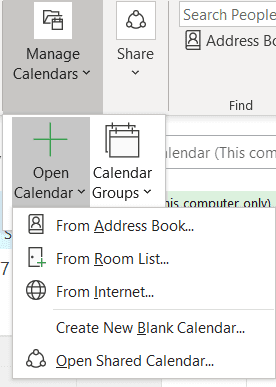
You can pull a calendar from one of the contacts in your address book. You can check the availability and the events taking place in the rooms associated with the account. Some calendars, such as national holidays and team schedules, are available on the Internet. You can download them and view them. If someone has shared calendars with you, you can also choose one of those calendars to open. And you can create a new blank calendar.
That can sound somewhat confusing—and it’s about to get worse. The next button is about calendar groups. You can create a new calendar group on the folder pane, and you can save all the calendars currently displayed in the folder pane as a new calendar group.
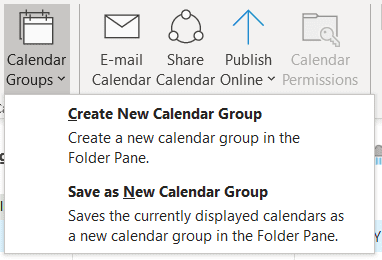
What does that all mean? One of the benefits of Microsoft Outlook Calendar is the ability to place multiple calendars side by side on the same screen. An administration manager at a large corporation could open the four different corporate calendars on the exchange network that belong to the heads of four various departments. She would be able to enter events into each of those calendars and look for a time that was available to all of them.
Instead of opening each of those calendars individually, she could save them as a group. The calendars, then, open altogether.
It’s worth noting that Microsoft is assuming that you’re going to have access to lots of different calendars. Here is some information about Microsoft also expects you’re going to be busy comparing one schedule with another. In practice, few users are likely to need that much control over multiple schedules.
But you might want to share calendars, which is what the next section is all about.
How to Share Your Microsoft Exchange Calendar
You’ve got three options to share your calendar.
Email Your Calendar
The first is to email the calendar. That sounds simple enough. Click the button, and you should be able to email your calendar to someone else. In practice, it gets a little more complicated. And, yes, you can learn to manage your emails better.
Together with the email, you also get up a pop-up that asks what kind of information you want to include about your calendar. First, you’ll have to choose the calendar you want to send. You can send any of the calendars that you’ve created.
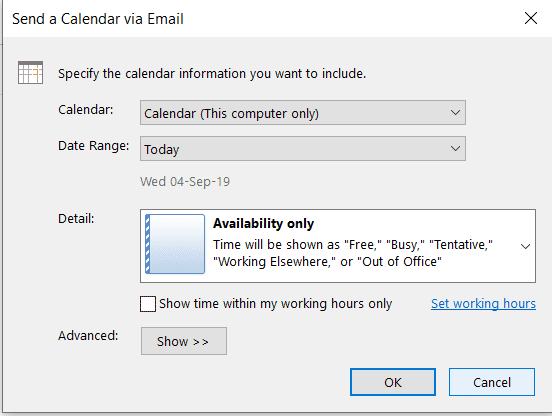
More interesting is that you can also select a date range. The default is to send your current day to your recipient, but you can also select a week, a month, the whole calendar, or any period you wish. That helps to retain your privacy. If you’re trying to arrange an event with someone or you need someone to see your schedule, you don’t have to send them your entire calendar. Merely send them the appropriate week.
You can also choose how much information the recipient sees on your schedule. The default is that booked times only appear as “busy” or “out of office.” You can also choose to show your availability and the subjects of the events. And you can show the person who’s receiving your calendar everything you’re doing.
Another neat feature here is the ability only to show your working hours. Again, this is Microsoft understanding that the people who use Exchange calendars do so because they need those calendars for work. There’s no reason that a colleague needs to know about your anniversary dinner or your school meeting. You can even adjust the working hours from within the pop-up box.
A strange feature, though, is a section marked “Advanced.” By default, the options here are hidden. When you click “Show,” you’ll receive a long list of complex operations that you don’t want to get wrong.
Actually, you only get three options. You can include the details of any items marked “private,” and you can also add attachments in the calendar events. Finally, you can set the email layout according to your daily schedule or as a list of events. While you’ll probably want to keep private information private, the other options aren’t that advanced.
When you’re done, press “OK” and the calendar will be embedded into your email. It will be attached as a (.ics) file while the body of the email will show the calendar itself, complete with a key for each of the days that have an event.
You’ll need to enter the recipient’s email address and change the subject. (The default will be “your email address Calendar,” which isn’t too exciting.)
Share Your Calendar
Emailing your Microsoft Exchange Calendar is a good option if you want to show a few people which dates you have available within a narrow range. But you can also share your calendar with people. Keep in mind that there are ineffective ways to share your calendars, too.
Select the “Share Calendar” button and choose the calendar you want to share. Make sure that you’re only sharing the calendar you wish to other people to see. One of the benefits of Microsoft Exchange Calendar is that you can create multiple calendars for different parts of your life. Make sure that you’re sharing the right one.
You’ll be offered a Calendar Properties dialog box. Click “Add,” then add the user or users you want to share your calendar with. You’ll be able to search for people in your contact list or type in their email address.
The next step is to set the level of privacy you wish to share. Again, you’ll be able to let people see everything in your calendar. Block out times showing you’re busy. You only need a small amount of information, such as the titles and locations of your events. You’ll also be able to let the person you’re sharing with edit your event contents.
After you press “OK,” your recipient will receive an email inviting them to share your calendar. They’ll have to press “Accept” to add your calendar events to their calendar. It’s a great option when it works, but it doesn’t always work. If the email address is invalid, then the share won’t work. Nor will it work if the email address belongs to someone who isn’t part of your organization.
It’s also important to know how to stop sharing your calendar. If the person you’re sharing with leaves the organization, terminate their access. If you don’t want them to see what you’re doing anymore, then you’ll wish to rescind their access. Right-click on the calendar you’re sharing to bring up the menu. Press “Share,” then choose “Calendar Permissions.”
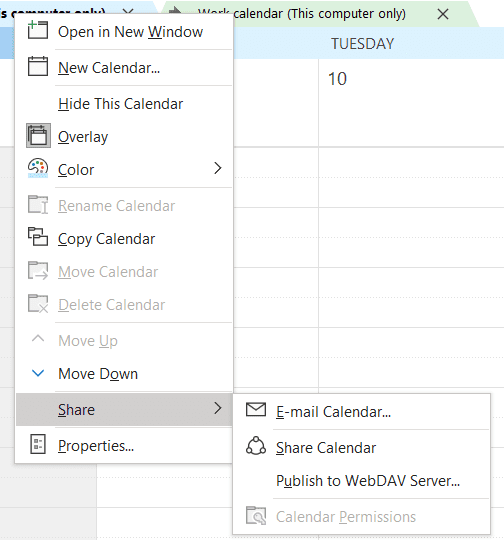
Choose the user’s name, select “Remove,” followed by “OK.” Your calendar will no longer be shared with that person.
Publish Your Calendar
Sharing your Microsoft Exchange Calendar is the most straightforward way to let other people keep up with what you’re doing. But there is a more exciting way to show your events: you can publish your calendar online. Microsoft lets you put your calendar on a WebDav server. Again, you’ll have to decide how to show your availability and the period you want to share. But now you’ll also have to add a location—a URL—to which you can put the calendar.
The advantage here is that you’ll then be able to give other people a URL where they can see your schedule. You don’t have to share it all the time. It’s a useful way to make your Microsoft Exchange Calendar available to customers and leads. You’ll want others to make appointments and bookings or publish the dates of your events.
A consultant, for example, could publish a schedule showing when they’re available for one-to-one meetings at a forthcoming conference. A sports team could enter all of their games into their Microsoft Exchange Calendar, then use the WebDav server to put it on the Web. It’s an option that provides a useful amount of flexibility.
Building an iCal Feed from Your Microsoft Exchange Calendar
The most common reason that you’ll want to share your calendar is to enable other people to see what you’re doing and when and where you’re doing it. But sometimes, you might want to share your calendar details not with a person but with a piece of software such as a project management application.
Sharing with a piece of software for a project isn’t an option available to all users. Microsoft’s Exchange server comes in several different forms. If it is available on your Microsoft Exchange Calendar, this is what you need to do. Click the “Share” button and choose “Publish This Calendar.” Again, you’ll then need to set the permissions and the privacy levels for the calendar you’re sharing.
Even if you’re adding a work calendar to Slack, for example, you might still want to avoid telling people exactly where you are. Other people don’t need to know everything you’re doing. You’ll accomplish this by only sharing a particular period. When you’re finished with this process, you’ll get a subscription link that you can paste into the application you want to use.
The Address Book
The last part of the ribbon is the address book, which is straightforward enough but surprising to find on a calendar. It’s another reminder that while other calendar platforms are intended to help people keep track of their own schedules, Microsoft’s Calendar applications are built with collaboration in mind.
How to Sync Your Microsoft Exchange Calendar with other Calendars
A common challenge thrown up by Microsoft Exchange Calendar is that it might not be your only calendar. While your workplace will give you a professional email address and a platform to access it, together with a calendar, you’re also likely to have a Google Calendar. Perhaps you also have an Apple calendar on your iPhone. The fact that you’re using a Microsoft Exchange Calendar doesn’t mean that you can’t use those other services.
If you use all of those platforms for different purposes—perhaps the Microsoft Exchange for work, the Google calendar on your desktop, and the iPhone calendar as you’re roaming around. Now, you’ll want a way to bring all of your events together. The easiest option, of course, is to stop using the other calendars and instead to export them to Microsoft.
To Export Your Google Calendar to Your Microsoft Exchange Calendar
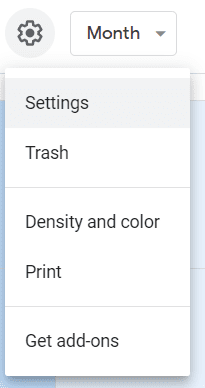
If you want to abandon your Google Calendar and add the events it already contains to your Microsoft Exchange Calendar; you’ll first need to export your Google details. Open calendar.google.com, and click the gear icon in the top right corner, and choose “Settings.”
At the bottom of the menu on the left, you’ll find “Import & export.” Select that option, and on the right, the screen will be divided into “Import” at the top, and “Export” at the bottom. The “Export” section shows a list of all of the calendars in your account. Press the “Export” button to download them together as a compressed .ical file.
Next, in your Microsoft Exchange Calendar, choose “File” then “Open & Export” from the menu on the left. You’ll then be given a choice between opening a calendar; opening an Outlook data file; importing and exporting files and settings, and opening a folder shared by another user.
Choose “Import/Export,” then select “Import an iCalendar (.ics) or vCalendar file (.vcs).” Find the file you’ve just downloaded from Google and upload it to your Microsoft Exchange Calendar.
You’ll now have added the events on your Google Calendar to your Microsoft Exchange Calendar, but the two calendars won’t be connected. If you add more events to your Gmail calendar, they won’t appear on your Microsoft Exchange Calendar. You’ll need to steer clear of Google’s tool to make sure you don’t miss any future events.
To Export Your iCloud Calendar to Your Microsoft Exchange Calendar
Apple, of course, has its own way of sharing calendar data. The company doesn’t play well with Microsoft. You have a couple of ways of bringing your iCloud Calendar data to your Microsoft Exchange Calendar, but neither is particularly intuitive.
The first is to open iCloud then click the share icon to the right of the calendar name.
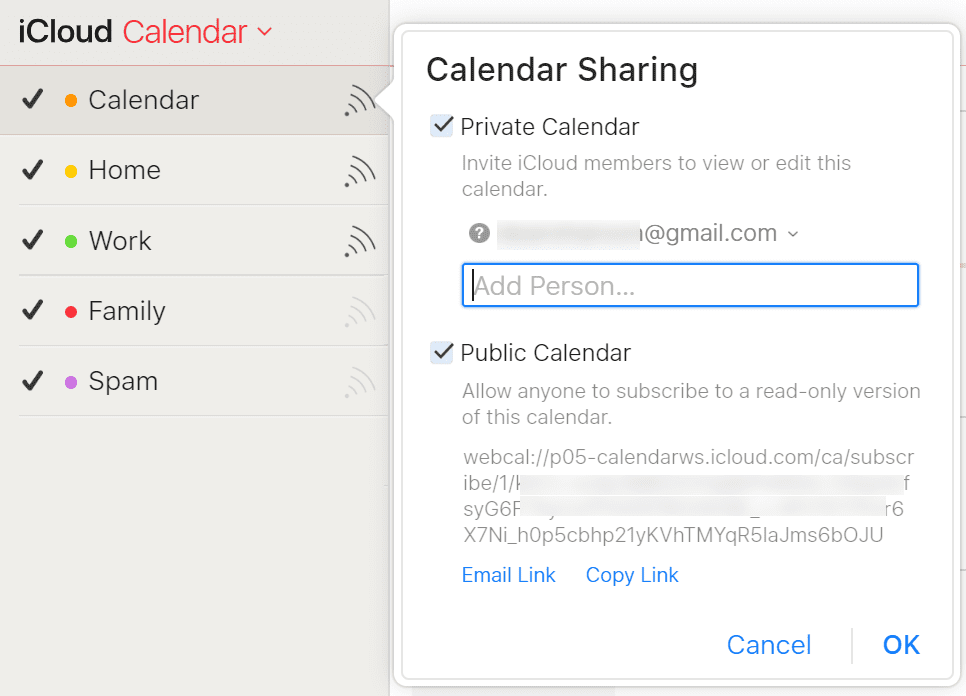
Check the box marked “Public Calendar” to receive a long, encrypted URL. You’ll be able to email that link or copy it. Neither will help you add it to your Microsoft Exchange Calendar.
Copy the link and paste it into your browser. Before pressing enter, delete the “.webcal” prefix and replace it with “https.”
Now when you press enter, instead of the calendar being displayed in the browser, you’ll be asked to download it as an iCal file.

Note that the default name of the file will be a long string of unintelligible letters and numbers. You should probably change that name to something like “Apple Calendar” so that you can find it easily.
Save the file then open your Microsoft Exchange Calendar.
Choose “File,” then “Open & Export,” and select the “Import/Export” button. Microsoft won’t actually show an option for importing a .iCal calendar, but you can choose “Import an iCalendar (.ics) or vCalendar (.vcs).”
Select “Next,” and the information on that iCloud calendar will be imported into your Microsoft Exchange Calendar.
Similar to importing your calendar from Gmail, the problem with this approach — apart from being fiddly — is that it’s static, and doesn’t sync the two calendars. As a result, any new additions made to the iCloud calendar won’t appear on the Microsoft Exchange Calendar, and vice versa.
There is an alternative approach, though.
Using iCloud for Windows to Sync Your Microsoft Exchange Calendar
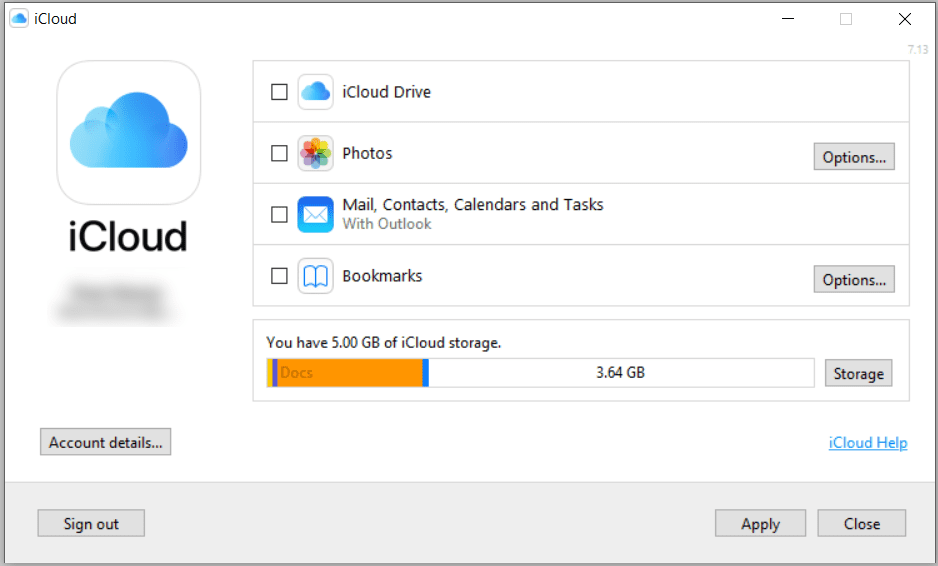
Apple does have a piece of software that syncs the iCloud Calendar with Outlook. You can find the iCloud for Windows app in the Microsoft Store as well as at Apple’s own site. Download and install the app, then check the box marked “Mail, Contacts, Calendars, and Tasks with Outlook.”
That should automatically bring any new events added to your iCloud calendar to Outlook. You can also sync your content with iCloud Drive, your photos, and your Internet Explorer bookmarks.
Setting up a Microsoft Exchange Calendar may take some effort, but using the calendar is very simple. It’s even accessible when you’re managing lots of schedules, sharing your calendars, and need to access lots of other people’s schedules. But that doesn’t mean that things won’t go wrong. Microsoft Exchange Calendar is a complex piece of software, and it does throw up many challenges that aren’t straightforward.
Getting More Out of Your Microsoft Exchange Calendar in 2020 and Beyond
The biggest challenge when using Microsoft Exchange Calendar will be managing multiple calendars. You’re likely to have access to several other people’s schedules. Lots of people will have access to your calendars, too, and there is a danger of losing control of your time. The very tool that’s supposed to enable you to keep track of your hours becomes too unwieldy to use.
There are a few things that you can do to keep things under control.
Make Time for Yourself
Look at your Microsoft Exchange Calendar, and the first times you’ll notice are the appointments and the events that are already on your schedule. They stand out. They have bright colors and are filled with text. You’re supposed to notice them. But all the time around those events is essential too.
That’s your time. It’s time that’s available, so two things can happen to it. Either you can enjoy it and make use of it any way you want. Or you can leave it open and let other people fill it with the events they wish to schedule. That’s always a risk when you’re sharing a calendar. You’re handing over control of your time to other people.
One way to take back control of that time is to pay close attention to those negative hours and block them off for yourself. For example, you might want to make sure that no one ever tries to book time your Microsoft Exchange Calendar during your lunch break.
Open your calendar and drag your cursor over the time you wish to block out — Right-Click that hour to bring up the function menu. To block out that time throughout your calendar, you’ll need to choose one of the recurring options.
Your calendar will let you create three different kinds of recurrences: a new recurring appointment; a new recurring event; and a new recurring meeting. Because you’re only blocking time for yourself, forget about the recurring meeting and choose a recurring event.
You’ll now have a ton of different options that you can use to create your own time. First, you’ll need to enter or change the start and end times of the duration of the event. (Be careful with that duration; it will adjust automatically, so you’ll need to make sure that you’re only blocking out the time you want.)
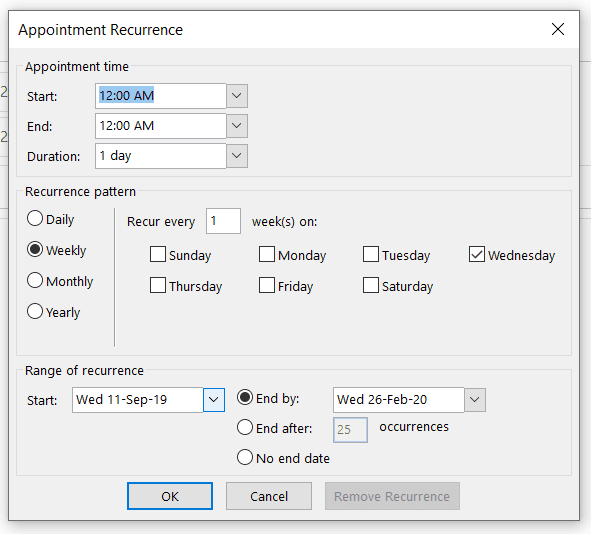
You can then set the recurrence pattern. A recurring pattern is where things get interesting. You can block out precisely the days and the hours you want to use, and state how long you want to keep those times blocked. So you could, for example, keep an hour lunch break free every day or preserve the third Thursday afternoon every month.
Before you finish, don’t forget your privacy settings.
You can set global privacy settings for your calendar, but you can also set specific privacy settings for individual events.
On the event creation ribbon is a button marked “Private.” Ignore that. If you’re sharing your calendar with other people who can read your events, they’ll still be able to see the contents of that event even if you’ve pushed that button. So if you’ve called the time that you’ve blocked out every week, “Me time!” then your co-workers will see that you’re not working at that time.
A better option is to pick one of the options under “Show As.” You can choose between “Free,” “Working Elsewhere,” “Tentative,” “Busy,” and “Out of Office.”
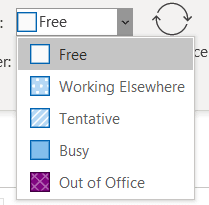
As long as you don’t choose “Free” or “Tentative,” you’ll be able to make your Microsoft Exchange Calendar look busy in those periods without telling people you’re catching up on your emails with your phone closed — or having a snooze.
Buffer Your Time
Buffering your time is a pretty simple technique but a hugely important one. If your calendar is going to be full from nine to five every day of the workweek, you’re going to be busy. You’re also going to be late. Meetings never finish precisely on time or start precisely on time. It’s a good idea to leave at least ten minutes between your appointments.
If some meetings run over, you won’t immediately push the rest of the day late. And if they do start and finish on time, you’ll be able to take short breaks between your meetings—or have the time to run from one meeting room to another.
One way to create that buffer time is to make sure that each event either starts ten minutes after the hour or finishes ten minutes before the hour.
But there is another way.
Right-click on the calendar icon in the bottom left corner and select “Options.”
Under “Calendar options,” check the box marked “End appointments and meetings early.” The default options are zero minutes, five minutes, eight minutes, and ten minutes. But you can also enter any amount you wish.
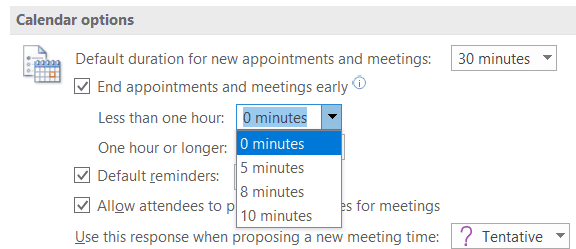
Select a period, press “OK,” and your schedule will start to look a lot easier.
Schedule Reminders
The events listed on a personal calendar are likely to be things like birthdays and parties, events that require little preparation. But the events listed on a Microsoft Exchange Calendar will be a lot more critical. A mess-up on this calendar has greater monetary consequences for your company. They might include a pitch meeting or a sales meeting, a conference talk, or a product launch date.
Those events do require preparation. You’ll have milestones to meet before the event. You might need to prepare a pitch deck, get feedback for your talk — and make sure that the product is working the way it should.
The Options table does let you set a default notification for your events and appointments, but it only enables you to set one. If you want to set a series of reminders that pop up as the deadline approaches, you’ll need to arrange all but one manually.
Create your deadline event and set the reminder. Then at the same time that you create that event, go back through the calendar and enter your milestones, complete with reminders. Having to create and record milestones and other information is one solution that Microsoft Exchange Calendar doesn’t provide automatically, but it is one you should use for long-term appointments.
Microsoft Exchange Calendar Conclusion
Microsoft Exchange Calendar is a business and college tool that is a must-have in 2020. It’s a place where multiple calendars are shared, which means that users have to pay special attention to privacy. Always make sure that you know what kind of events are appearing on your Microsoft Exchange Calendar—and who can see them.
Updated January 2020
John Rampton
John’s goal in life is to make people’s lives much more productive. Upping productivity allows us to spend more time doing the things we enjoy most. John was recently recognized by Entrepreneur Magazine as being one of the top marketers in the World. John is co-founder of Calendar.