In general, online calendars can help us manage our time more effectively since most successful people use their calendars to schedule all their meetings, tasks, and events. Despite this, even solid tools such as Google Calendar haven’t seen much innovation in recent years. If you want extra features and an easy-to-use interface, you can use Cron calendar instead.
What is Cron Calendar?
Cron Calendar is a well-designed calendar app for Mac and Windows that features time zone features, meeting tools, and pleasantly-sounding notifications. With Cron, you can explore and use a wide variety of features daily. For example,
- Recurring events can be created and edited.
- In calendar grid density and resize, you can adjust spacing.
- You can switch between different time zones and add the time zone to the calendar.
- You can categorize your events by color-coding them.
- The number of days you can see on the screen can be adjusted.
“Time isn’t renewable,” Cron founder Raphael Schaad told Product Hunt. His team and he are obsessed with making YC-backed Cron easy to use and easy on the eyes. The product has been upgraded to anticipate actions before you click. You can now see your coworkers’ time zones, block off time, and share meeting times by hovering over them on your own calendar.
In June 2022, Notion acquired Cron, which works with Google Workspace and Gmail. During the 2021 Golden Kitty Awards, Cron users voted it the best productivity app.
Getting Started with Cron Calendar
Currently, Cron is in beta, so accessing it requires a request.
Visit cron.com, enter your email address, and click on the “request access” button to receive an invitation via email. The process may take 3-5 days to receive a unique link to access the Cron app.
To set up Cron, you’ll need to “Accept Invitation” in your invite email. You’ll then have to download Cron at cron.com/download. Your Cron account can be accessed once you’ve created one.
After you’ve downloaded the app, you connect it to your existing calendar, like Google Calendar. Once all the required data is set up, you’re good to go.
Your Cron Calendar is now ready for scheduling tasks and meetings. What makes this app so unique? It syncs automatically with your Google Calendar.
All of your tasks will be auto-synchronized in your Google Calendar if you want to view your calendar on your mobile device. You can even see everything you did with your Cron Calendar simply by opening your Google Calendar.
Cron Calendar is still in beta. As a result, they have yet to release the entire app. And, in order to compete with giants like Google Calendar, it’s free.
Google Sign-In to Cron
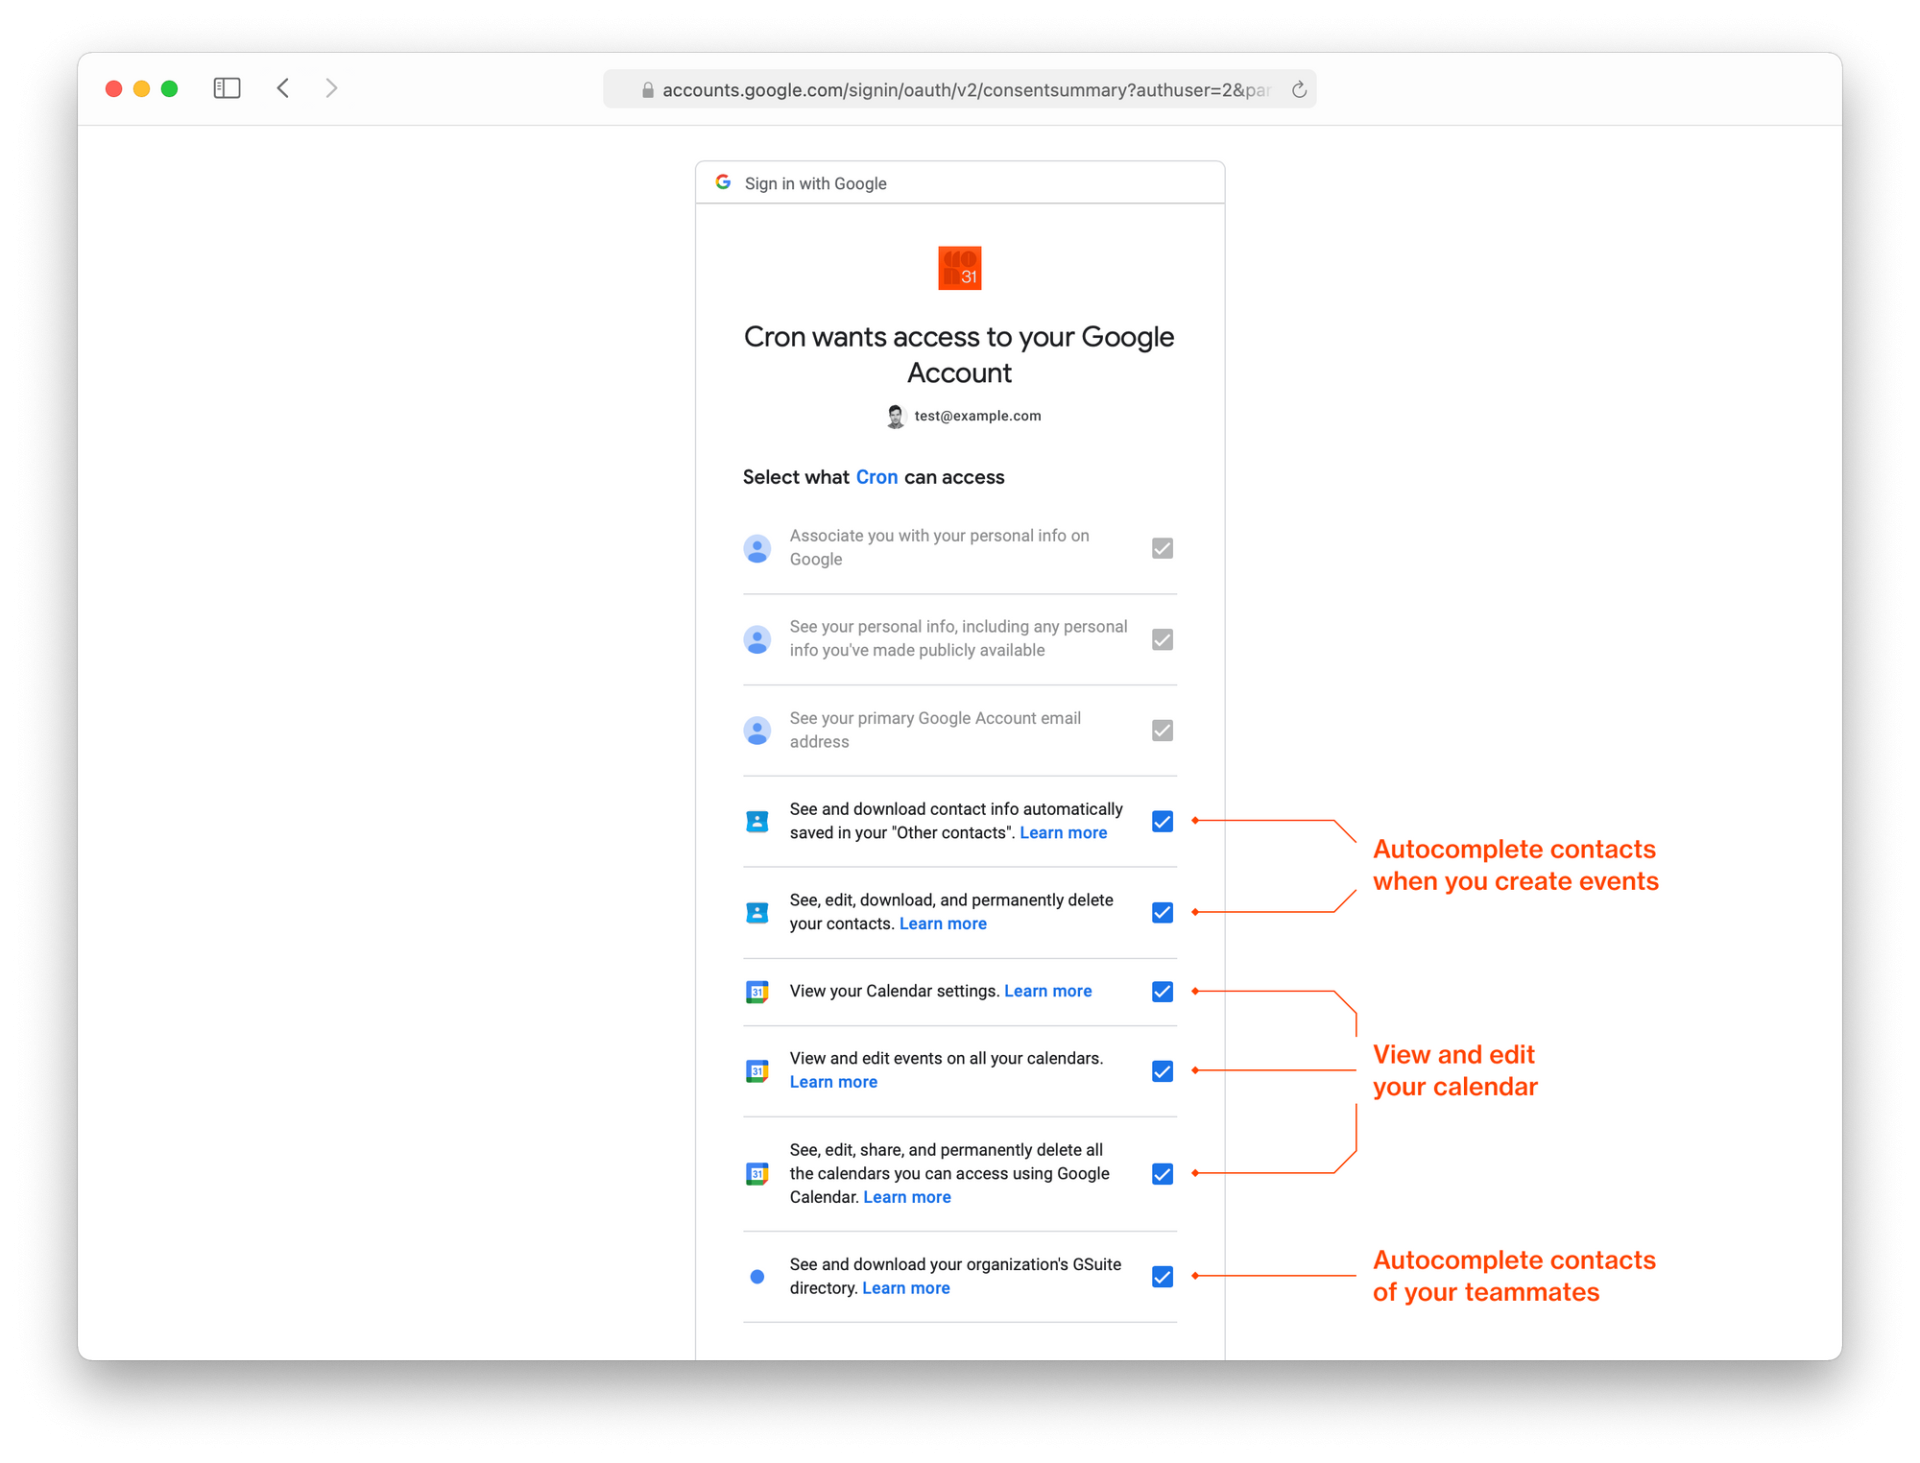
You must “Sign in with Google” to access Cron Calendar. To put your mind at ease, Cron never sees your Google password. To keep access requests to a minimum, Cron has carefully selected the scope of the requested access. In order to work with your calendar and contacts, you need the following permissions:


Cron Google Permission
When logging in for the first time, all boxes must be checked. Data can only be accessed on your behalf using the permissions. There is no reading, editing, or deleting of data without your consent. Google has verified that Cron does not access user data that is categorized as “restricted.”
Multiple Google accounts.
Using your existing Cron user account, you can connect additional Google Calendar accounts. After that, navigate to Settings > Integrations > Calendars and select “Connect” (or simply press ⌘ K > Add Google Calendar account).
In the left-hand Cron menu, you will find a list of connected accounts and their calendars. Accounts can be collapsed, reordered, and calendars within them can be reordered. Additionally, you can switch your primary account and disconnect your secondary account.
Cron Calendar Tips and Tricks
Calendars, events, and customization
In Cron, you can easily change calendars, hide and show calendars, edit calendar colors, and customize themes.
Set default calendar
- In the left-hand Cron menu, click on your calendar’s name.
- In: Settings > Calendars > Default calendar.
Show and hide calendar
- You can show or hide your desired calendar by clicking the eye icon in the Cron menu on the left.
- Press Ctrl/⌘ K > Show/hide calendarName. Using this method, you can quickly toggle multiple calendars on and off.
The left-hand Cron menu allows you to hide all but one calendar by holding Alt/Option while clicking the eye icon.
Change calendar
- Choose an event from your grid.
- In the context panel on the right, select a calendar.
Rename calendar
To change the name of a calendar, select it from the left-hand Cron menu. On the right, in the context panel, you can edit the Name field.
Reorder calendars and accounts
You can reorder calendars and accounts by dragging and dropping them on the left-hand Cron menu. You will see these changes reflected in the calendar dropdown on the right.
Subscribe to a new calendar
Subscribing to a new calendar from Cron is not yet possible. However, Cron will automatically add any calendar you subscribe to in Google Calendar.
Change calendar color
- Select a color in the Cron menu by right-clicking the calendar.
- Choose a color in the right-hand context panel by clicking on the calendar in the left-hand Cron menu.
Events
- Cron saves events automatically. You must click “Send invite” before adding participants to an event.
- Press ctrl + K to open the selected event in Google Calendar quickly.
- There may be some events that cannot be edited. For example, a Google API limitation may prevent changes in Cron if you do not have edit permissions. This will prevent you from editing certain fields. A button that links to Google Calendar may say “Edit original event” or “Propose new time.”
Collapse/expand all-day section
To collapse/expand the all-day section, either click on the two arrows in your zone column or press Ctrl/⌘ K > Collapse all-day section or Expand all-day section.
Change event color
- To change the color of the event, right-click it and select the desired color.
- When an event is selected, press Ctrl/⌘ K > Change color of selected event.
- Once you’ve selected an event, press E than C. To unfocus another field, press ESC before pressing E than C.
Event locations
Event locations can be easily added and removed.
- Choose an event from the list.
- Right-click the Location field and edit it.
Show/hide declined events
It is possible to hide/show declined events by selecting Ctrl/⌘ K > Show declined events or Hide declined events.
RSVP to events
- You can change your RSVP status by right-clicking on an event.
- In the right-hand context panel, select an event, then change your RSVP status.
Change free/busy and event privacy
In the event selection window:
- Right-click the context panel and select “Busy” or “Free.”
- Depending on your preference, select either “Default visibility,” “Public,” or “Private.”
Email participants
As soon as an event has been selected:
- To send an email to event participants, press E and then E.
- Select the event from the right-click menu and click “Email participant(s).”
- Go to the … option in the context panel’s top right corner and select “Email participants.”
Mark participant as optional
When an event is selected:
- Once a participant has been added, click on the … menu and click “Mark optional.”
Themes
In Cron, you can choose between light and dark modes by:
- Settings > Calendar > General > Theme.
- Press Ctrl/⌘ K > Set theme.
Username
Cron allows you to change your username. When sharing scheduling links, your username will appear: cron.com/yourUsername
- Settings > Account > Username.
Calendar Views
Views of the day, week, and month are easy to navigate. Using this feature, you can see what you’ve scheduled. Just click on your account at the top of the calendar side or use shortcuts.
Change the number of displayed days in your viewport
- On your grid, click the Today button or press T to get to Today.
- To go to the next week/month, press J.
- You can go back a week or a month by pressing K.
- Use ← and → to move your view left and right. Based on the number of days you display, you will move left (backward) or right (forward). Unlike pressing J and K, pressing ← and → does not guarantee that you will move forward exactly one week.
The number of days that are displayed in your viewport can be changed
- For day view, press D.
- Get a week view by pressing W.
- To see the month, press M.
- You can change the number of days by pressing 2 – 9.
- Press Ctrl/⌘ K > Set number of displayed days
- At the top of your Cron grid, click the view selector
- Just click on the ± button at the top right-hand corner of your grid. A search for “14” will display 14 days at once, for example.
Show/hide week numbers
Keeping track of your yearly progress is easy with weekly numbers.
- On the Cron grid, click View > Week numbers
- Open Settings > Calendar > General > Calendar view and toggle “Week numbers”
Show/hide weekends
- Hiding/showing weekends is as simple as hitting Ctrl/⌘ K > Show weekends or Hide weekends.
Resize your grid
You can change the density of your grid or remove empty spaces by:
- Zoom Hours in: shift ⌘ . (in Windows Shift Ctrl .)
- Zoom Hours out: shift ⌘ , (in Windows Shift Ctrl ,)
- Default Hour Size shift ⌘ 0 (in Windows Shift Ctrl 0)
You can also access it under View.
→ More on Cron’s changelog
Zoom the interface scale in/out
- Press Ctrl/⌘ + to zoom in.
- Tap Ctrl/⌘ – to zoom out.
- Press Ctrl/⌘ 0 to reset to default zoom.
You can also access it under View.
Time Zones
A survey from 2022 found that 56% of full-time jobs are “remote capable.” While some jobs require employees to work from a certain place, others do not. As such, employees and freelancers are now dispersed across the US and the globe.
Because of this, Cron hasn’t overlooked the importance of time zones. Adding multiple time zones, giving them custom labels, and traveling between them temporarily are all possible.
Primary time zone
The events on your grid are displayed according to the time zone in which you live. This column is on the right-hand side of the calendar grid. Whenever you display another time zone, it is referred to as a secondary time zone.
The Cron system will automatically ask you whether or not to change your primary time zone when you travel to a new location.
You can manually set your primary time zone by following these steps:
- Make sure the time zone is touching the calendar grid by moving it toward the right.
- Ctrl/⌘ K > Make time zone primary
- On the right-hand context panel, toggle “Primary time zone.”
Add a time zone
To show additional time zones, click the + button in the upper left corner of Cron or Ctrl/⌘ K > Show additional time zone.
Rename a time zone
On the right-hand context panel, select the “Label” field (pencil icon), then select a time zone in the top left.
Drag-and-drop a time zone
The time zone label can be dragged left or right by clicking and holding it. A time zone will become your primary time zone if it is dragged to the far-right position.
Travel to a time zone
Press Z or Ctrl/ ⌘ K > Travel to time zone to change your primary time zone temporarily. If you would like to add this time zone permanently, right-click on its label, e.g., “PST.”
Time zones in Google Calendar
Cron reads your primary time zone from Google Calendar when you set it up for the first time. Changes made in Cron (and vice versa) will not be reflected in Google Calendar after that.
Team Calendars and Features
With a click, you can view any teammate’s calendar. You no longer need to share your calendar or use “Meet with” to find out when someone is available.
Teammate calendars
- In the left-hand Cron menu, you can find the option “Show teammate calendar…” under the header’s ⋯ menu, or via ⌘ K. The hotkey P opens it directly.
- To dismiss the calendars of your teammates, press ESC.
- If you right-click on a teammate, you’ll be able to permanently add them to your left-hand Cron menu.
Drag and drop 1on1s
- To schedule a 1on1 meeting, drag a teammate onto your grid. Meeting title, time, and participant information are automatically filled in. Depending on your preferences, even conferencing will be added automatically.
Cron Calendar FAQs
1. How do I access Cron?
At cron.com, you can request early access. To receive an invitation right away, ask a friend who has Cron or search on Twitter for invites.
2. Where can I download Cron?
Visit cron.com/download to download. Again, an invite is required to create a Cron account. You can log into your Cron account after creating one.
3. How does Cron stand out from the competition?
- Availability sharing. You can mark holds on the grid, share slots, and schedule easily.
- Team overlays. You can quickly see your teammates’ calendars
- Time zones. Easily “travel” between places by adding as many as you need, dragging & dropping.
- Multiple accounts. In one place, you can manage both your work and personal calendars.
- Menu bar calendar. In seconds, you can see upcoming meetings and join them.
- There are multiple flow options, keyboard shortcuts, and gorgeous light and dark modes.
4. What other tools does Cron integrate with?
In addition to Zoom and Microsoft Teams, Cron integrates with many other conferencing services. In Cron, you can integrate conferencing in three ways:
- Default integrations. Your calendar provider provides default conferencing. At the moment, Google Meet is integrated with Google.
- Connected integrations. A conferencing service that enables you to generate new links from Cron by logging in through Zoom accounts.
- Custom integrations. You can share a personal link with participants during a conference. It is easy to add custom links for conferencing in Cron Settings > Integrations > Conferencing > Conferencing providers > Add custom link.
In addition, Cron detects popular services, so any stable link works. As of now:
- Around
- BlueJeans
- Doxy.me
- Google Duo
- Microsoft Teams
- Skype
- Vowel
- Webex
- Whereby
5. Does Cron work on my platform (Outlook, iCloud, Web, Linux, iOS, Android)?
Initially, Google Calendar accounts on macOS and Windows will be covered. All other platforms are currently under development or are planned.
You can, however, request your platform or integration under “Product Requests.”


John Rampton
John’s goal in life is to make people’s lives much more productive. Upping productivity allows us to spend more time doing the things we enjoy most. John was recently recognized by Entrepreneur Magazine as being one of the top marketers in the World. John is co-founder and CEO of Calendar.