We’re accustomed to using productivity suites made by giant corporations. Microsoft has Outlook, which packs a complex calendar into its email program. Apple provides a calendar alongside its own mail program as part of Apple Cloud. Yahoo! has long had a mail and calendar application, and Google has its own comprehensive suite filled with features. All of these products are free to a various degree.
But there’s another company that also offers a free and comprehensive productivity suite. Zoho is a privately-owned Indian company that serves more than 50 million users. Its products include a digital calendar that’s delivered as part of its Mail Suite platform. Here’s how to make the most of it.
Setting Up Zoho Calendar
Registering an account with Zoho is straightforward. The company doesn’t demand any unusual information, although it will ask for OAuth authorization for added security. You can always come back and do that later, once you’ve got used to the service.
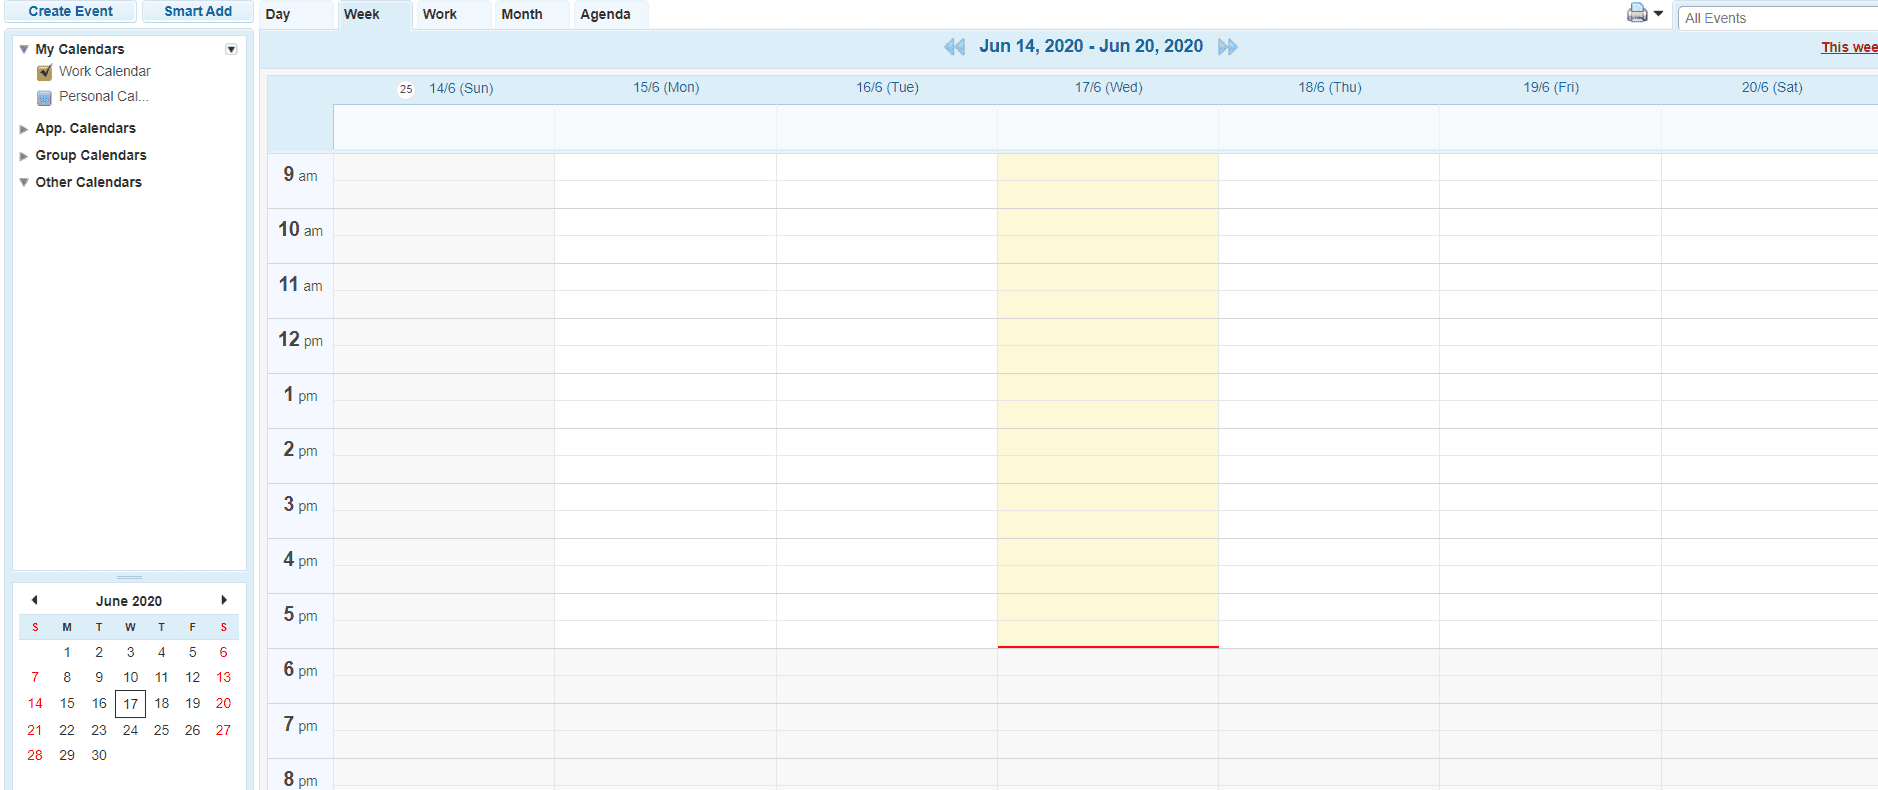
After you’ve registered and confirmed your email, Zoho will take you straight to your calendar—and it will look a little strange because it will be completely empty.
Other digital calendars tend to ask you to first merge any other calendar you’re using with your new account. They assume that you’re using a different calendar and they know that you’ll already have events that you need to bring over.
Zoho doesn’t do that. It never prompts you to merge your calendar, which gives Zoho a particular advantage. Digital calendars can become overladen with layers of different schedules. By the time you’ve added your work calendar, personal calendar, sports calendar, birthday calendar, and national holiday calendar, it’s difficult to see what exactly is coming up on each day. Because Zoho is unusual in not prompting new users to immediately bring over all of their other events, it does give them an opportunity to start with an entirely new digital calendar.
You can still merge your other calendars if you want, but Zoho makes for a useful additional platform. You can keep your Google Calendar for your personal life or your Outlook Calendar for work, but your Zoho Calendar can be for your sports team’s events or your vacation property’s bookings.
Adjusting Your Settings in Zoho Calendar
Rather than begin by importing your events then, start by adjusting your Settings.
Zoho doesn’t offer much in the way of navigation icons. To open the Settings, you’ll need to select the tiny link in the top right corner marked “Settings.” Or you can open the tab at the bottom of the page. If you can’t see that tab, that’s because it’s almost invisible. It consists of a thin, blue line that opens up when you mouse over it.
Open the settings and Zoho will offer two tabs. The “Email notify” tab lets you change the email address you used to register your account.
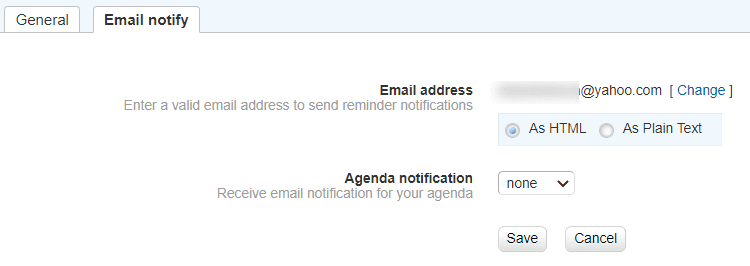
It also lets you decide whether you want to receive notifications in HTML or good, old-fashioned plain text. Finally, you can choose to receive an agenda of your upcoming events every day, once a week, or not at all.
That’s it. There’s nothing else under this tab. Everything else is under “General” which is where the Settings open. There’s not much here either.
Time Zone
Top of the list is “Time Zone”.

Zoho will take your time zone from your IP address but you can open a dropdown menu to choose a different region. Zoho also tells us that “Changes effects across Zoho”. That spelling isn’t reassuring but it means that the time zone you choose here will affect all of Zoho’s applications. If you change the time zone in your calendar, you’ll also change the time zone in Zoho Analytics, CRM or Docs—if you use those applications.
Theme
Zoho’s default theme is blue with a medium-sized font. You can change it… but not by much.

Altogether, Zoho offers six different color schemes and four font sizes. You can’t change the font itself, and can’t change the size of the elements of the page. But you can pick a nicer color and make it easier on your eyes.
Date and Time Formats
Zoho offers four formats of date.
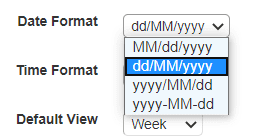
You can set your calendar to use the American-style MM/dd/yyyy format; you can put the day first and the year last; and there are two different ways of putting the year first. One format uses slashes to separate the elements, and the other format uses hyphens.
The time format offers a simple choice between a twelve-hour clock and a 24-hour clock.
Setting the Week
The next four settings in Zoho Calendar focus on how the week appears.
The first lets you set your schedule’s default view. You can choose between day, week, month, and agenda—a list of your events.
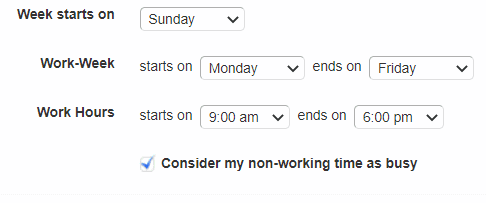
Next, you can set the day that starts the week. You can choose any day at all. The second setting lets you set the start and end of the work week—and again, you can select any day of the year. Not every calendar lets you do that. Some only offer a choice of three options for each of those days but Zoho Calendar is generous. If you work from Wednesday to Monday, or only at the weekend, Zoho lets you build the work calendar that suits you.
The last option is to set your work hours, and Zoho is less generous here. While you can choose any start and end hour from midnight to 11pm, you can’t choose any time between the hours. If your workday starts at 9.30am and ends at 5.30pm, you’ll be out of luck.
An additional option does supply a little more flexibility—and it affects how you use the calendar. Check a box and all the time outside those working hours is marked as busy. In effect, Zoho provides an option to turn your calendar into an exclusive work tool. That’s also very different to the way that other calendar operates. They tend to use work hours to display only those times in the main view. But they still let you scroll and use time before and after work. Zoho Calendar lets you make non-work time unusable.
It’s also worth noting that these settings apply across all your calendars. You can’t create one calendar for your personal life and another for work, and only set your non-working time as busy on your work calendar. If you block out your leisure time on one calendar, you block it out on every calendar on Zoho.
That’s important. It means if you choose this option, you can only use Zoho Calendar as a work calendar. You can create different kinds of work calendars—maybe one calendar for appointments, and another for project deadlines. But you can’t create one work calendar on Zoho for fun and another for work.
Invitations with Zoho Calendar
The next two settings determine what Zoho does with event invitations.

The default setting is to automatically show invitations on the calendar. You can change this so that the invitation only shows if you’re free, or doesn’t show invitations at all.
It’s tempting to choose “Allow if I’m free.” After all, do you really need to see on your calendar the events that you can’t make? But you might prefer to attend the event that comes in later or split your time between the two events, especially if one starts and finishes later than the other. You’ll probably want to keep this setting on “Allow” .
Building a Group in Zoho Calendar
For Group Invitations, Zoho doesn’t even offer the option of not showing the invitation if you’re already booked. You can either let Zoho automatically add group invitations to your personal calendar or not.
That’s because group invitations are a special kind of events. Groups let you keep in touch with people with whom you share something in common. You might want a group for you and your employees, for example, or a group made up of a targeted list of customers. It’s something that you’ll probably want to do if you’re using your Zoho Calendar for work—and as we’ve seen, the platform is really designed for work.
But you can’t create a group within Zoho Calendar. Instead, you’ll have to use your Zoho Accounts page.
Click “My Accounts” at the top right of the page. Zoho will take you to Zoho Accounts which displays your personal information and email addresses. In the navigation menu on the left, you’ll also find a item marked “Groups.”
Select “Groups” and you’ll be able to start creating a new group.
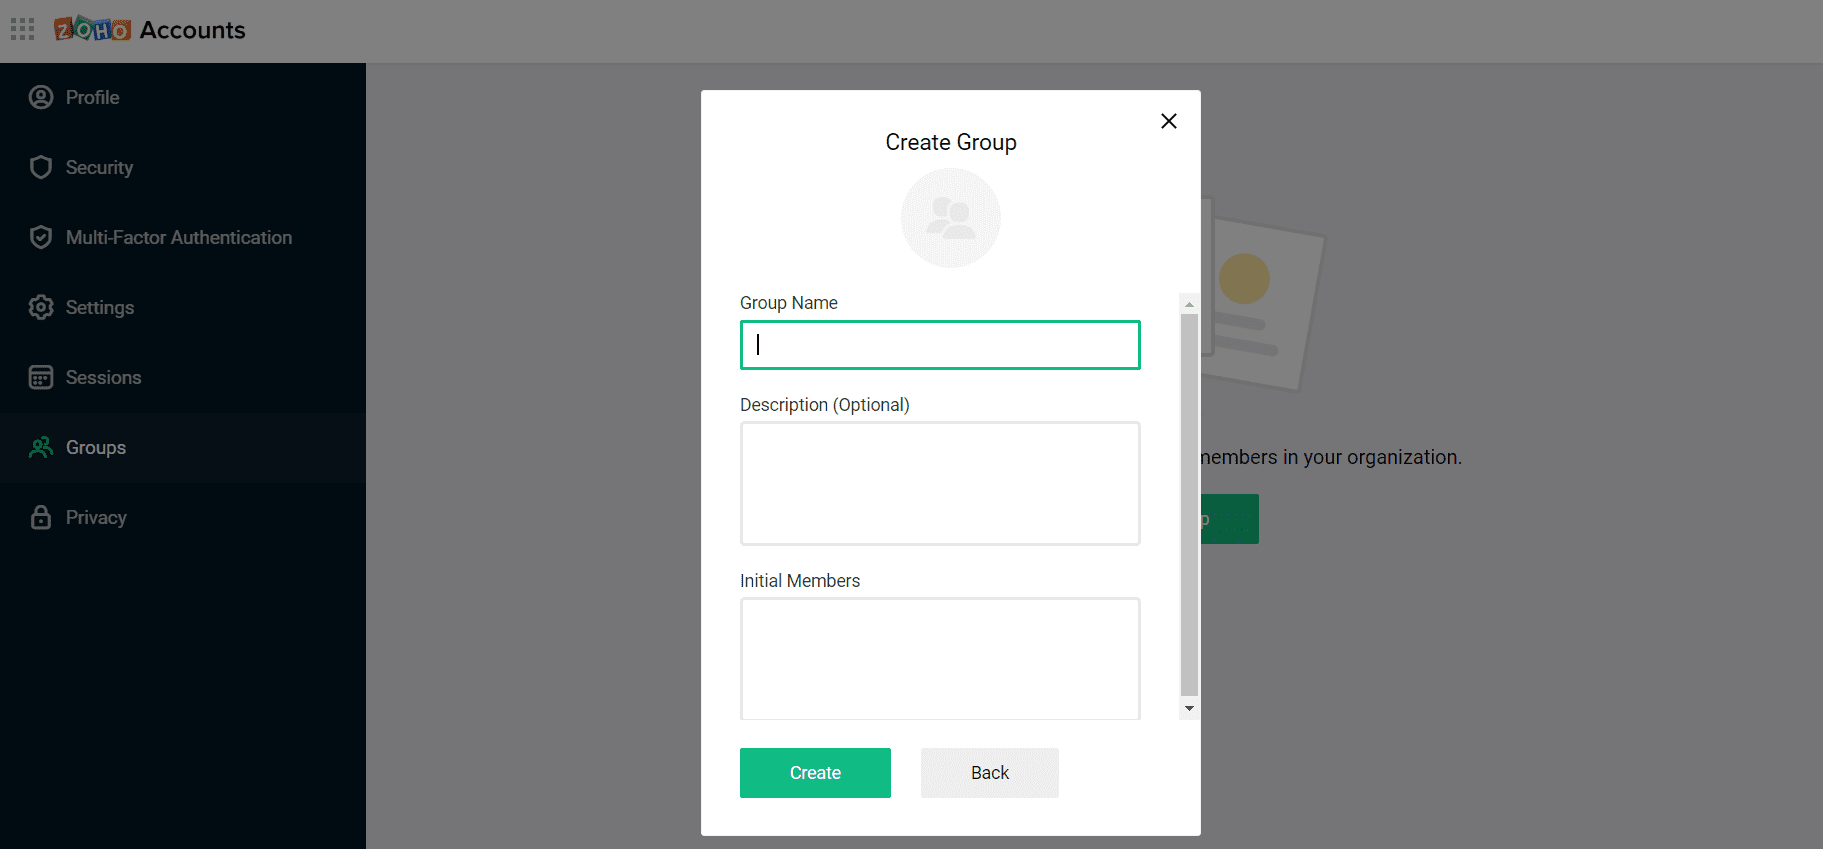
You’ll just have to give the group a name, and enter the email addresses of your members. Each entry has to be separated by a comma, and Zoho won’t let you upload an Excel file.
Once you have a group, Zoho will add any events created in that group to your Groups Calendar. And if you choose “Allow” next to “Automatically add group invitation to personal calendar” in the settings, Zoho will add it to your personal calendar too.
Denied Events
The next setting is more complex than it looks.

Zoho explains the option to show or hide “Denied events” is a choice to “display cancelled events.” But those aren’t quite the same thing. You can deny an event by not accepting an invitation but the organizer of the event can cancel the event themselves. Either way, if the event’s not happening you don’t need to see it on your calendar. Keeping the default option of “Hide” is the best thing to do.
Reminder Notifications
Finally, the last option in the Settings may well be the most important.

By default, Zoho turns reminder notifications on. Obviously, you’ll want to keep them on so that you don’t forget any events that you need to attend. But it’s worth bearing in mind that Zoho doesn’t send those notifications as pop-ups on your screen or on your mobile device. It only sends them by email.
To make sure that you’re receiving them, you’ll need to log in to yet another of Zoho’s applications.
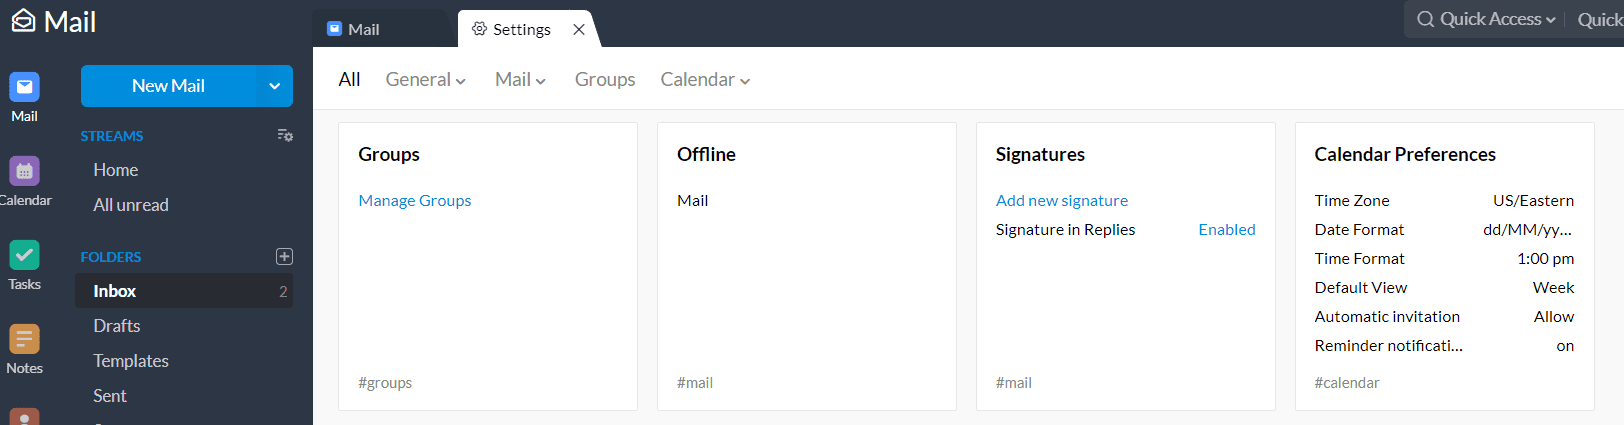
This time you’ll need to open Zoho Mail. Select the gear icon in the top right corner then scroll down until you find “Calendar Preferences.”
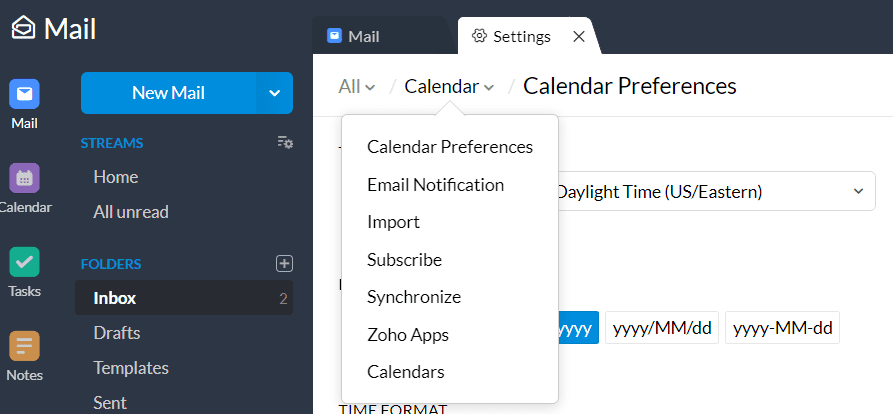
This will bring you to a better designed version of Zoho Calendar’s settings page. Mouse over the “Calendar” menu item at the top though, and one of the options will be “Email Notification”.
Here, you’ll have the option to change the notification email address. You can also change the format from HTML to plain text. And you can select the frequency for the agenda notification between daily, weekly, and none at all.
Finally, once you’ve made your changes, you won’t be able to just head back to your calendar. You’ll first have to remember to press “Save.”
And now you’ll be ready to start using your Zoho Calendar.
Creating New Calendars
The first thing you’ll need to before you can start creating events and telling other people about them, is to create the calendars you need.
As we’ve seen, while other digital calendars ask users to begin by bringing their events from Google Calendar or Apple Calendar or some other calendar, Zoho appears to assume that you’ll want to use its calendar separately. Or perhaps it believes that you have no other calendar.
Either way, you’ll start not with the calendars you’ve already created elsewhere but with four groups of calendars—of which only one contains any calendar at all.
My Calendars with Zoho
My Calendars is the most flexible category of Zoho’s calendars. You can create different calendars for different kinds of schedules: a calendar for work, for example, another for your personal life, and so on.
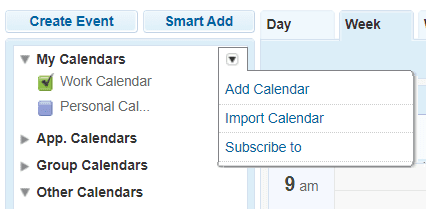
To create a new calendar under My Calendars, you need to place the cursor over the small arrow at the end of the menu. Zoho will offer you three options. The first is “Add Calendar”.
The process is simple enough. You’ll need to give your calendar a name and choose a color. That color will apply to the background of the events on your calendar. You can then choose a text color: you’ll have a choice of black or white. Strangely, white is the default. Finally, you can add a description of your calendar which might be useful if you’re planning to share the calendar. If it’s just for you though, you should be able to remember what this calendar is for.
Click “Ok”, and you’ll have created a new calendar that will appear under your My Calendars list. To toggle the visibility of the calendar on Zoho Calendar, you can check and uncheck the box next to the calendar’s name.
Import a Calendar
The ability to import a calendar that you’re already created is important when you start using a new digital calendar. If you want to replace your current calendar with Zoho Calendar, you’ll want to bring over events that you’ve already created on that platform.
Zoho Calendar provides two ways to import a calendar.
Select the small arrow to the right of “My Calendars”, and choose “Import Calendar”. Zoho will open an option to upload a file of your calendar. The file needs to be in iCal format.
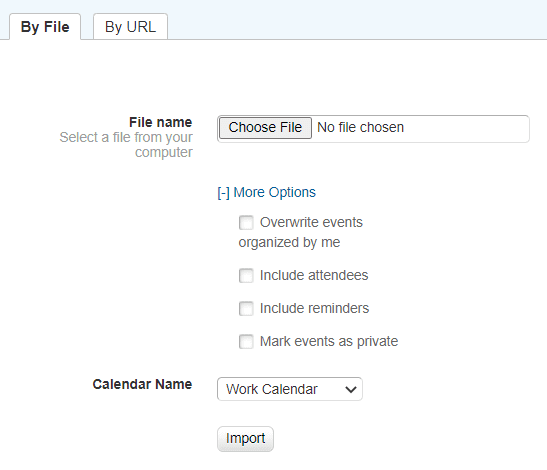
Select “More Options” and you can choose whether to include the event’s attendees and reminders. You’ll also be able to overwrite your own events, which should help to prevent the same events appearing twice. And you can mark all of your imported events as private.
That last option is particularly important. Zoho Calendar expects that you’ll be sharing your calendar. It appears to assume that you’re going to use the platform to organize your work schedule. So if you’re bringing over your personal calendar, you’ll want to make sure that none of your colleagues can see your personal events.
Finally, you’ll need to name the calendar you’re importing. Or rather, Zoho lets you choose to which calendar you want to import your events. The best option is likely to be to choose “New calendar” so that you can import your events into a fresh schedule. That will keep those events in a special category and make them easier to control.
Alternatively, you can select “By URL” in the top tab. You’ll have the same additional options, and you’ll also be able to place the events in a current calendar or in a new calendar. The difference is that instead of uploading your calendar in iCal format, you can enter a valid HTTP/Webcal URL.
Importing a Google Calendar
So let’s say that you wanted to import your Google Calendar to Zoho Mail. Open Google Calendar and select the gear icon in the top right corner.
Choose “Settings”.
Scroll down to “Import & Export” in the menu on the left, then select “Export”. Google will turn all of the calendars you’ve created in Google Calendar into a single iCal file that you can download to your computer then upload to Zoho Mail.
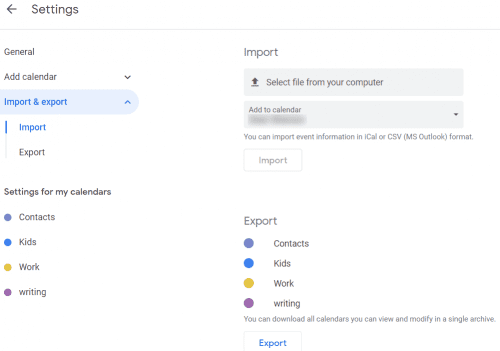
If you only want to export one of the calendars you’ve created in Google Calendar, select the calendar from the menu on the left. Google will open a long dropdown menu of that calendar’s settings. To download the calendar as a file, choose “Export calendar” on the right of the page.
Alternatively, if you scroll down the page on the right, you’ll find the calendar’s URL. If your calendar is public, you’ll need to copy the URL marked “Public address in iCal format.” If your calendar is private, and you want to keep it private, choose the URL marked “Secret address in iCal format”.
Subscribe to a Calendar
Bear in mind that whether you upload an iCal file or import the URL, you will only be adding the events that appear in the calendar at that time. If you add new events to the source calendar, they won’t appear in Zoho Calendar.
To maintain a constantly updated version of the source calendar on Zoho Calendar, you need to subscribe to it, not import it.
From the menu under My Calendars, choose “Subscribe to”.

Now Zoho will give you three options. The first is “Web URL”. Zoho asks you to enter a valid HTTP/Webcal URL in iCal format. Paste in the URL of your calendar. If you add something to your source calendar, you should find that the event also appears in your Zoho Calendar.
Zoho also lets you subscribe to someone else’s calendar here. Choose the tab marked “Friends Calendar”, and enter their email address. If your friend has a public calendar associated with that email address, Zoho will add it to your Zoho Calendar.
Finally, you can also subscribe to national holidays. Zoho provides a long list of options, from Australian and Austrian holidays to Venezuelan and Vietnamese holidays, as well as religious holidays.
Select the “Holidays” tab and hit “Subscribe” next to the holidays you want to add.
Synchronizing Calendars
If you’re using Google Calendar, Microsoft Calendar, Zoho Calendar on Android, or any CalDAV calendar such as those on iOS devices, then you do have another option.
Open Settings, then select “Sync” in the left column.
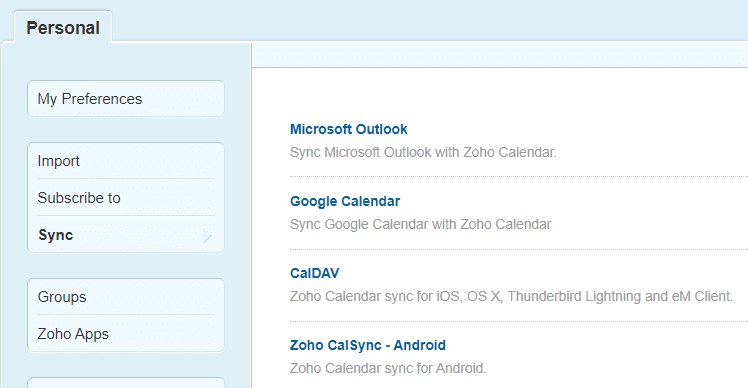
Choose the calendar you want to synchronize, and agree any terms of service, privacy policies, or authentication requests that the calendar requests. Finally, press “Synchronize” and your two calendars should update each other.
App Calendars
The ability to create new calendars, subscribe to friends’ calendars, import your own calendars, and add national holidays to your calendar isn’t unusual. Just about all digital calendars act as platforms that let users add schedules of their choice, including those from other digital calendar platforms.
One aspect that makes Zoho Calendar different though is its integration with the company’s network of applications. Zoho has a wide range of applications but the calendar application takes information from five them: CRM; Recruit; Tasks; Projects; and Contacts. If you’re using any of those applications, you can bring the events and reminders from those applications to Zoho Calendar.
So if you’re using Zoho Projects instead of Slack to manage your projects, then you can bring your deadlines and milestones to your calendar.
Group Calendars
We’ve also seen how it’s possible to create Groups in Zoho, bringing people together to hold discussions and swap content. If you’ve created a Zoho group or are a member of a group, then Zoho can place any dates or events in those groups in your Zoho Calendar.
Other Calendars
Finally, Zoho will also list what it categorizes generally as “Other Calendars”. Initially, there are no calendars here. Select “Import Calendar” or “Subscribe to” from the dropdown menu and Zoho will take you back to the Personal calendar page. Choose “Other Calendars” and you’ll get a message saying “No other calendars to display. Click here to subscribe.”
Click the link, and Zoho will take you back to the “Subscribe to” section where you can enter a valid HTTP/Webcal URL in iCal format to add another calendar to Zoho Calendar.
Creating Events
So we’ve seen that you can adjust the settings of your Zoho Calendar, and you can also add calendars, import calendars, and subscribe to other calendars online.
Now we’re ready to start using Zoho Calendar. That means creating events.
You can’t do much more on Zoho Calendar. The application doesn’t let you add tasks or reminders. You’ll have to use some of Zoho’s other applications to do that. While some digital calendars have merged their applications together, Zoho keeps them separate—including events and tasks.
There are three ways to put events on Zoho Calendar.
The most obvious is to hit the big blue “Create Event” button in the top left of the calendar. That brings you to the “Create Event” page.
Title
The first piece of information you’ll need to enter is the title of the event.
Zoho only gives you a small field for that title but it also doesn’t appear to limit the number of characters you can enter. That’s a risk. You might feel tempted to keep writing and put as much information in there as possible. But that title has to fit into the small space on the calendar so keep it as concise as possible while still being understandable.
That’s particularly important if you’re placing the event on a shared calendar. Other people will need to understand what the event will be about.
Next to the title field is a checkbox marked “Private”.
It looks out of place. If you’re placing an event on a shared calendar, then surely you can expect those events to be visible to the people who share that calendar. If the event is private, then you can place it on a different, private calendar.
But if you want to add an event to a shared calendar but you don’t want anyone else to see it, then you can check that box. Only you will see that you’ve blocked out time in the afternoon for a quiet nap.
Calendar
Once you’ve created the title of the event (and decided whether you want to make it private), you’ll need to select the calendar to which you want to add the event.
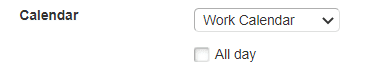
Oddly, this is also where you can choose to mark the event as lasting all day. Clicking on that checkbox removes the time from the next section.
Time
The time section of the event creation page looks confusing. Zoho provides four fields: two with dates and two with times; two with green icons and two with red icons. A kind of bracket connects the two time fields and describes the time zone.
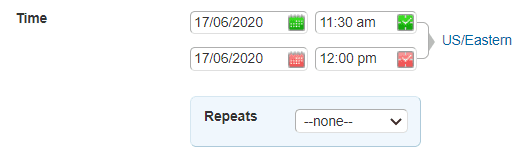
It takes a moment to recognize that the fields with green icons are the start times and dates, and the fields with red icons are the end times and dates. An addition of “From” and “To” would have made the use of those fields more intuitive.
As you set a start time, Zoho will automatically set the end time half an hour later—which is useful if your events are always half an hour.
Finally in this section, you can set a repeat frequency for events that occur regularly. The options here are straightforward. You can choose between daily, weekly, monthly, and yearly events. That’s all. Other digital calendars are known to offer much more varied options such as the last Thursday of every month, or every other Monday. Zoho Calendar doesn’t go that far. If you attend an event every two weeks, you’ll have to opt for either weekly and ignore one of them, or monthly, and risk forgetting one of them.
Event Color
Just as Zoho Calendar doesn’t offer too much in the way of repeat event options, so its calendar palette is pretty miserly too. You get a choice of ten pastel tones ranging from purple to blue. But while the choice is limited, the colors are easy to select, ensuring that you can choose consistent colors for particular kinds of events: blue for sales meetings, for example, and red for board meetings.
It’s worth making a note of the colors you want to use for those events so that you can always see at a glance what’s coming up in your calendar.
Location
The Location field is one place in which you’re going to feel the difference between using Zoho Calendar, and using a digital calendar created by one of the large Internet companies. Users have grown accustomed to calendars from Google and Apple including maps in their events. Start typing the location and those calendars will add a map of the location. They’ll also often provide driving instructions and offer the option of sending a notification when it’s time to leave. The integration of maps and calendars is one of the more successful synergies in software suites.
Zoho, despite its association with a huge array of different applications, doesn’t provide mapping options. All you can do is type in the location and see it listed on the event. You’ll need to figure out how to get where you’re going and when you need to leave to arrive on time by yourself.
Reminder
The Reminder option on the Event Creation page looks rather… well, quaint. While you can’t type in your own reminder interval, Zoho does give a very long array of different options, ranging from five minutes before the event to as much as 90 days before.
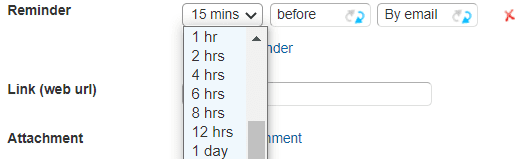
You can also switch the notification to come after the event, which is more useful than it sounds. It means that you can set one reminder before the event, and a second reminder to send a thank you or a follow-up after it. It’s a useful way to ensure that you don’t forget to run after a sales lead or thank people for a gift.
But what makes the Reminder so old fashioned is how it’s delivered. You can choose between an email and a pop-up. It’s as though text messages or mobile notifications didn’t exist.
Link (web url)
Zoho has a special field for entering a URL—if you need one. That means that you don’t have to work the name of a website into the description, a field that you’re likely to miss.
Attachment
You can also upload an attachment to your event, which will be useful if you’re sharing that event. Because Zoho seems to expect that people will use the platform to create work calendars, you might find that you’re booking sales meetings and pitches. Being able to upload copies of the meeting’s agenda or pitchdeck is a useful way to ensure that everyone comes to the meeting prepared.
Description
Finally in this section, Zoho lets you add a description of the event. It gives you about 3,500 characters, which for a calendar is just about book-sized. You won’t want to use all of that space. The description shouldn’t be more than a few lines reminding you—or telling other attendees—what the event is about and what attendees should bring.
Associate
We’ve already seen that events and reminders added on other Zoho applications can make their way into Zoho Calendar. But you can also associate events that you place on Zoho Calendar with your other applications. Or rather, you can associate those events with three other applications: Zoho Meeting, Zoho Task, and Zoho Notes.
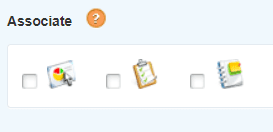
If you’re using those applications, and you want to put your events in them, you can check the appropriate checkboxes.
Attendees
The last field you can place in your event may well be the most important, especially on Zoho Calendar. This is where you enter the email addresses of the people who will participate in the event.
Zoho doesn’t make this simple. You can’t upload an Excel file or keep lists on the application that you can call up for certain kinds of events. You’re stuck with typing or pasting the email addresses directly into the field each time you organize an event.
Zoho Calendar also points out that each attendee can see who else is invited—and there’s no way to change that option.
This section also comes with a button marked “Free/Busy”.

Click that button, and Zoho will present a small portion of the calendar. A link marked “Find next available free time” lets you scroll through the calendar as Zoho finds free time that suits everyone in the list of attendees on the left of the box. You can also toggle between searches in working hours and all times.
It’s a neat tool but it works best when everyone invited is also using Zoho Calendar.
Smart Add
Zoho’s event creation form is simple enough but Zoho has even simpler option for creating events. Smart Add offers a field in which you can type in basic information about the event. So instead of pulling up the form and completing all the fields, you could type something like: “Sales Meeting 10.30am-11.30am.” If the event lasts for more than a day, you can even type the date range: “Trip to Disneyland March 3 – March 8.”
The field looks small and uninviting. It’s up there in the top left, next to “Create Event” so that it doesn’t look like another way of creating an event. But it is valuable, especially if you only need to include the most basic information in your event, and if you’re not inviting anyone else to attend. Writing a quick sentence is much easier than working through a form and choosing which field you need to complete and which you can ignore. And if you do need to add more information, you can always click on the event, pull up the form, and make your edits.
One point to bear in mind if you’re using Smart Add, though, is that syntax is important. Zoho doesn’t really offer real language input. The format of the event creation needs to be Title, Date, Time—and the date should be in the format of mm/dd/yyyy.
Drag and Click Event Creation
There is one more way to create an event, and that’s by dragging your cursor across the time and date of the event. Again, this is much faster than hitting the “Create event” button. Because you’ve already chosen the time and date, Zoho will give you a small box asking only for the title of the event and the calendar to which you want to add it. If you want to invite other attendees or add any more information, click the “More Details>>>” link at the bottom of the box.
Conclusion
So Zoho Calendar is a pretty simple application. It lacks many of the extras, such as maps, that we’ve come to expect of other major digital calendars. But it does deliver the basics, throws in some smart event creation, and makes it easy to create an new calendar to supplement your main calendar. It works best if you’re using the company’s other applications but even if you’re not, you can still expect to find Zoho Calendar a reliable workhorse.