In this Calendar guide, we help you learn how to get the most out of ScheduleOnce, a popular time management tool to use in your business during 2023 and beyond. The comprehensive guide on ScheduleOnce covers everything you need to know about this tool.
The guide starts with a section on how to set up your Schedule Once account, including what the settings do and what you need to enter to start using this time management solution. The next few sections provide an in-depth look at event types, booking pages, and master pages.
Each section explains what these features are and how they can help you effectively manage your time. There are tips and examples that illustrate how these features can benefit your time management processes.
The Calendar guide ends with a section on how to share and publish these types and pages from your ScheduleOnce account. After reading and using this Calendar guide, you will be able to find ways to improve your time management throughout 2023 thanks to Schedule Once.
Table of Contents
All businesses start with one resource already in place. They might not have money or employees, and the office might be nothing more than a laptop in the corner of a café — but all businesses have time. They all have 24 hours in a day. How they manage those 24 hours will determine whether or not the business succeeds.
Fortunately, there’s no shortage of tools that can help people to manage their time.
Just about every big software company has a digital calendar packed with smart features. If you really want to be more successful, start learning and using calendar app. Apple has a calendar on iCloud that syncs automatically with the iPhone. Google has a calendar whose app comes built into Android devices. Microsoft’s complex calendar comes built into Outlook. It allows administrative assistants to pull up different people’s calendars and compare their schedules. There are a certain amount of calendaring skills you will want to master for the new wave of calendars and calendar management levels — to help you be successful.
Users can add events to those calendars, set reminders for events, and even create multiple schedules that they can share with others. But, sharing calendars doesn’t solve the difficulty of making appointments.
A Realtor trying to make an appointment with a potential buyer has to pull up their calendar and hope that the times they offer hit an empty spot on the customer’s own schedule. A personal trainer has to flick through their calendar looking for an empty slot whenever someone wants to book an appointment.
Even two people trying to set up a time to talk on the phone often find themselves shooting suggestions back and forth until they manage to pick an hour that suits both of them. Too often, the process can feel like a bad game of battleships.
ScheduleOnce aims to solve that problem. Instead of shooting suggested hours at someone else’s schedule and hoping for a hit or miss — or worse, sharing a calendar with a stranger who will then be able to see exactly what you’re doing and when — ScheduleOnce acts as an intermediary.
Users can connect their calendars to the site. They can create particular kinds of events that they want people to book. They can define times when they’re willing to accept bookings for those events, and they can let ScheduleOnce check their calendar to make sure that those hours are still available.
Everything You Need to know About ScheduleOnce
1. Setting up Your Schedule Once Account
ScheduleOnce starts with a free trial that lasts for fourteen days. It’s a good place to begin, giving you just enough time to get used to the platform and understand what it can do without having to cough up a dime.
You sign up with an email address and password, but you can also add a ScheduleOnce app to your G Suite from the G Suite Marketplace. G Suite Marketplace is Google’s set of productivity software and is targeted at businesses. That option gives you a clue to who ScheduleOnce thinks might be using its platform.
Google expects users to be digitally savvy and to spend plenty of their time using online services. As we’ll see, digitally savvy and spending a lot of time doesn’t have to be the case — but you will need to be a regular user of your digital calendar. If you’re the kind of person who still prefers to write their appointments on paper, then ScheduleOnce might not be a great fit.
The more you keep your digital calendar up to date, the better ScheduleOnce will work for you.
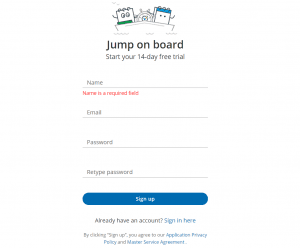
First, fill in the fields, and Schedule Once will get to work creating your account. It will then ask you whether it’s got your time zone right. This process is more important than it sounds. If you’re using a VPN, then there’s a chance that Schedule Once will think you’re in a different time zone, and that will mess with your scheduling. Make sure that Schedule Once knows exactly where you are for best results. You will need to make sure that each of your team members schedules in the correct time zone where they reside, as well.
Schedule Once will then give you a quick, little tour of the main areas of the platform. It’s about five little notifications which end with an invitation to connect your calendar.
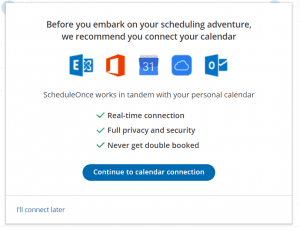
You don’t have to do this immediately, but there’s no reason to wait. Click “Continue to calendar connection” and you’ll be offered six different kinds of calendars that you can connect. These choices are Exchange Calendar; Office 365 Calendar; Outlook Calendar; Google Calendar; Apple Calendar; and PC Connector for Outlook.
Whichever platform you use to keep track of your hours, Schedule Once will check it in real time. Press “Connect” and grant “OnceHub,” the software that powers Schedule Once, access to your calendar entries by selecting your account, and press “Allow.”
While you’re doing all this, Schedule Once will send you an automated email that contains your sign-in ID and your “Booking page link.” That booking link looks something like this:
https://go.oncehub.com/[name]
Copy this down — you’re going to need this link. It’s what you’ll give to other people to bring them to a page where they can make bookings.
Defining the Integration Settings
If you look at the top of the page, you’ll find four menu items: Activity, Setup, Share & Publish, and Reports. At this stage, you’ll have no activity to report, so you’ll still be in “Setup”:

The settings you’ll be able to make will depend on the calendar you’ve connected, but you can expect to have to make two kinds of integration settings.
The first setting makes sure that changes you make to your calendar are synchronized with the events that have been booked in ScheduleOnce.
You should check the box that cancels a booking in ScheduleOnce when you delete the event in your calendar. And you should also check the box that updates the booking in ScheduleOnce when you change the time in your calendar.
That will give you two ways to manage the events that appear in your Calendar: through ScheduleOnce; and through your calendar.
The second setting takes the form of a link to the Booking page calendar settings.
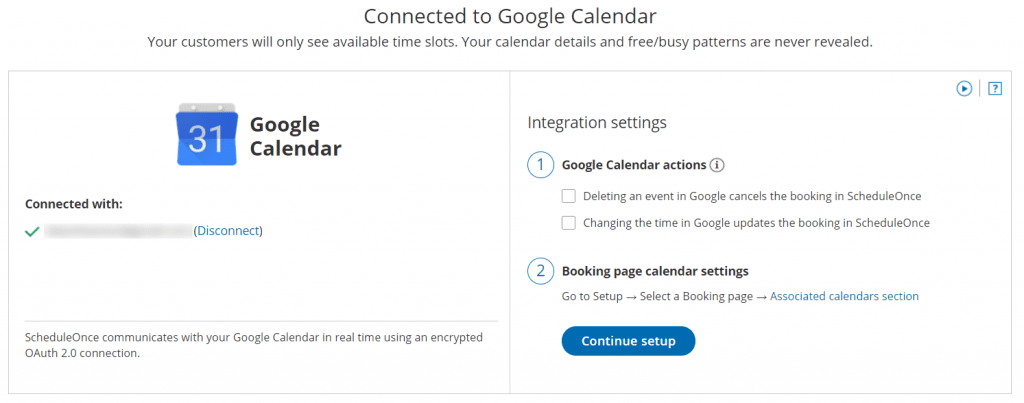
Don’t worry about that for now. Check the boxes and hit the “Continue setup” button.
Now ScheduleOnce tries to help you. It offers a series of videos that are meant to guide you through using the platform. There are twelve of those videos. The longest lasts for about six minutes, and some of them are more confusing than helpful. Nor will you need all the information contained in those videos right away. If you’ve got about 35 minutes in your schedule that you’re not doing anything with, then you can go ahead and watch them all. Otherwise, you can certainly skip the first two—and you can probably skip all of them.
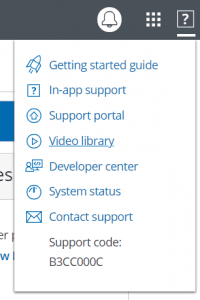
Press the X in the top right corner to close the videos. You can always come back to them by pressing the big “Getting Started Guide” at the bottom of the page or by selecting “Video library” from the dropdown menu under the question mark at the top right.
Understanding the ScheduleOne Setup Page
The next step will be to create an event type. Before we do that though, take a look around.
On the left is a bar containing a series of icons. That bar opens when you place the cursor over it. It’s divided into three sections. The first section is “Configuration.” That’s where you are now, and its where you make Event Types, Booking Pages, and Master Pages.
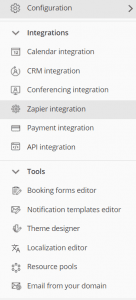
The next section is “Integrations.” This lets you add all sorts of additional functions and automation to ScheduleOne.
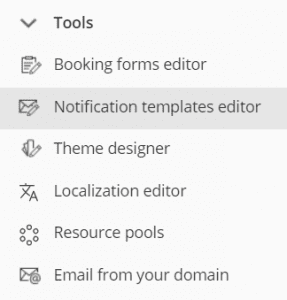
Finally, “Tools” lets you customize the information you present to people booking your events. This is going to be a very useful section.
In the top right corner of the page are icons for notifications; for other applications in the ScheduleOne family; help; and your personal information, including adding other users.
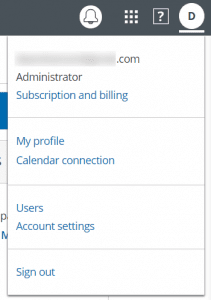
You’ll need some of those options, particularly the ability to add new users. But the important stuff is in the center of the page and that’s where we’ll focus.
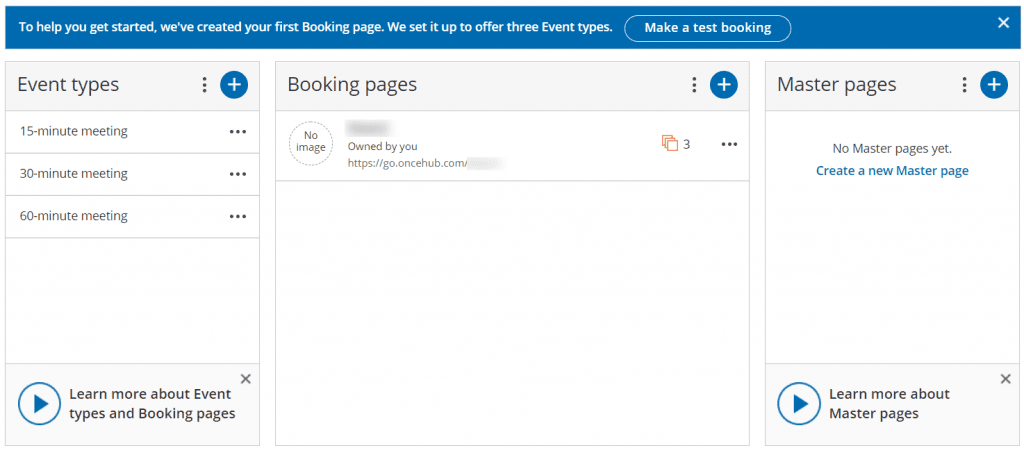
This is divided into three sections. The left is for creating and managing “Event Types.” The middle section lets you create and manage “Booking pages.” And the final section on the right is for creating and managing “Master pages.”
We’ll deal with each of those in turn. Let’s start by looking at Event types.
2. Event Types with ScheduleOnce
“Event Types” are the core of ScheduleOnce. These are the meetings that you’re going to allow people to book with you. They’re slots of time that ScheduleOnce will reserve on your calendar for a particular purpose.
You can decide when you’re willing to accept these bookings, where the meetings will take place, what happens if the event needs to be canceled or postponed, even how much you wish to charge for a meeting and how you want to take the payments.
This is how you create those events.
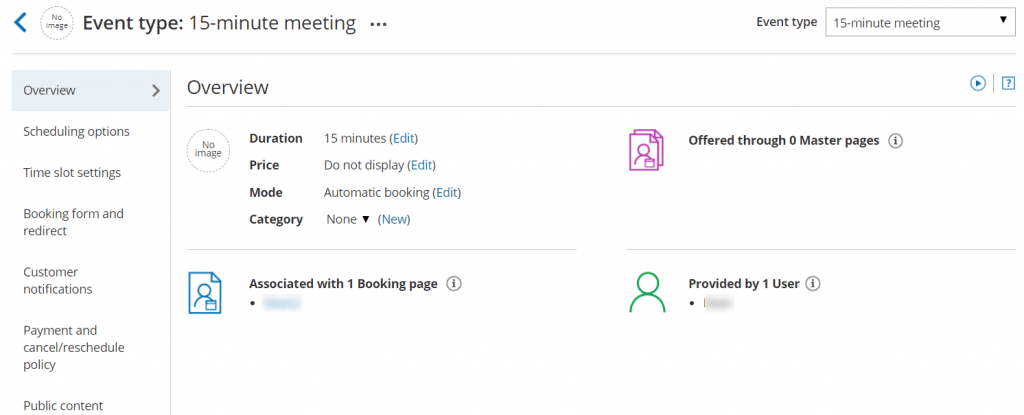
ScheduleOnce starts you with three different Event types: a 15-minute meeting; a 30-minute meeting; and a 60-minute meeting. If you click on one of those meetings, you’ll be offered an overview of the event. You’ll be able to see that it’s possible to associate an image with that event; a duration; a price; the mode of booking; and a category; as well as a booking page, a master page, and the name of the user who created the event.
Let’s go back and explore what those characteristics mean, and how to set them.
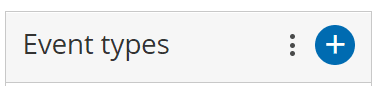
Start on the Configuration page, and click the big + icon next to “Event types.”
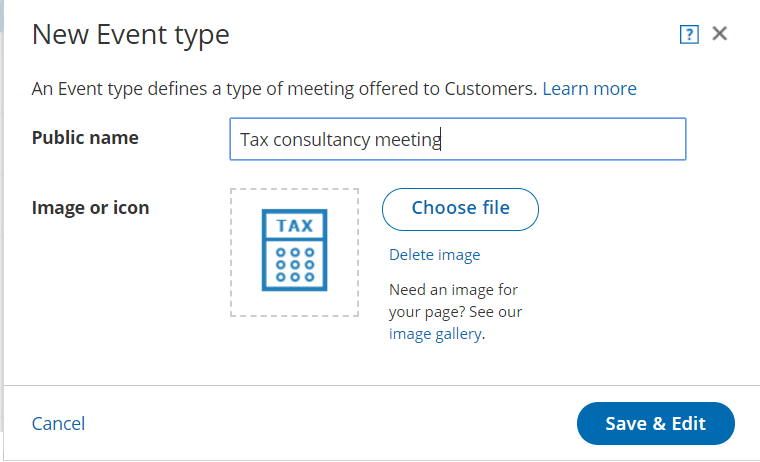
The first step is to give the event an identity. You’ll need to give it a “Public name,” and you can choose to add an image or icon. ScheduleOnce even lets you choose an image from its own gallery.
These are two small fields in a single box, but they matter. The event title and the image are what a potential client will see when they reach a booking page. They need to understand exactly what they’re booking, and they need to feel enough trust to go ahead and make that booking.
You will be able to change both of these entries if you wish, but do make sure that you choose names and images that invite people to complete their bookings.
Press “Save and edit” and you’ll be through to a page where you can start defining the elements of the event type. ScheduleOnce offers no fewer than seven different areas: Overview; Scheduling options; Time slot settings; Booking form and redirect; Customer notifications; Payment and cancel/reschedule policy; and Public content.
Overview
The Overview shows the current state of your event. The first section lists the duration, price, booking mode, and category, and there are links next to each of those definitions. Each of the first three takes you to one of the areas on the left of the page.
Click the “Edit” link next to Duration and you’ll be taken to the Time slot settings. The same link next to the price takes you to the “Payment and cancel/reschedule policy.” And the link at the end of the mode line leads to “Scheduling options.”
The only part of the Overview that doesn’t lead to one of those areas is the Category.
The default is that the event type has no category. Press the “New” link at the end though, and you can start organizing your event.
![]()
Categories let you group different events together. A financial consultancy, for example, might offer different meetings for businesses and for individual clients. An individual reaching a booking page wouldn’t be interested in the options available to businesses, and vice versa.
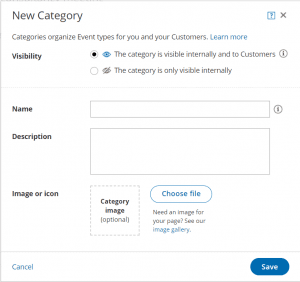
The options here are pretty simple. You can give the category a name and a description, and you can add an image too. But the first option is the most important. You’ll need to decide whether to allow customers to see your categories.
Categories are useful for businesses to keep their events organized. But if you’re going to present the categories to customers too, you’ll need to make sure that the name, description, and any icon are all professional and inviting. If you’re just organizing for yourself, you can be a bit more forgiving.
Scheduling options
Scheduling options define what happens when the customer makes a booking. There are three options. First, you need to determine whether or not you want to approve a booking before it’s created.
Choose “Automatic booking” and this puts the customer is in control. The customer can then pick a time and make the booking. It’s a good option if you’ve controlled the times the customer can choose, and you have a limited number of event types. Your schedule will fill up automatically with customers booking appointments in five-minute increments.
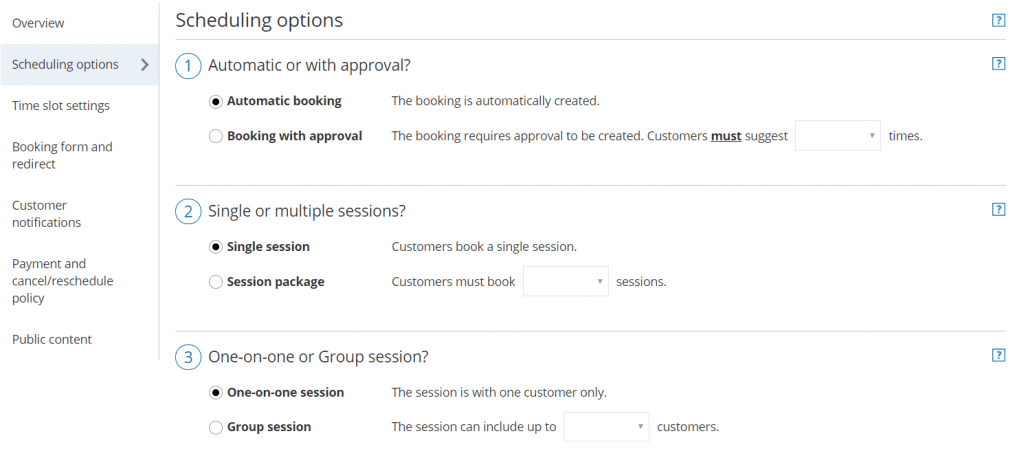
The alternative is “Booking with approval.” Instead of simply booking a time, customers will only be able to ask for an appointment. You’ll need to define the number of times for the event that a customer can request. The more times you make them suggest, the more freedom you’ll have to choose an hour that suits you. But you’ll also increase the risk that they’ll get fed up and click away without completing the request.
Once they’ve picked their times, you’ll be able to review the suggestions and approve the time you want. Bookings with approval have fifteen-minute increments.
The next option is whether customers can book a single event or whether they have to book multiple sessions.
Again, the more sessions you require customers to book in advance, the greater the chances that they’ll run from the commitment. Use this option if you know that your service will require more than one session but try to minimize the number of bookings and hours they need to choose.
Finally, you can set the event as either a one-on-one or a group session with a number of customers that you’ve defined.
This option will be useful. If you’re meeting someone to discuss a personal problem or for a private chat then obviously you’ll need to choose the one-on-one session. But the ability to allow a number of customers to attend a meeting means that you can also organize webinars, classes, and lectures. That’s a very different kind of event, one that lets you address a number of leads at the same time.
Time slot settings
The time slot settings are a lot more complicated—and each one is important.
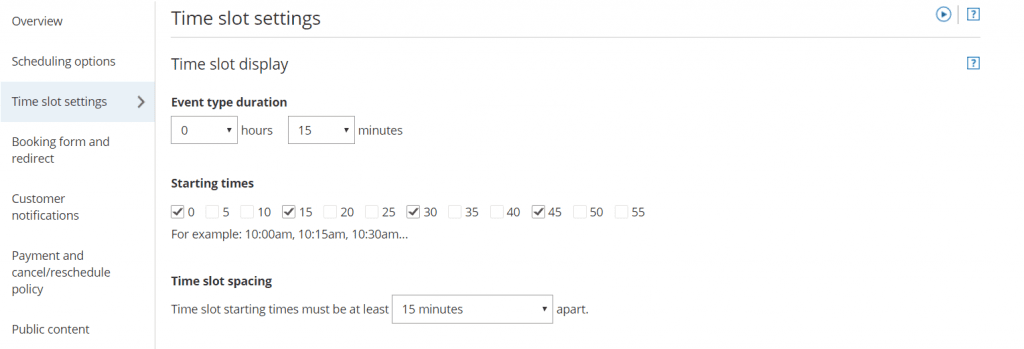
The first choice is how long the event will last. You can choose between 0 and 16 hours, and between 0 and 55 minutes. Remember that this setting only applies to this event. If you want to create events of different duration, you’ll need to create separate event types for each one.
Select the duration, then set the starting times. Events don’t have to start at the top of the hour. If you’d rather start the event at five minutes past the hour, ScheduleOnce allows you to change the starting times in five-minute increments.
Time slot spacing determines the gap between the times that a customer can book. The minimum space is fifteen minutes, and the gap rises in increments of fifteen minutes until it reaches five hours.
By using each of these three settings, it’s possible to control when your events begin. If your events last thirty minutes, for example, but you set them to start at the top of the hour, you know that you’ll always have at least half an hour between bookings.
Workload rules
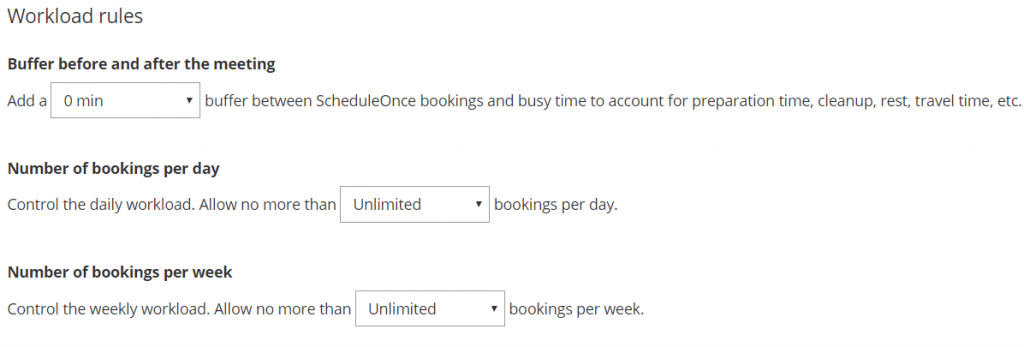
- The workload rules give you more direct control over those bookings.
- Buffers let you set the time between the end of one booking and the start of the next.
- The number of bookings that an event can receive each day may be unlimited or up to 20.
- You can also limit the number of bookings that you receive each week.
Timeframe Rules
The workload rules ensure that you don’t get overwhelmed with bookings. While that might sound like a good problem to have, especially if you’re selling those times, you don’t want to burn out and you don’t want to feel so pressured that you can’t deliver a good service. The benefit of using a tool like ScheduleOnce is that it allows people to book a time that suits both sides.
Bear in mind that if you are feeling overwhelmed by the number of bookings that your events are receiving, you do have another tool to control that workload: you can raise your prices. You might receive fewer bookings but you’d also be able to earn more money in fewer hours.
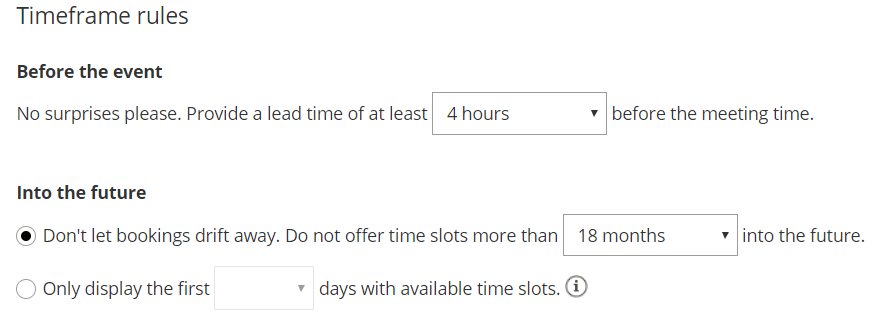
The timeframe rules are slightly different.
The first option, “Before the event,” does much the same as placing a buffer before a meeting. You can set a lead time in minutes, hours, or days before the meeting time to ensure that you’re not rushing from one event to another.
More interesting is the “Into the future” section. There are two options here. The first prevents users from booking events a set amount of time in the future. The range is from one day, which only allows people to make bookings on the same day, up to eighteen months.
The benefit here is that the further ahead someone can make a booking, the greater the likelihood that they’ll forget it or cancel it. It’s also possible that the contents of your event will no longer be relevant.
In practice, people are unlikely to book your event a year or more ahead but you’ll need to find a balance between giving people the chance to make long term plans and avoiding cancellations.
Time zone conversion
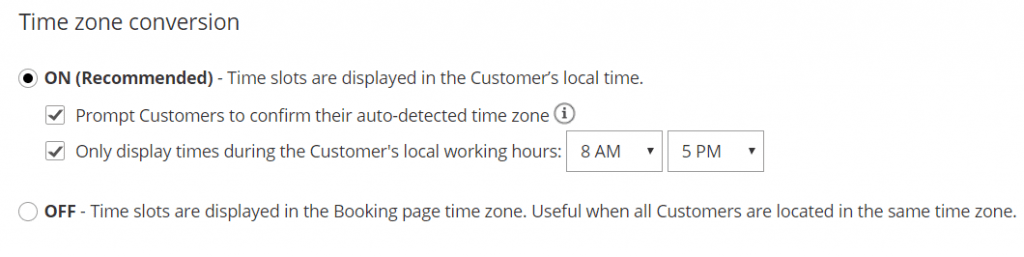
The time zone conversion settings are more complex — and more useful — than they appear.
You can turn the conversion on, which displays time slots in the customer’s local time; or you can turn the conversion off, which lists the time slots in the time zone of the booking page. ScheduleOnce says that turning off the conversion is useful if all of your customers are in the same time zone—if you’re only pitching to local customers, for example.
But if you’re aiming at people further afield, whether across the United States or internationally, then you will need to turn on time conversion so that people know exactly when they’re booking the events. Accept ScheduleOnce’s recommendation to turn time conversion on and you’ll be able to do a couple more things. First, you can prompt customers to confirm the time zone that ScheduleOnce has detected.
You should check this box. ScheduleOnce will use the customer’s IP address to identify their time zone but it will be confused by a customer who uses a Virtual Private Network. Asking customers to confirm their time zone ensure that everyone sees the right times.
The second option lets you only display times during the customer’s local working hours. You can adjust those hours but unless you know that people will only book your events during their working hours, and know when all of those hours are, it’s best to leave this box unchecked. If people want to book your event outside their working hours, there’s no reason you should stop them.
The number of time slots offered per day.
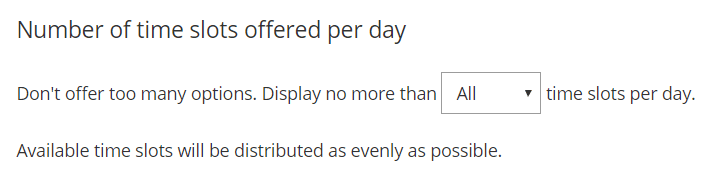
The final option in this section is to limit the number of available time slots that will be displayed. If that sounds similar to the number of bookings you’re willing to accept per day, or the length of the time between bookings, or the time slot spacing, then that’s probably because they are all fairly similar.
The difference here is that instead of offering every time slot in your day, then cutting off the bookings when you reach your quota, you’ll only make a set number of time slots available. What’s really important here is that ScheduleOnce distributes those time slots evenly.
That makes it useful if you know that you’re only able to accept a certain number of bookings each day, you know that all those events will be booked and that you want those events spread across the day instead of piled up in the morning or the afternoon.
Booking form and redirect with Schedule Once.
The features described so far affect how you’ll present hours that potential customers can book. The following features determine what happens after the customer has made a decision. The first thing they’ll do is reach a booking form. The customer will be required to enter a certain amount of information so that you know who’s booked the event.
ScheduleOnce offers a default form but it’s pretty complex:
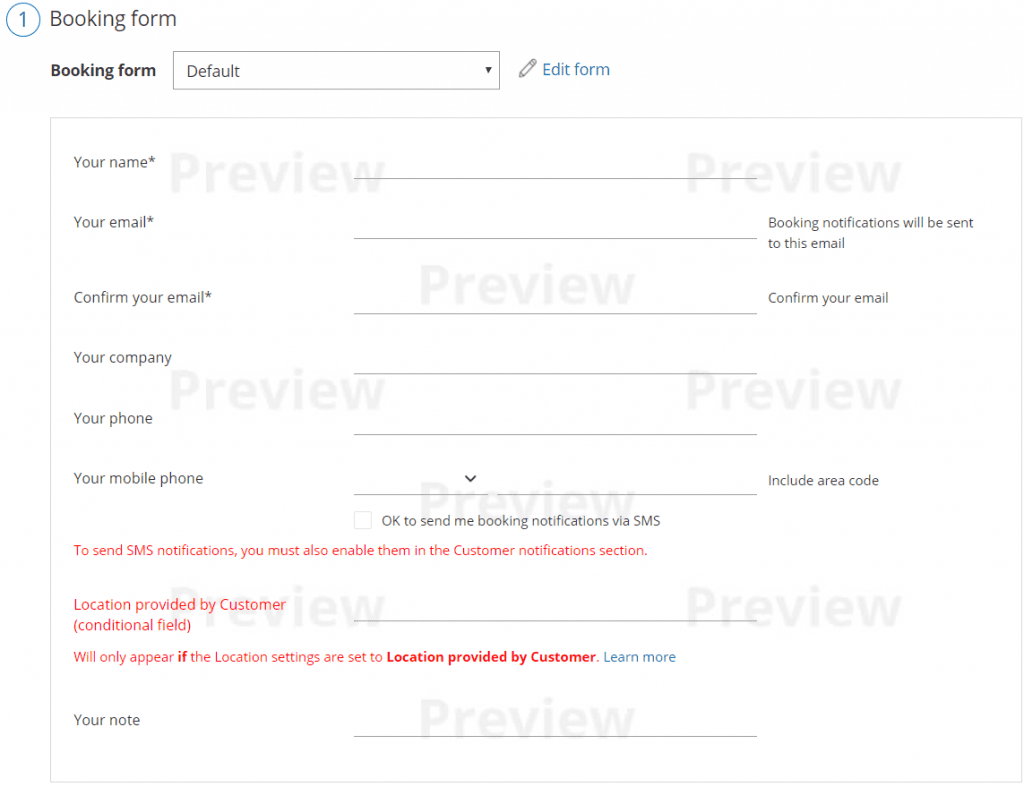
This form requires users to enter their name and email address, confirm their email address, list their company, and enter two phone numbers. Remember that the more you require a customer to do, the more likely they are to click away without completing the booking.
But remember too that the more information that you can take out of a customer, the more you can prepare for the meeting, and the more effective it’s likely to be. You will always be balancing ease of booking against the need for data.
Wherever you find that balance, you’re unlikely to find ScheduleOnce’s booking form to be the best. Click the booking form dropdown menu, and choose “Create a new booking form.”
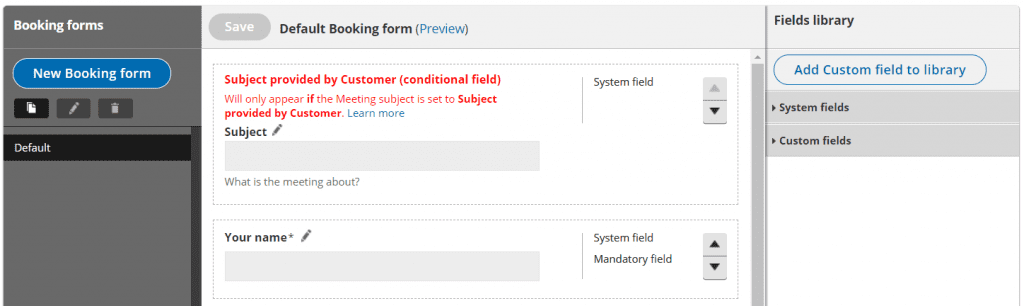
ScheduleOnce will allow you to edit the fields of the default form, which is a good place to start. Next to each of the field titles is an edit icon. Most of the fields are pretty self-explanatory but a couple of these choices are exceptional.
When you reach the Booking page, you’ll be able to allow the customer to set the subject of the event.
Otherwise, the subject of the event will be the title that you created when you set it. The same applies to the location setting. As we’ll see on the booking page, you’ll be able to set the location as “Physical,” “Virtual,” or “None” then either enter the location or allow the customer to enter it.
- The first of those might be useful. It allows you to create a single event type then let customers define what they want to do with that time. It gives them more work, but it might be a good option for some businesses.
- The second option is less useful. It allows your customers to set the venue for a meeting, which could have you running around to places you’d rather not go—or going back and forth with the customer to come up with a place that works for both of you. If a business has a small number of possible venues for a meeting, then it’s an option that could work. Otherwise, you don’t want the location to be provided by the customer.
- Next, to each field are a few pieces of information. You can see whether the field in the form is a “system field” (one created by ScheduleOnce) OR, a “custom field” (one created by the users). There’s also a checkbox that makes a field mandatory, and arrows to move fields up and down the form.
- To the right of the form is a “Fields library.” The system fields are the fields are already present in the default form. “Custom fields” opens a drop-down menu of additional fields such as a list of countries or states, a checkbox for terms of service or a place to add attachments.
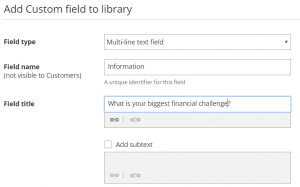
- Finally, a big “Add Custom field to library” button at the top of the column lets you create an entirely new field.
What to Put in Your Form
How you create your booking form is important. The form is a bit like the receptionist at a medical clinic. They need to take details but their attitude determines whether the booking is completed and the customer returns or whether they turn away, frustrated at the amount of information they need to supply.
You’ll need a name and an email address. Those fields need to be mandatory. The remainder will depend on the nature of your business. Often, the best option is to simply include a single multi-line text field and a single question.
Prepopulating Your Fields
Designing your field will be a compromise between requiring your customers to hand over information that will make the event smoother, and hurrying them quickly through the booking process.
One way to avoid that compromise is to complete the form for them. ScheduleOnce lets you do that in two ways.
- One way is by creating a personalized link.
- The other is by bringing in data from your Salesforce or Infusionsoft accounts.
The link’s URL contains all or some of the information that the form demands, and that information is inserted into the form automatically.
Automatic redirect
Finally, in this section, you can determine where the customer goes after they have submitted the form.
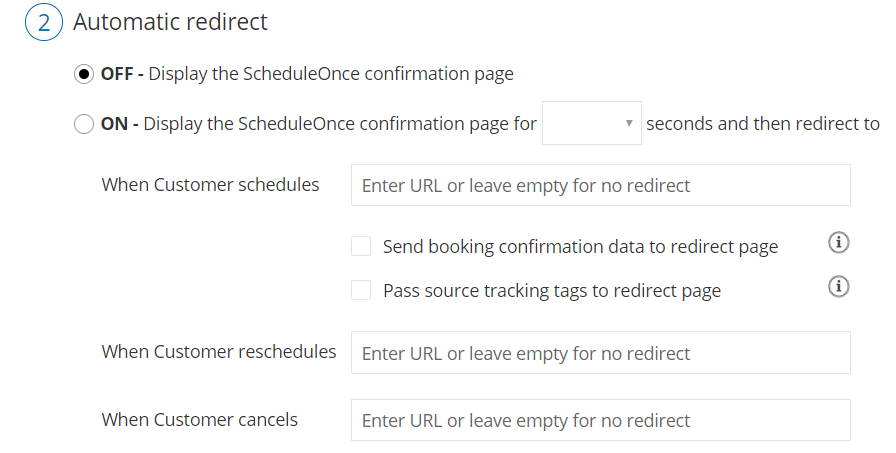
By default, customers are sent only to a confirmation page containing information about the event. But you can you do more than that. Check the “On” box, and you can send the customer to a page on your website. You can also send the booking confirmation data and the source tracking tags to that page, and you can bring them to your own pages when they cancel or reschedule.
This is something you should do. You should create separate landing pages to show when a customer books, cancels or reschedules.
Again, what you put on that page on your own website will depend on your business, but you could give users a button to download a brochure or an information product or guide them to other parts of your business. Whatever you choose, you’ll have brought your new customer to your website, and you’ll be able to guide them through your content.
Customer notifications
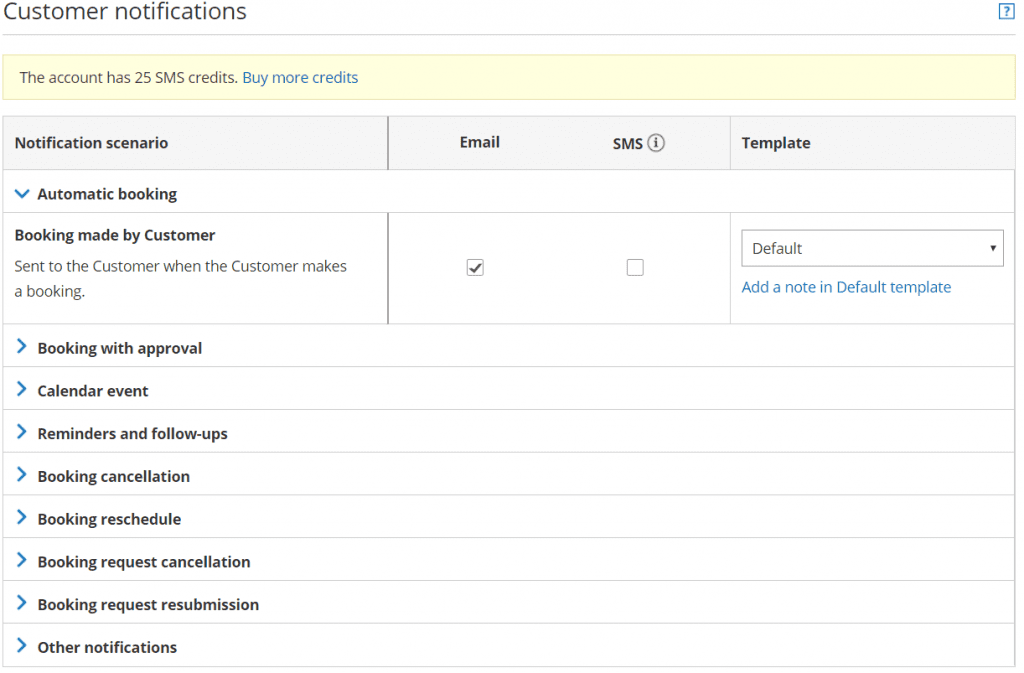
Whenever a customer interacts with ScheduleOnce, they can receive a notification. The “customer notifications” section offers a long list of different events that can trigger one of those notifications.
Those options include making a booking, either automatically or with approval; calendar events; cancellations and reschedules, and even manual refunds.
Most of these options are pretty clear.
- Customers should receive notifications when they make or request a booking.
- They should also receive notifications when they’ve canceled or rescheduled.
- And they should receive reminders about their bookings—but not too many.
ScheduleOnce lets you send three reminders and a follow-up message. My recommendation is that three reminders are too many.
- It’s a good idea for the customer to receive a notification the day before the event.
- You might also want to send a second reminder an hour before.
- But don’t go for that third reminder.
- And, unless the event has been booked weeks or months ahead, you’ll start to bother your customers.
Similarly, while a follow-up message might be a good idea, sending it automatically will feel too formulaic if the event was one-on-one. Use an automated follow-up message to thank a customer and outline next steps if the event is a workshop. But if you’ve met someone in person, follow-up with a personal message.
You’ll also need to decide whether you want to send the notifications by email, by SMS, or both. To send reminders by SMS, you need to ask for a telephone number on the booking form and you might have to buy credits. You start with enough credits for 25 messages.
Pick one option — and lean towards email.
Email feels less intrusive and less urgent than SMS. Business is conducted by email while phones are also used to chat with friends. You can get away with sending the first reminder by email then the second by SMS an hour before the event, but in general stick to email.
Each notification comes with a default template but you can also create your own, and you can create it for each notification you want to send. You can build those templates by selecting the dropdown menu under “Template” in the top right corner of this section or you can edit the default template by selecting, “Add a note in the default template.”
Alternatively, you can also reach both the notifications editor and the booking forms editor from the menu on the left of the page.
Again, you should make use of this option. All the communications that the client has with you through ScheduleOnce should carry your business’s voice and its brand. It’s easy to leave ScheduleOnce to do all the work for you. But that small investment of time before you begin taking bookings will go a long way towards deepening customer loyalty.
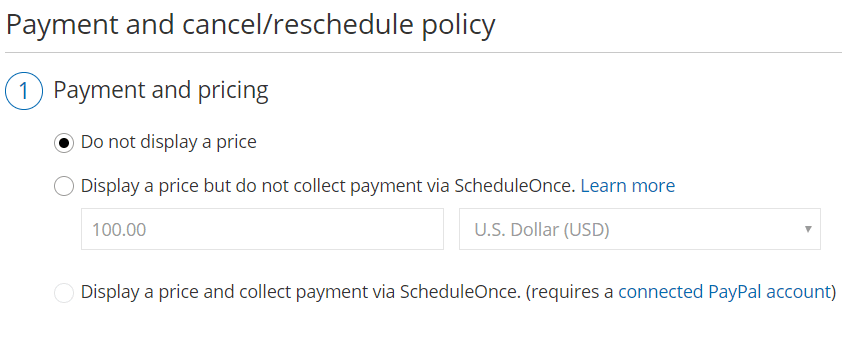
Payment and cancel/reschedule policy
One of the most useful features on ScheduleOnce is the ability to make money from your events. The platform doesn’t just allow users to book your time, it also lets you charge and collects a fee for those bookings.
Select an event and choose “Payment and cancel/reschedule policy” and you’ll be offered three sections.
The first section is about the payment itself. You can choose not to display a price at all if you want to keep the booking free. You can also choose to display a price but not collect the money on ScheduleOnce. Your customer will have to bring a check or cash or find some other way to get the cash to you. And you can also display a price and collect the payment through ScheduleOnce.
That last option means connecting your PayPal account and taking the payments through that financial service.
There are no other options… which forces you to make some decisions. The first decision is simple enough. Whether you want to charge for your event will depend on the nature of the event and the content it contains. If the meeting is supposed to be only for lead generation, you’ll want to skip the price display.
But if you do want to charge for the meeting, then you’ll need to decide how to do it.
- PayPal is useful and convenient but can be problematic. The company’s customer service is often poor and while the transaction fees are usually around 2.9 percent they can reach as much 5.4 percent—and if you’re selling internationally, you can add currency charges to those costs.
- There are alternatives. You could ask customers to send the payment through TransferWise or some other payment system but you can’t do it in this section of the event creation. You can only do it on the public content section.
If you want to collect payment but don’t want to use PayPal, choose: “Display a price but do not collect payment via ScheduleOnce.” Then when you come to edit the booking page — tell customers how to make the payment.
ScheduleOnce also lets you define your cancellation policy here. You can set the time before the meeting when the customer can cancel, and set an amount in dollars or a percentage of the sales price that they’ll get back.
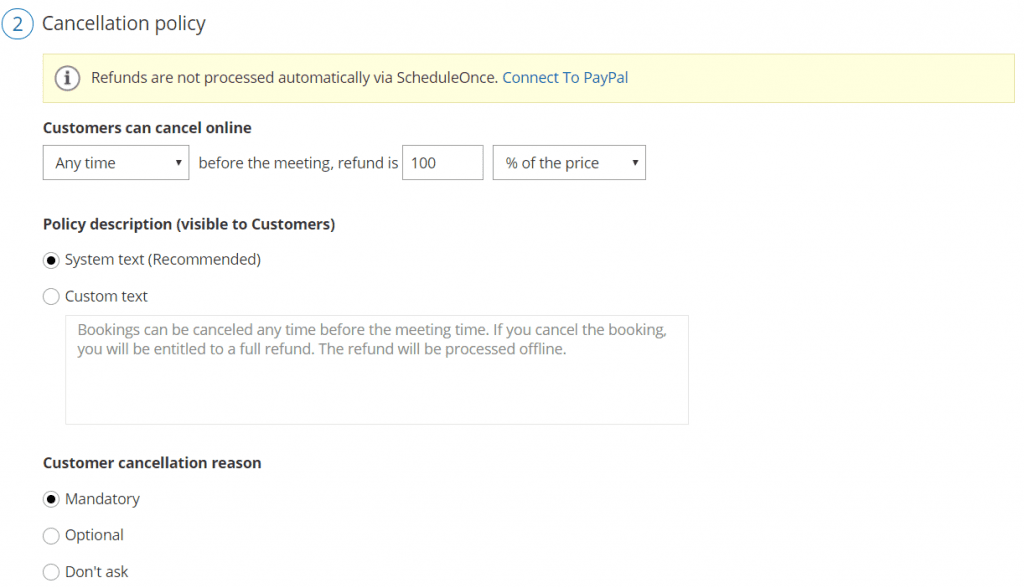
Customers can be required or invited to give a reason for the cancellation (keeping it optional is usually the best choice) but the important section here is in the middle. You need to give your cancellation policy a description. This description will be visible to customers and it will tell your customers when they can cancel and what they will receive.
ScheduleOnce provides a default system text which it recommends that people use. The text depends on how you’ve decided to take payment. If you’re taking payment but not using PayPal, for example, the text states:
Bookings can be canceled any time before the meeting time. If you cancel the booking, you will be entitled to a full refund. The refund will be processed offline.
You can probably do better than that. Any automated text lacks personality. You can use this space to add that personality, build a connection with your customer, and try to reduce the cancellations:
You can cancel your booking at any time and for any reason and receive a full refund. That’s a promise!
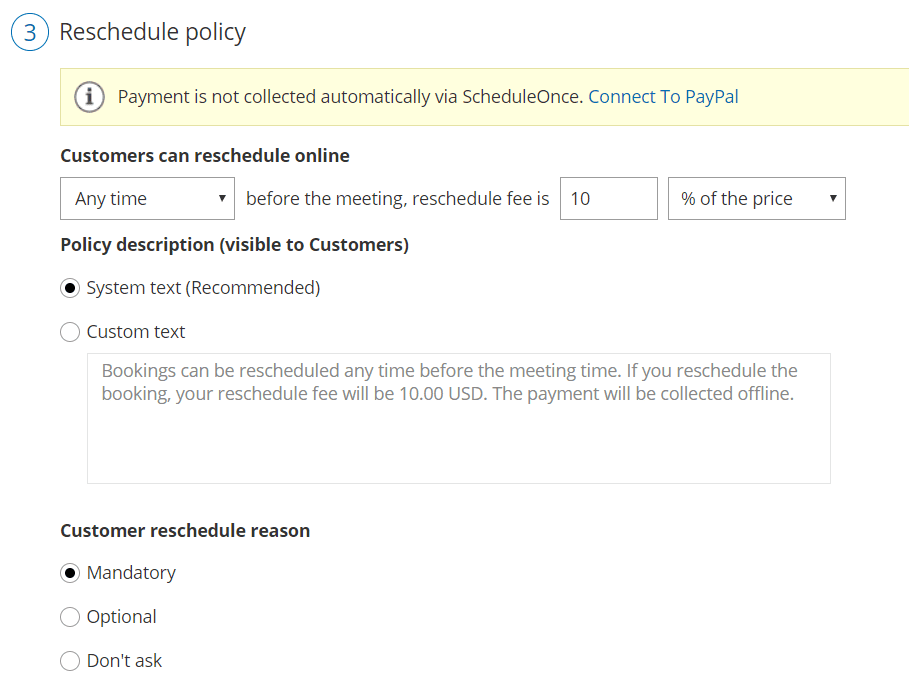
Finally, you can also describe your reschedule policy.
The process is similar to the cancellation policy. You can set a time and a cost to reschedule, ask for a reason, and add a policy description. It is interesting here though that the system text that ScheduleOnce supplies for a reschedule policy for a payment collected away from PayPal states:
Bookings can be rescheduled at any time before the meeting time. If you reschedule the booking, your reschedule fee will be 10.00 USD. The refund will be processed offline.
Remember that this is a customer that you’re keeping so while rescheduling might be irritating, you’ll probably want to avoid charging them if something comes up. They don’t even need to ask for a convenient time. They’ll be able to pick an hour from your booking page.
Public content
The final section might well be the most important. This is where you get to brand your event. You can upload a thumbnail (in JPG, GIF or PNG format) which will eventually be 200 x 200 pixels and no more than 200KB.
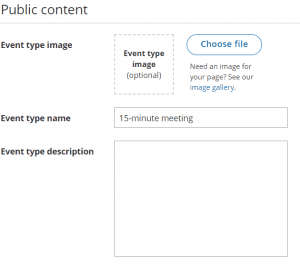
The event type name can be no more than 75 characters, including spaces, and the description is up to 2,000 characters.
This isn’t just a place to describe your event. It’s a place to sell it. Upload an image or a logo that builds trust and shows professionalism. Pick a name that describes clearly what the meeting is about, and maybe even sells it. That might not work for every meeting but an event title that says: “Beat your financial hang-ups and learn how to save!” looks more inviting than “Financial skills meeting.”
Similarly, your description is a place to put sales copy, to list what the meeting will cover, and tell customers what to bring or how to prepare. It’s also the place to tell customers how to make a payment if you’re not using PayPal.
All of this takes time — and it’s worth taking your time — especially over the first event. (Once you’ve made event, you should find that next event will go faster.) But even once you’ve created all your event types, you still won’t be finished. The next step is no less important: you get to prepare the page on which those events are booked.
3. Schedule Once Booking Pages
So far, we’ve only talked about creating events themselves. We’ve seen that you can determine the length of the meeting, its location, its title, and its description. You can also charge for the meeting and take your payment by PayPal or any other way.
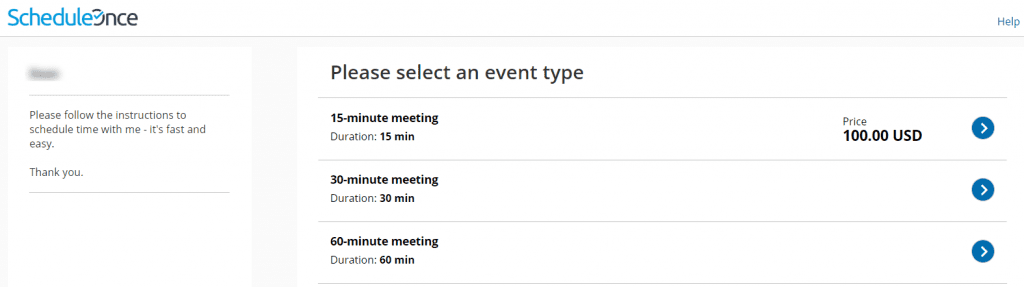
But you still have to present those options to your users. That happens on the Booking Page.
- The Booking Page offers a list of the meetings that you have available.
- It has its own URL that you can offer to potential customers.
- It’s customizable so you can add calls to action, social media buttons, and tags.
- You can also make multiple Booking Pages so that you can present different groups of events to different kinds of customers.
That’s really important. A business that serves both retail customers and commercial customers doesn’t have to put all of its events together. It can create a page full of retail events and a second page full of commercial events.
In this section, we’ll explain how to create and use those pages.
Create a Booking Page with Schedule Once
You start with a Booking Page already created and containing the three sample event types that come with the account.

You’ll notice a few things here. You can add an image to the Booking, and see who owns the page and how many meetings are associated with the page. You can also see the page’s current URL. All of those can be changed.
To create a new Booking Page, press the + icon in the top right corner.
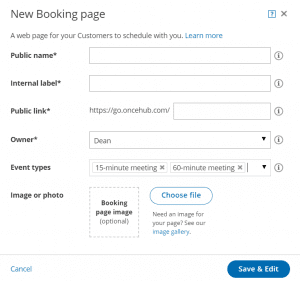
The form that you’ll need to complete to create that page is simple and straightforward.
- The public name is the title of the page that your customers will see.
- The internal label is the title you give it for your own records.
- You can add your own slug after the slash in the URL, which is very handy.
- You can change the owner and add any of the meetings that you’ve created.
- Finally, you can upload a picture to put on the Booking Page.
The real work begins once you’ve completed that form. You’ll be presented with a number of different options that define the booking page.
Overview
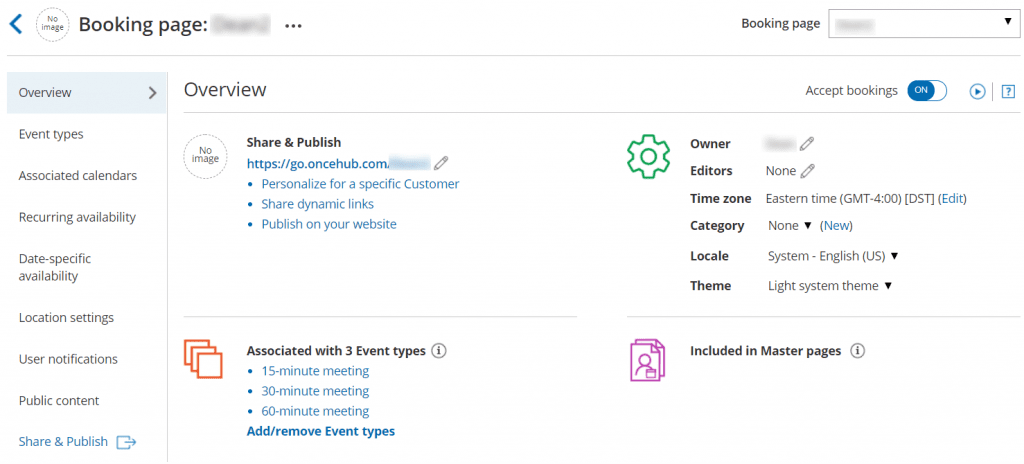
Like Event Types, the booking page starts with an Overview but then offers a long list of other features.
The first part is “Share & Publish,” which isn’t quite the same as the “Share & Publish” you can find at the bottom of the list on the left—but only because you can personalize the URL for a specific “Customer.” That doesn’t personalize the whole page. It just allows you to enter the customer’s name and email address, adding that information to the URL. When you send that URL to a customer, part of the booking form will already be completed. You can even allow them to skip the booking form entirely.
The other two links in this section take you to the Share & Publish page accessible from the tag at the top of the page… and from the link on the bottom left of the page.
Beneath this Share & Publish section is a list of the events associated with this booking page, and a link to add or remove events.
And on the top right, you can change the owner of the booking page, give an editor the right to change the content on the page, categorize the page, and also change the time zone and the theme. (The events can be listed against five different background colors.)
Finally, you can place this Booking Page in a Master Page, adding another level above the Booking Page and that page’s events. We’ll come to that later.
Event types
“Event types” lets you add or remove events on the Booking Page. An edit link on the right also lets you make changes to those events… by taking you back to that event’s edit page.
Associated calendars
The associated calendars are a little more interesting. You can see here which digital calendar you’ve linked with ScheduleOnce, and which calendars (or schedules) on that calendar you’re using. You’ll also find those calendars categorized in three ways.
The Main booking calendar simply shows all of the calendars in your account, and you can select one of those calendars to accept the bookings. You must have permission to make changes to those calendars, so if you’ve added a third party national holiday calendar to your Google Calendar, for example, you won’t be able to add your events to that list of holidays.
The Busy time retrieval calendars are what ScheduleOnce reviews before making a booking. You can check as many of these calendars as you want, but you’ll need to be careful here. The more calendars you check the fewer times you’ll have available for your events. If you’re willing to take bookings on some national holidays but not others, you might want to leave that calendar unchecked but block out the days you’re not willing to work using the recurring availability section.
Finally, you can add Additional booking calendars on which to receive a booking. If you’re making a joint booking with someone else, then you might want to make sure that they’re receiving the booking. Add their calendar to yours, and make sure that you do have permission to add events to it. Otherwise, there’s little point in writing events to any calendar other than your main one. You’ll just end up with the same event taking up more space in your schedule.
Recurring availability
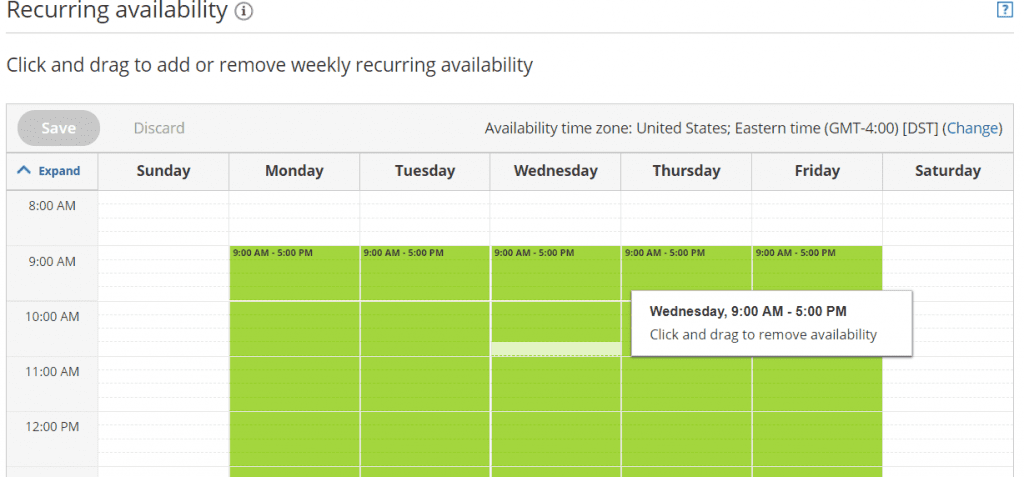
Recurring availability is both clever and a little complex. You’ll see a week of schedules with the hours available marked in green. To remove hours from that availability schedule every week, simply drag the cursor over the hours that you wish to remove. Similarly, you can drag the cursor over any blank hours to make them available.
It’s a good option to use if your weekly schedule is consistent. ScheduleOnce will start by assuming that these hours are available then check your calendar before making a booking. As long as you keep that calendar up to date with your events, you should find that you’re never double-booked.
Date-specific availability
Recurring weekly availability is great if you’re usually available — and when the times you’re unavailable times are consistent. Date-specific availability is good when you’re not usually available or if the hours of your availability vary and you haven’t connected a digital calendar.
You’ll first need to delete all the hours on the recurring availability calendar, then each week, you’ll have to manually add the hours you can take bookings. It’s a bit high maintenance. You’re better off linking your digital calendar and keeping it up to date.
Location settings
The location settings are refreshingly straightforward. They only contain three options. You can choose not to place a meeting location in the fields on this page’s events. You can indicate that the meeting will be virtual — or you can say that the event will be face-to-face.
The default option is not to use a meeting location, and if you stick to that option you won’t need to do anything else.
But you’re probably going to want to add location information so that your customers know where the event will be taking place.
If you choose to add that the event will be a virtual meeting, you’ll need to supply a little more information. First, you’ll need to decide whether you supply the conferencing information or whether it’s provided by the customer. Pick the former—which is what you’re likely to do if you’re organizing an online meeting—and you’ll have to supply a header, a short note, and details about your Web conferencing tool.
ScheduleOnce will let you connect any account you have with Zoom, GoToMeeting, or WebEx. You’ll be able to make that connection here. If you prefer to use Skype, you can choose “Web conferencing: Other” and your Skype ID, phone number or whatever other information you need to make the event happen.
If you want the customer to provide the conferencing information, a move that gives them a great deal of power and leaves you uncertain how you’re going to be making the meeting, you’ll need to add a note telling the customer what to do. ScheduleOnce suggests “This is a virtual meeting. You will provide conferencing information” but you can probably come up with something softer and more inviting: “We’ll be having a virtual meeting. Let me know how you want to arrange it.”
A face-to-face meeting gives you the same kind of options. Again, you’ll need to decide whether you set the location or you want to let the customer do it. This time though, if you’re setting the meeting, you’ll need to provide an address for the meeting.
User notifications
The user notifications settings will all be familiar. Like the notification you set for individual events, you’ll be setting reminders and follow-ups, alerting customers when they’ve made a booking or when the booking has been approved and sending out a notification when the bookings are canceled or changed.
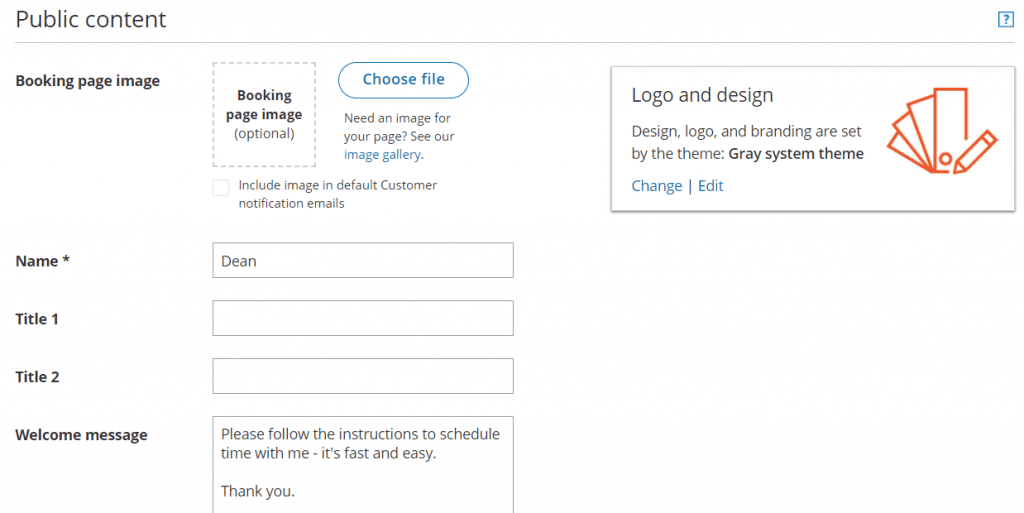
Public content
The last setting may well be the most important. The public content forms let you personalize the booking page. It lets you add images, titles, logos, a design, and a welcome message, as well as personal details, such as a telephone number, email address, website URL, and social media buttons.
You should make use of this page. The more you’re able to brand the booking page to match your own brand, the more you’ll be able to leverage the trust that your brand already possesses to improve your conversions.
This section is important. Think about how your booking page will look and don’t rely on ScheduleOnce to do your design for you. You’ll want to move away from ScheduleOnce’s default settings and bring the page closer to your own look-and-feel.
Booking pages are a valuable tool. You’re going to have to spend time thinking about the sorts of events you want to offer, how much you’re going to charge, and how long each of those events will last. But you will also need to take the time to set up the booking page on which those events are offered.
You need to treat your booking pages with the same degree of seriousness with which you treat your landing pages—and measure their success in the same way.
4. Master Pages with Schedule Once
Booking pages provide a way to present multiple events on a single page. Master pages let you present multiple bookings with multiple people. This adds a whole new level to ScheduleOnce.
- It allows a financial consultancy to offer clients meetings with experts who specialize in small businesses or personal finances or debt management, and so on.
- An auction house could offer meetings with specialists in paintings or sculpture or jewelry.
- For any business with a team of experts, master pages provide a way for clients to make bookings based on the person they’re meeting rather than on the type or duration of the event.
- It gives businesses a very different way to approach serving their customers.
Unlike event types and booking pages, ScheduleOnce doesn’t offer a default master page, so you’re going to need to create one from scratch.
On the Setup page, press the + icon in the top right corner of the master page section. You’ll be presented with a pop-up that asks for a set of information.
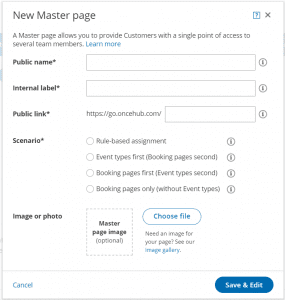
Much of that information is straightforward.
- You’ll need to give the page a name that will be visible to clients.
- You’ll need an internal label that will help you to keep your own pages organized. (They can be the same name.)
- You’ll also need to come with a go.oncehub.com suffix, and you can upload an image to make the page look pretty.
But the standout feature on this page is the “scenario.” This defines how bookings are assigned to the booking pages on the master pages. There are four options.
Rule-based assignment.
The first is the most complex. You can create rules to determine how bookings are assigned. Instead of the customer choosing who to meet, you can decide who receives which bookings or you can lay down rules to allocate meetings. So you can ensure that everyone gets a fair number of bookings or that certain team members only receive certain kinds of events.
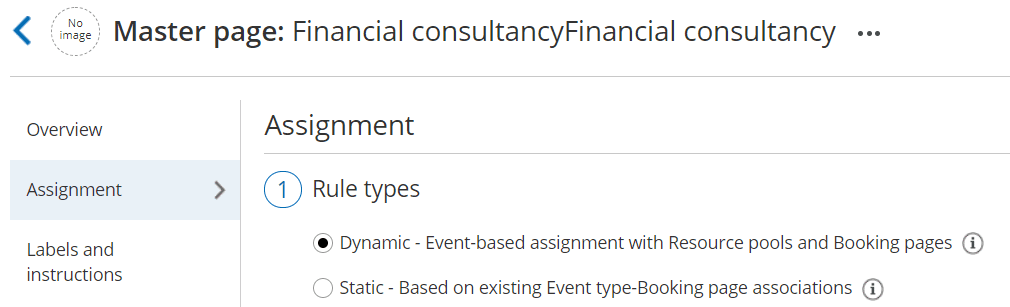
ScheduleOnce works with two kinds of rules: dynamic rules and static rules.
Dynamic rules assign bookings according to the rules defined in each event.
- They decide how events are provided, whether through a booking page or directly by a team member.
- Each event type included on a master page can have different rules.
- Events could be panel meetings or one-on-one meetings.
- These events can be distributed on a round-robin basis or only according to availability.
Dynamic rules require the use of InviteOnce, another application in the OnceHub suite of applications. It’s where you can add team members and contact lists to create a pool of users, what ScheduleOnce calls a “resource pool.”
To create dynamic rules: choose “rules-based assignment” when creating your master page. In the Assignment section of the master page, select “Dynamic.”
In the section below, press the “Add rule” button. You’ll be asked to make three selections. You’ll need to choose the event; a primary team member; and additional team members.
The “primary team member” receives the booking and determines the meeting’s settings. It doesn’t have to be an actual person; “the primary team member” can also be a booking page or a resource pool that you’ve created in InviteOnce. If you make the “primary team member” a resource pool, ScheduleOnce will assign the bookings to a booking page within that resource pool based on the allocation method you’ve selected for that pool.
So if you were trying to set an appointment for a board meeting, for example, the primary team member might be a resource pool made in InviteOnce. That pool would contain all the board members as well as all of the details for the meeting’s location, notifications, and any third-party integrations.
Static rules assign bookings based on global settings and on the relationship between events and booking pages.
- That means they can only include those events on the booking pages that have been added to the master page.
- It also means that you’ll be doing the work here instead of in the resource pools in InviteOnce.
In the Assignment section of the master page, check the “Static” box. You’ll now be asked for a distribution method. This determines how events on the booking pages included in this master page will be allocated. There are three options:
Pooled availability offers a customer all the times available for the event types on that master page. The customer chooses a time, and ScheduleOnce assigns the event to the team member who has been the longest without an event. All events in pooled availability must be able to take automatic bookings and they can only be single sessions.
After selecting pooled availability, you’ll need to select the booking pages to add to that master page. It’s an option to use when availability is the most important criteria to offer customers.
Pooled availability with priority works in a similar way. The difference is that you can give each booking page its own priority. Instead of automatically giving the event to the next event owner in line and available at the time the customer has chosen, ScheduleOnce will offer the events on the booking pages according to their priority. If different booking pages have the same priority, ScheduleOnce will assign the next booking page in line.
Find a member by time gives customers the most power. ScheduleOnce offers customers all the times available. The customer chooses a time, then picks a team member to meet. Like pooled availability, It’s a good option when you want to emphasize availability but also want to give customers the ability to choose who they want to meet.
ScheduleOnce recommends using dynamic rather than static rules. They say that this option provides greater flexibility, letting you create a host of different rules for different kinds of events. So a single master page could contain events distributed by round robin and other events allocated by pooled availability. Dynamic rules are also essential for booking panel events attended by multiple team members. The company says that static rules should only be used if you want to allow customers to first choose a time, then select a booking page that lists the events available at that time.
That may be true but it’s also true that if you use dynamic rules, you’ll be spending more time fiddling with your settings in InviteOnce and battling with greater complexity overall.
If you have a lot of teams, multiple team members, want to offer customers a host of different kinds of bookings with multiple people, or have an administrative manager who has to set up work meetings and has the time to build these pages, then you’ll probably want that flexibility. But if you’re just offering a handful of events then you’ll be better off keeping things simple.
Create different booking pages for each of your team members and for each of your event types. Use these pages to manage what you offer customers on your master page.
Event types first (Booking pages second)
The alternative to setting rules is to let customers find their way through the bookings options themselves. They get to lay out the path.
The first option is to show the event types first. Customers pick the kind of events they want to book. They’re then shown the booking pages associated with those events—so those might show the team members or locations for those events. Finally, they get to pick a time.
Booking pages first (Event type pages second).
Showing the booking pages before the event types probably makes more sense. If you’ve organized the booking pages by event types, you’ll be able to show a list of booking pages for customers to select before they find the event they want at the time they can accept.
Booking pages only (Without event types).
Finally, if there’s only one event type associated with a booking page, you can opt to show the booking pages then move straight to the available times.
Master pages are the most complex part of ScheduleOnce. They also provide the greatest flexibility, including the ability to control how your team members receive their events and how your customers choose the times they want to attend them. To make the most of those options, you’ll need to create a good choice of booking pages, including pages for team members and event types, and you might also need resource pools if you’re hoping to create events with multiple team members.
But they aren’t simple or straightforward to use. Take your time and try to enjoy playing with the options you have available.
So far, we’ve only discussed setting up your ScheduleOnce events, booking pages, and master pages. But no less important is how you present the events that you’ve created to your customers. The Share & Publish tab at the top of the page offers a plethora of options.
Unlike the organization of booking pages and master pages, these are pretty straightforward. They really are also fun to play with.
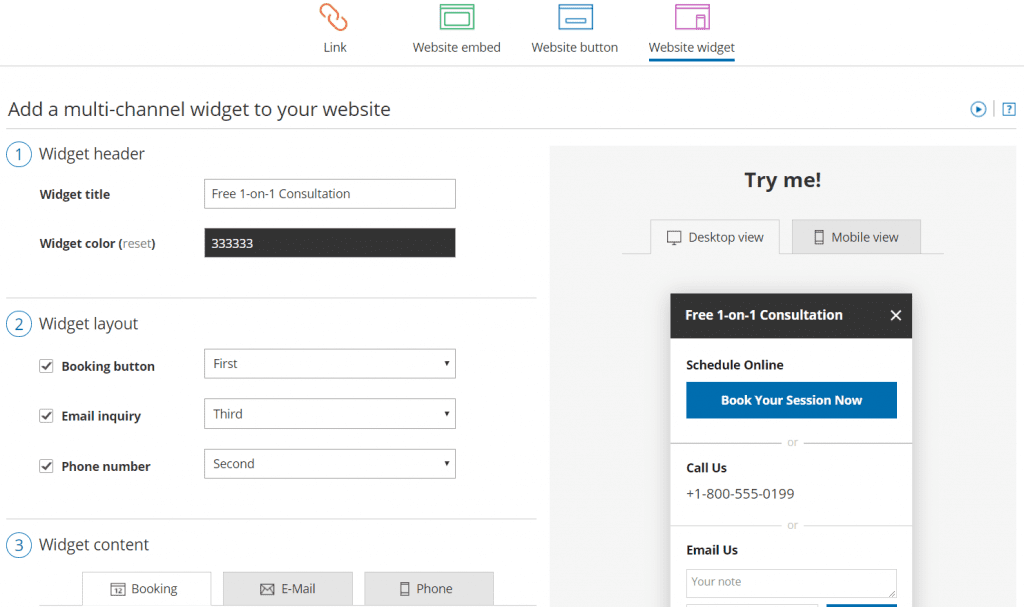
You can simply create links to a booking page; embed calendar schedules on a Web page; create a button that says something like: “Book now!”; or build entire widgets with contact details and buttons, and even see how it looks on a mobile device.
You can change the content of each of these options, and you can also change the look so that they fit the design of your website.
Conclusion
There’s even more to ScheduleOnce than we’ve outlined here. You can also track the conversion rates of your booking pages and events and even your revenues on a reports page. Plus, it’s possible to add third-party integrations.
In short, there’s a lot that you can do on ScheduleOnce in 2023, from simply helping people to make bookings to ensuring that every member of a sales team gets a chance to meet their targets with carefully shared leads.
But, it’s not simple. ScheduleOnce’s combination of booking pages, master pages, and event types can be confusing. The separation of InviteOnce into a separate application doesn’t make things easier. If you’re willing to put in the effort, you should find that you’re using a powerful scheduling tool. But be prepared to take your time and experiment throughout 2023 with this productivity tool.
Updated January 2023
John Rampton
John’s goal in life is to make people’s lives much more productive. Upping productivity allows us to spend more time doing the things we enjoy most. John was recently recognized by Entrepreneur Magazine as being one of the top marketers in the World. John is co-founder of Calendar.