A successful business depends on good client management. And one way that you can keep customers on a long-term basis is by offering tailor-made services.
At the same time, the more you grow, the wider your client base becomes. It will, then, be unfeasible to manage clients manually at some point in the future. There are, however, some solutions that can assist you in overcoming this problem. An example of this is Thryv software.
What is Thryv?
With Thryv, you can automate customer relationship management (CRM) processes. As a result, better results can be achieved in a shorter period of time. For small and medium-sized businesses, Thryv opens a whole new world of possibilities. Whether it’s marketing or online booking, Thryv simplifies everything. In addition to marketing automation, you can manage contacts, process payments, and handle appointments in order to boost your brand.
While Thryv is packed with features, we want to focus specifically on its appointment and scheduling capabilities. Why? Because for small business owners, scheduling can be challenging. Thankfully, by automating synchronization, Thryv makes booking easier. In addition to better time management, you can also control payments with it.
In addition, staff, clients, and owners can schedule appointments. A feature like this can benefit both small business owners and their clients. For example, calendars can be displayed to show upcoming classes and sessions for your gym.
Customers will be able to schedule appointments using these. It is up to you what details you want to include. You can also share the calendar with your staff. It’s even possible for them to manage their bookings via their own accounts.
With that all said, here’s an introductory guide to Thryv Calendar.
Thryv Calendar Setup
Does your business rely on booking appointments with clients? If so, you might want to give Thryv a try. Here’s how to customize your Thryv calendar so that it works exactly how you want it. As a result, you can keep track of everything more efficiently than ever.
However, due to Thryv’s robust system, setup can take some time. As such, another platform might be a better choice if you want a quick-start platform.
Set Up Your Staff Calendars
Every member of your Thryv staff will have their own calendar. To make it easier to identify who will be assigned to an appointment, appointments will be color coded.
Your staff member’s calendar can be created with just a few clicks once their account has been created. In order to add a staff member, click on the Add A Staff Member button below your current staff members.
You will need to enter the name of the staff member, their email address, and the role they play. To determine what features of Thryv your staff can access and use, assign them a role as you add them to Thryv.
Depending on your needs, you can assign your staff members to one of the following roles:
- User. This role is great for client-facing staff. However, it has the fewest permissions. Users can only view conversations, appointments, payments, and documents that they have been assigned.
- Collaborator. For a staff member who needs to interact with clients as well as view and edit other staff members’ actions, this role is ideal.
- Marketer. An employee in this role can send promotional emails or communications to all clients. The role is also good for employees with access to the business website, listings, and social media accounts.
- Manager. An employee who needs access to all of Thryv’s features would benefit from this role. It is possible for users to view all the actions they have taken. All account settings are accessible except those pertaining to account plans and other staff members.
- Admin. Among all roles, this one has the most permissions. Ideally, this would be for a staff member who needs access to all Thryv’s features and the ability to edit staff settings and account plans.
- Primary Admin. When setting up a Thryv account, this role is automatically assigned. It should be the owner of the business or the main user of Thryv.
Add Staff Members
Add New Staff
Your staff member can be invited to set up their own password with a Welcome Email.
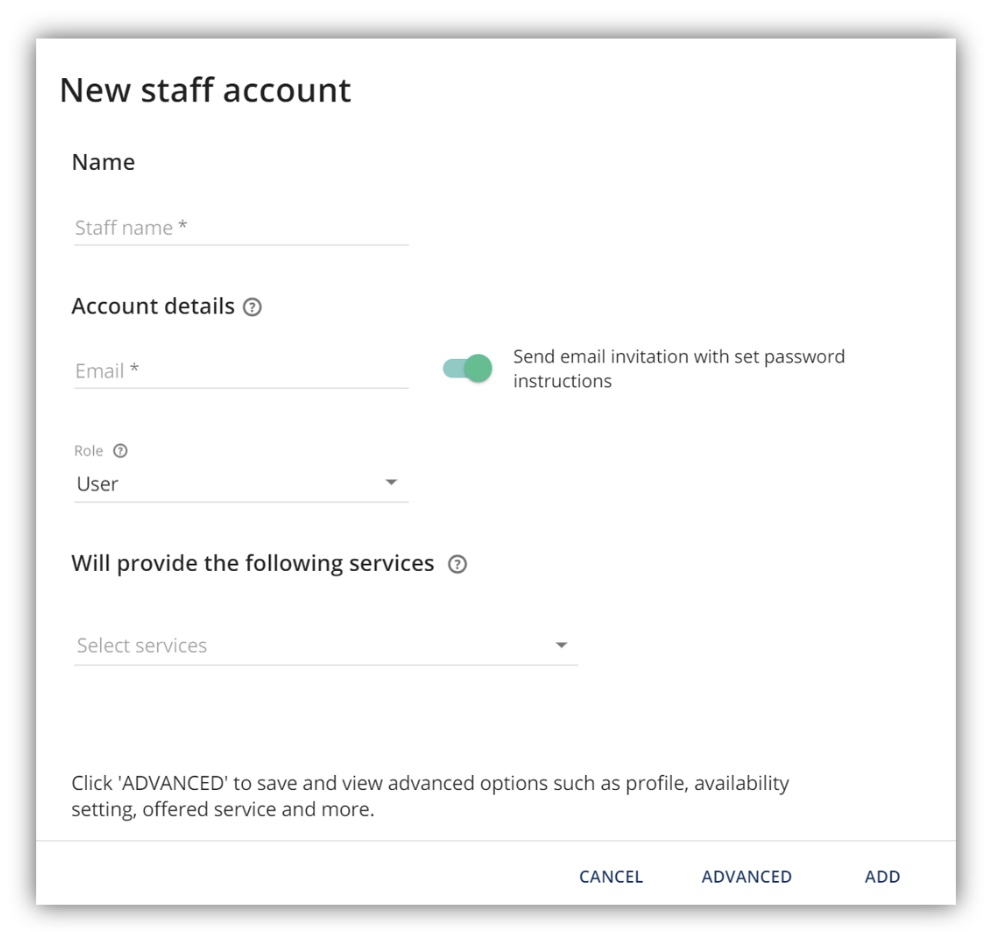
In Settings>Staff, click “Add Staff”:
Choose the services your Staff Member will provide to your customers by entering their information. When the toggle to the right is set to green, the email invitation with password instructions will be sent. By clicking on the toggle (it will turn gray), you can set your own password for the staff account, and the staff member will need to set their own password once they try to log in. Roles and permissions can be assigned to each employee so that they can view and edit specific information.
Finally, click on Add after you’ve assigned the right roles to the appropriate team member. If you want to add more staff members, repeat this process.
Add Your Services to Thryv Calendar
What’s next on your calendar? The addition of your services. Depending on their appointment type, your clients will see this “menu.”
To add a service by scrolling down and clicking Add A Service.
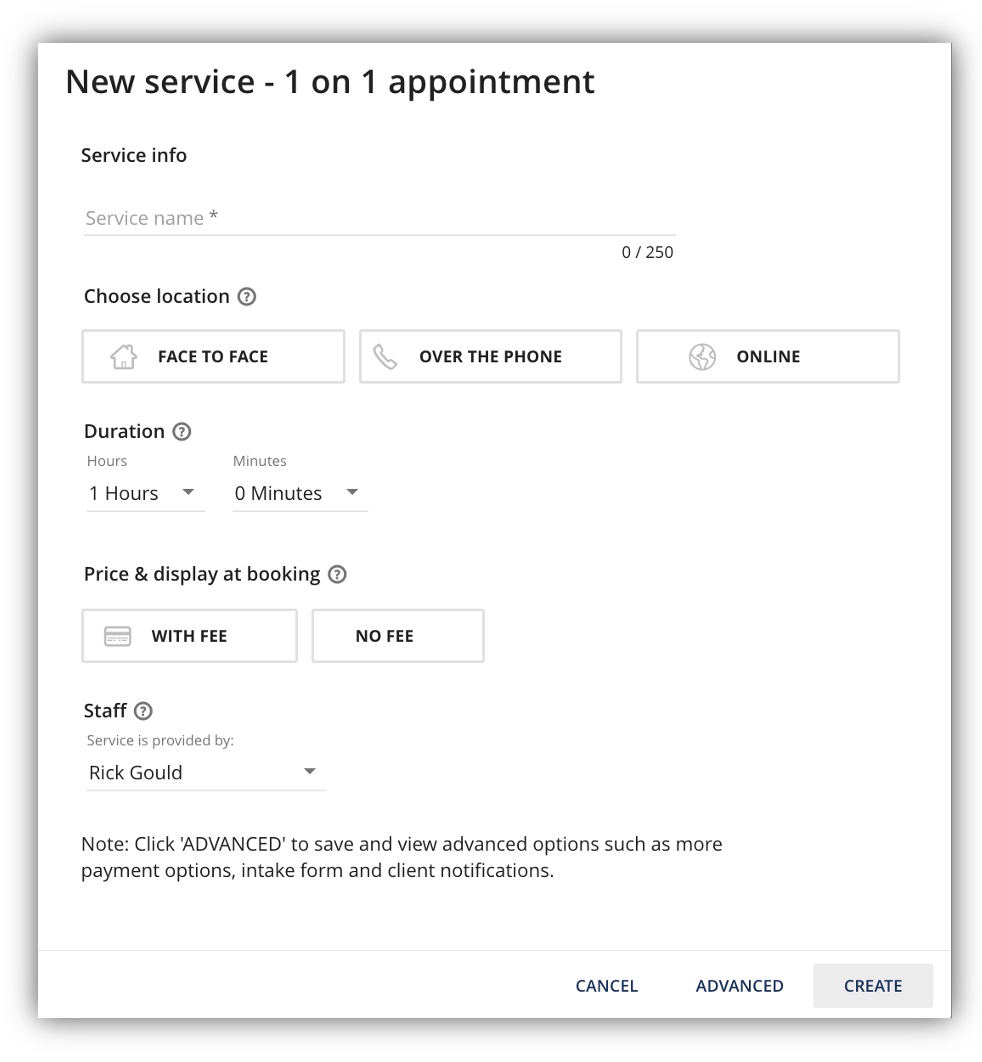
New Service
You can choose between a 1 to 1 appointment or a group event. From there, you’ll then be presented with a window containing the necessary information. Each field in this window must be filled out. You can set up more detailed information about this service by clicking on Advanced.
Add to Thryv Online Scheduling
Make sure the online scheduling option is enabled on your website, your Client Portal, emails, or social media pages so that clients and prospects can book services and events online:
- Navigate to Settings> Online Booking Options
- Check the box next to I offer online scheduling
Set and Update Your Services
You can customize a few default services in your account when it is created.
Your service menu will display any new services you create on your client portal, website, and social media unless you choose to HIDE them from the menu by default.
Setting Your Services Menu
You can customize your service menu by dragging and dropping 1 on 1 appointments, or group events in the order you prefer.
- 1 on 1 appointment. In most cases, you and the client are involved. Your clients can choose from a variety of appointment options based on your current availability and schedule their appointments at their convenience.
- Group event. Meetings, classes, workshops, or other events involving multiple participants can be set up with this service type. It is possible for clients to sign up online until all spots have been filled. You can set a time for a group event after you add it to your service menu. Depending on the event, new registrations can be opened on a daily, weekly, or monthly basis.
Updating your Services Menu
Simply go to Settings>My Services
To edit a service or event, choose it from the drop-down menu.
- Whenever you hover over a service type with your mouse, you’ll see the tri-dot () icon. This will open a drop-down menu with the following options:
- Edit the service/event.
- Create a package for your service.
- Hide the service from your menu’s display.
- Clone similar services that only need a little tweaking.
- Grab a link leading to the service for emails or social media.
- Delete the service from your services menu.
- Click on the Edit icon to edit a specific Service.
- Drag & drop to reorder services based on your requirements.
In addition, Online Services Menu Settings Options can be customized.
- Service info. You can name your service and customize the default image attributed to it. You can also choose whether or not your service should be displayed from your Services Menu.
- Location. Describe where and how the service will take place.
- Duration & Availability. Provide time slots for clients to schedule each service. Choose the option that suits your needs to make the most of your time and make the most of your services.
- Price. Select how your clients are prompted to pay, the method of payment, and whether you wish to get paid online, in person, or upfront for your service.
- Staff. Depending on the service, you can determine which staff members will handle it.
- Booking Options. The minimum and maximum scheduling windows can also be controlled and automated for online bookings.
- Client Notifications. If clients schedule this service specifically, you can customize the notifications they receive. This setting allows you to send different notifications to clients for this appointment than the ones you normally send.
- Scheduling Request Form. Forms should be customized so that clients are asked or required to complete them while scheduling services. Forms can be customized for each service.
Set Your Availability Hours
Availability Hours
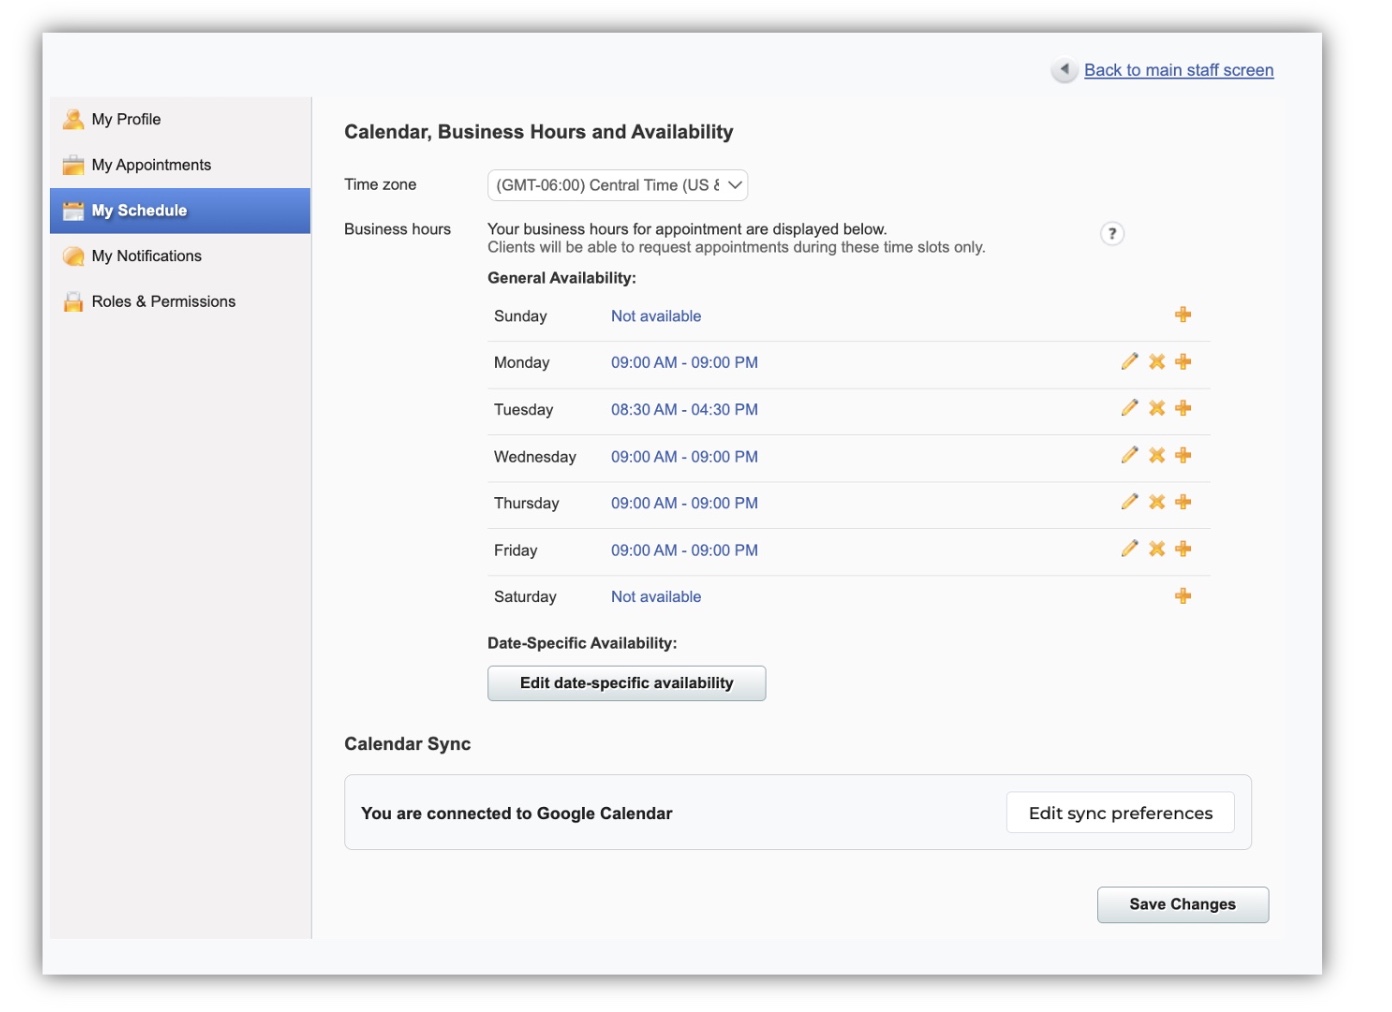
At the top of the calendar, click Edit Calendar>Business Hours & Calendar Settings. Once you click on Settings, you will be taken to your Business Hours.
- You can edit your business hours for a certain day by clicking on the Pencil Icon.
- You can change the times available by using the drop-down menus. When you are finished, click Save to keep your changes. To undo all changes, click Cancel.
- You can delete your availability for that day by clicking the X icon. By doing this, it will appear that your business is closed on that particular day.
- You can add a second set of available hours on the same day by clicking the + icon. If you want to close during the day, you can use this. Taking a lunch break at midday would be an example.
Sync Your Thryv Calendar
Thryv calendar also integrates seamlessly with your existing external calendar. As a result, you won’t be booked during personal appointments, and no massive transfers are required when you set up Thryv.
The following calendars can be synced with Thryv:
- Google Calendar. Navigate to your account dashboard and click on Settings> Availability & Calendar. Alternatively, if you have staff members enabled in your account, go to Settings> Staff> Edit the desired staff member>My schedule. Click on Connect Now under the Calendar Sync section.
- Other calendars use an .ICS file. You will need to enter the public URL of the .ICS file in the field provided and click Synchronize. That means you should be able to connect your Outlook Calendar and Yahoo Calendar.
Set Up Your Online Booking Preferences
Last but not least, if you choose to enable online booking, set your preferences and policies accordingly.
You can disable online booking by visiting Settings>Online Booking Options making sure the box that says I offer online scheduling through my client portal is unchecked
Set your preferences below for online booking if you plan on using online booking:
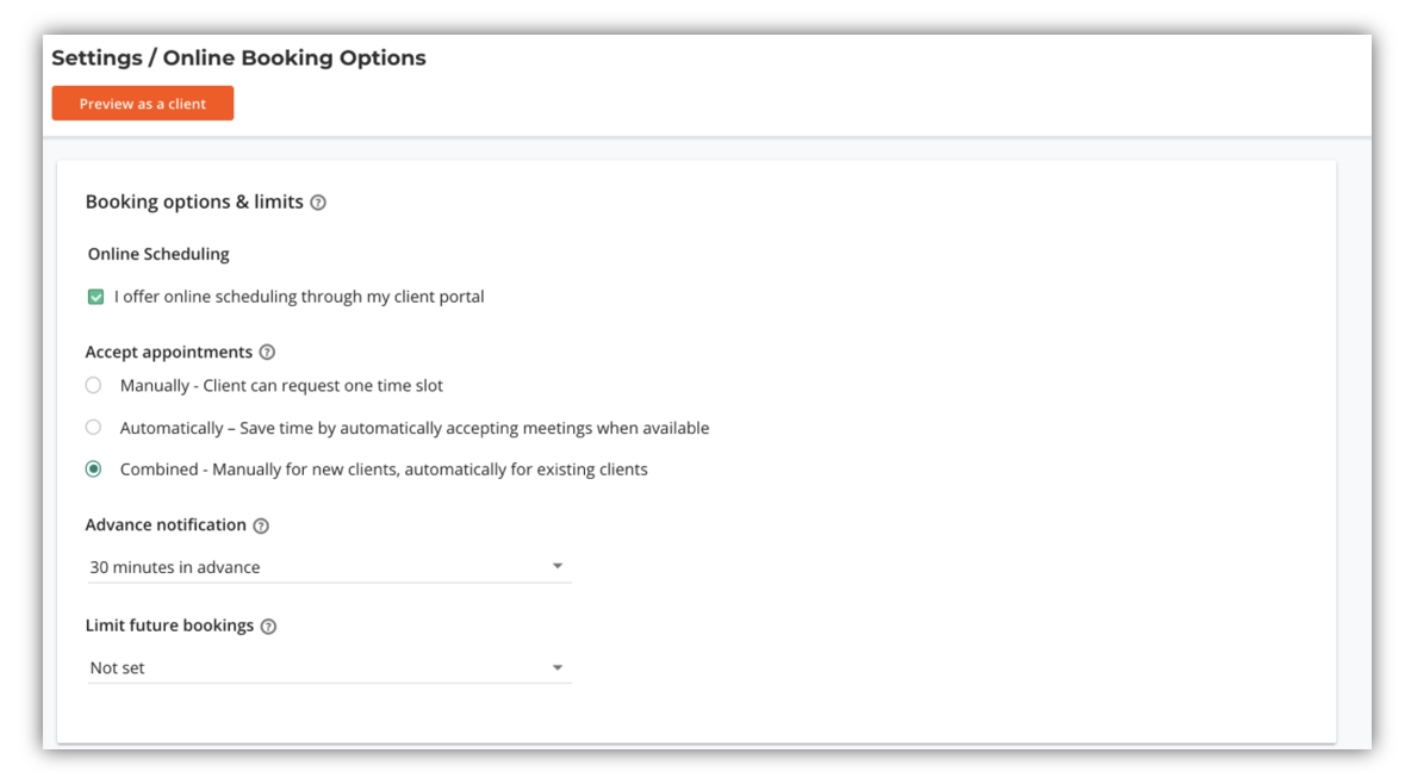
Booking Options
Schedule an Appointment With Thryv
Your workday can be organized more efficiently with the Thryv Calendar. Because Thryv can notify and remind your clients of all updates, you can manage your daily workflow and reduce the likelihood of a no-show appointment.
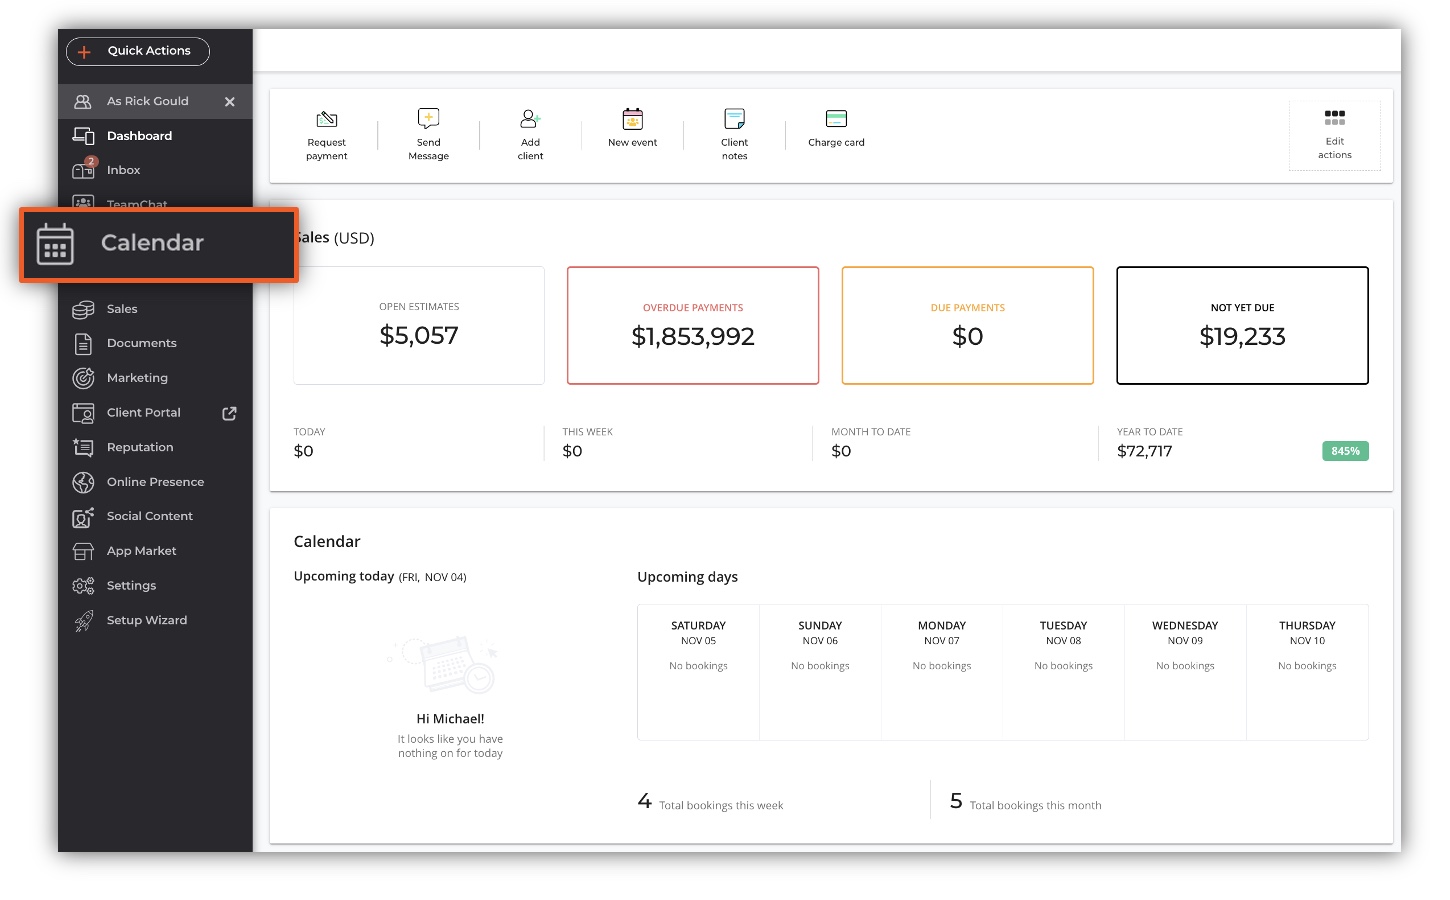
Select Calendar from the left navigation bar to create a new appointment.
Select the person with whom the appointment will be held:
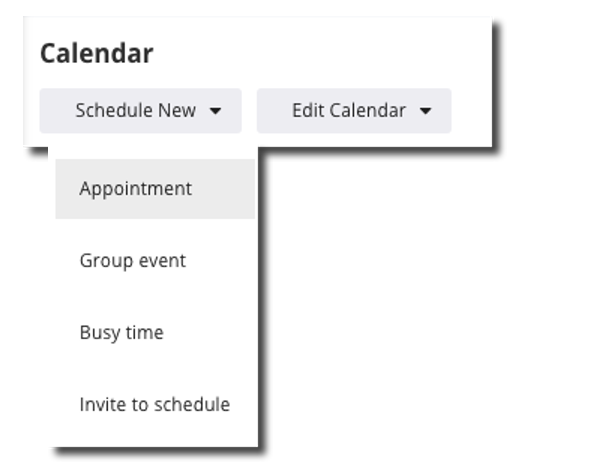
Calendar Menu
A Search of your existing clients can be conducted by name, email address, or tag. A New Job or Client can be added, or a Recently Active can be selected from recent active clients to be displayed.
To schedule an appointment, choose a service. You can choose to add a custom service, which allows you to customize the appointment title from your settings menu (Settings>Services).
The appointment date and time can be selected or typed.

Appointment Date & Time
In a neat feature, a warning will display if you attempt to schedule an appointment with a staff member with an already booked appointment.
Do you need to schedule an appointment for more than one day? At the bottom of the calendar, select the All Day toggle. This will make the appointment an all-day one. The end date can be the same for a one-day appointment, or if the appointment takes several days, it can be different.
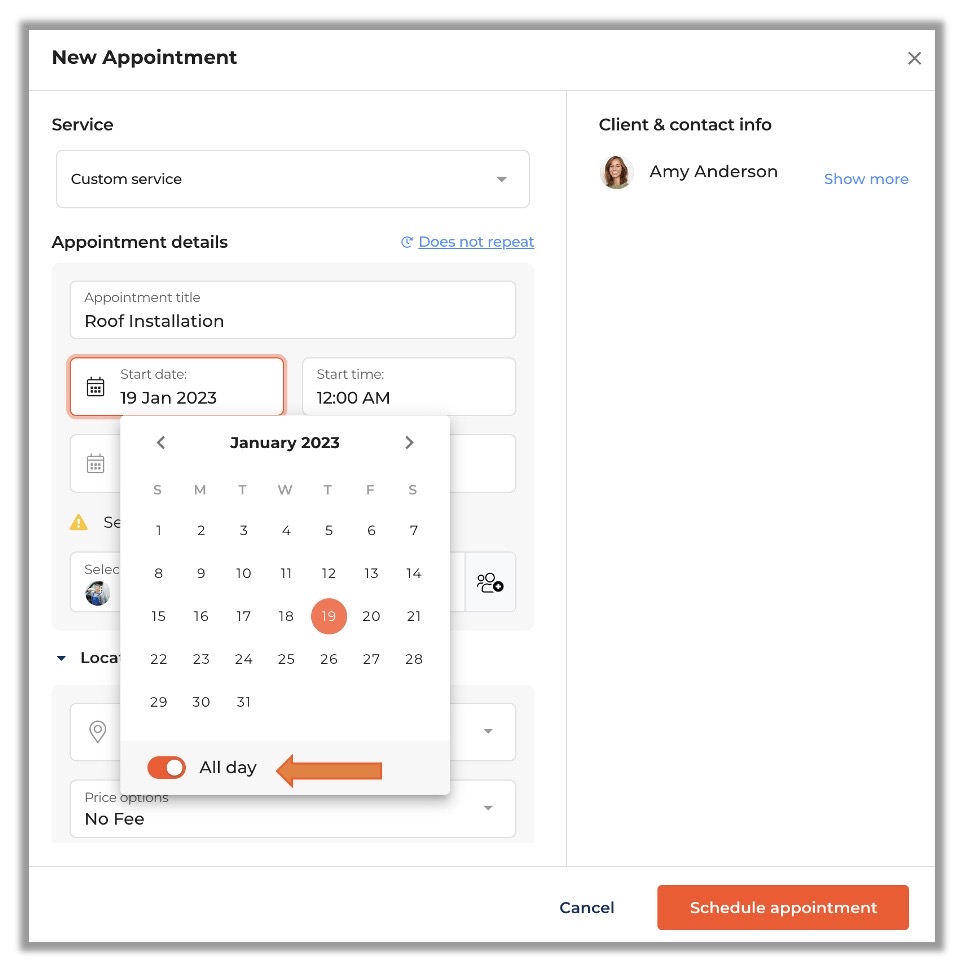
All day toggle
Set Up Recurring Appointments
Have multiple recurring appointments to set up? Select New from your inbox. Choose Appointment from the drop-down menu.
From the Calendar, create a recurring appointment:
Select Schedule New from the Calendar tab. Choose Appointment from the drop-down menu.
Click New Job/Client to create a new contact or job record, or choose a client or job from your list.
The appointment details are entered by selecting the service for the appointment and setting the first occurrence date.
To change the appointment to reoccurring — select Does not repeat.
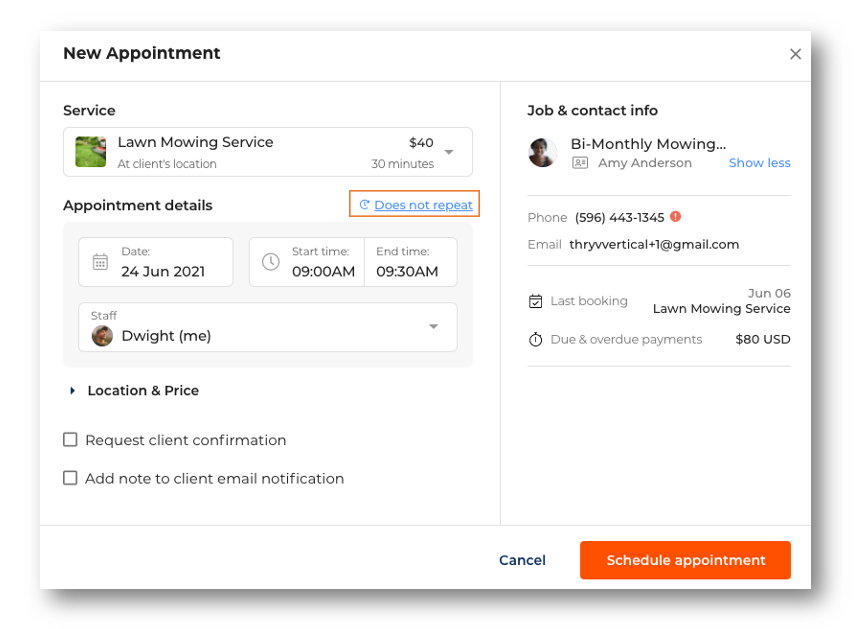
Reoccurring Appointment – Set Service
You can toggle the switch over to Repeat in the pop-up box.
- Specify how often this service will repeat.
- You can select the days when the appointment will take place.
- Set the appointment series’ end date.
Select Schedule Appointment once your revisions are complete.

Reoccurring Appointment – Set repeat
Select which Staff Member will take the Appointment
Next, you can set the appointment’s price. By default, the selected service’s price settings will be applied. From this screen, you can only make a one-time change. It is necessary to edit the service’s settings to make a permanent change to the price.
- Fixed Price. Using this method, the appointment price will be set.
- Custom Price. Service prices will not be displayed. On the confirmation sent to the client, no price information will be displayed. For a price, please refer to the invoice sent by your client. If the price of an appointment varies, this can be useful.
- No Fee. During this appointment, there will be no charge.
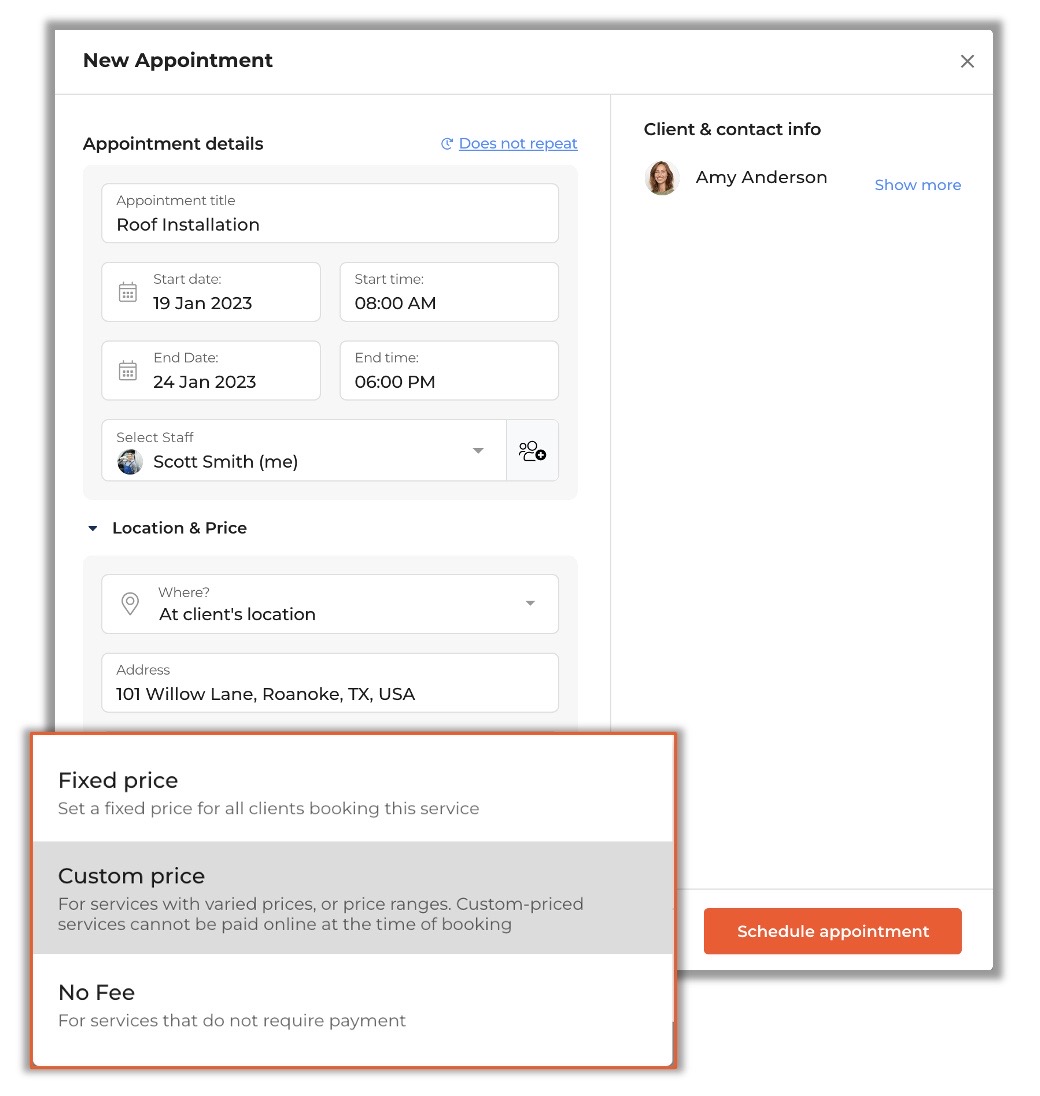
Appointment Price
Adding additional recipients to this appointment is also possible. You can do this by selecting Additional Recipients and Email Notes. Afterward, add each additional recipient’s email address under Additional Email Recipients.
If any changes are made to the appointment, the additional recipients will receive an email with a .ics file.
Additionally, you can include a message in the appointment invitation for the client. The client’s contact information, last booking, and overdue and due payments can be found by selecting show more next to their name.
For new appointments, the location, details, and notifications can be modified but default to the preset values.
Thryv Calendar View
With Thryv Calendar, double bookings and lost appointments are no longer an issue. With business calendar scheduling, you can save time, energy, and headaches.
You can schedule one-on-one appointments or group events directly from your calendar and enjoy the following benefits:
- Ensure fewer no-shows. Your clients will receive automatic appointment reminders via email and SMS/Text from Thryv.
- Keep your schedule in order. In addition to viewing your upcoming appointments, you can modify them if necessary or block times when you are unavailable.
- Online Scheduling. Clients can schedule an appointment by calling or emailing.
- Manage your schedule from one place. Your personal Gmail/Yahoo/Outlook calendar can be synced with your business calendar with ease.
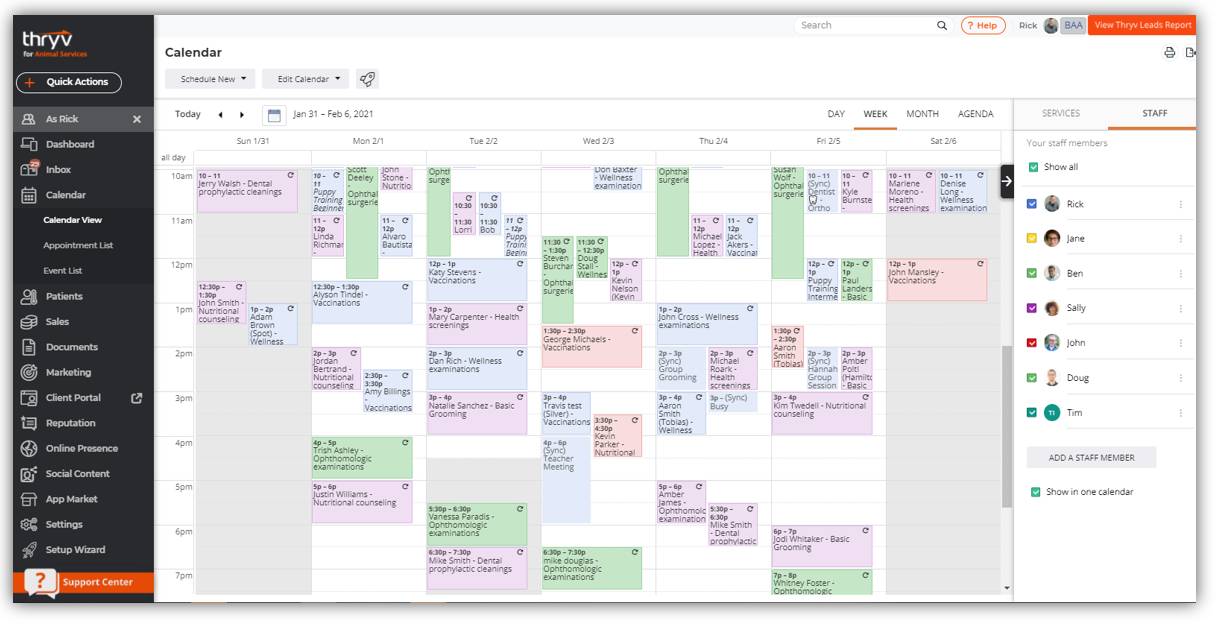
Your Calendar
Calendar View
On the left navigation pane, select CALENDAR to access your business calendar:
You will be taken to your calendar when you click this. The right-hand side of the page lets you toggle between your Staff Calendar and your Services Calendar.
Schedule New. You can select one of the following actions from the drop-down menu:
- Appointment. Creates a new client appointment.
- Group event. This lets you create a group event and invite clients or do it yourself.
- Blocked off time. A time range or time slot can be blocked as ‘not available for meetings with clients’ or for a specific task. In case you’ve enabled online scheduling, clients will not be able to select these times.
- Invite to schedule. From your email, invite your clients to schedule an appointment.
Print. You can print your agenda or calendar.
Export. You can either export all of your appointments and events to a CSV or Excel file within a given date range by selecting the appropriate drop-down menu.
Calendars can be displayed as Day, Week, Month, or Agenda.
- Day view. Specifies the day’s schedule.
- Week View. Your weekly schedule will be displayed in a Sunday-Saturday format.
- Month View. An overview of your monthly schedule.
- Agenda View. Calendar of all upcoming appointments.
On the Calendar Tab, navigate to the top left to see past or upcoming appointments and events.
- You can view the current day by selecting Today.
- View previous events or appointments by selecting the left-pointing arrow.
- You can view future events and appointments by clicking the right-pointing arrow.
The arrow will scroll between past or future events based on your selection of the display option: Day, Week, Month, or Agenda.
The Right Pane
There are two options in the right pane, either Services or Staff.
Services View
There are three possible actions for each of your configured services on this tab:
- Schedule. Schedules specific services with one or more clients at a time.
- Grab a Link and Invite. Put a link to the online scheduler for the specific service where your clients can see your availability. The link can be pasted anywhere online where people can find you – in emails, websites, landing pages, social media, etc. A direct email invitation can also be sent from your account to one or more clients at the same time.
- Promote. Promoting your service(s) to your clients is possible by creating an announcement.
- Edit. You can edit the specific service configuration on this page.
Staff View
Using this tab, you can see all the staff members that you have configured. You can view the following information about each member of staff:
- Clients can schedule appointments with specific staff members.
- Send a client a scheduling invitation on behalf of a specific staff member, or copy their scheduling link.
- Profiles can be edited for specific staff members.
Add Staff Member. Creates and manages your staff profiles and accounts on the staff settings page.
Show all. The calendars of all your staff members will be displayed. When a team member’s calendar is selected, only their calendar will display.
Show in one calendar. Your staff’s calendars will be displayed in one calendar view if you check this box. Unchecking this box will split your staff calendar view into individual calendars for each of them.
Color Coding
full calendar
Each service in Thryv’s calendar is color-coded for clients who do not have additional staff. By assigning a color to each service, the business can easily see which services are popular, identify trends over time, and see what’s up next during the day.
As a result, you will be able to manage your business and schedule more effectively.
In your calendar, click on the tri-dots under “Services” and click “Set Color”:
Thryv Mobile Calendar
You can view and manage appointment details on the Thryv Mobile Calendar, so you’re always where your client needs you to be when they need you.
On the bottom row of your dashboard, tap Calendar
Your mobile device’s Thryv App offers a wide variety of features, such as:
- Viewing your upcoming appointments
- Creating new appointments
- Organizing events for groups
- Editing your Availability
- Scheduling busy time
Setting Your General Availability
In the upper right corner, tap the tri-dots to change your general availability
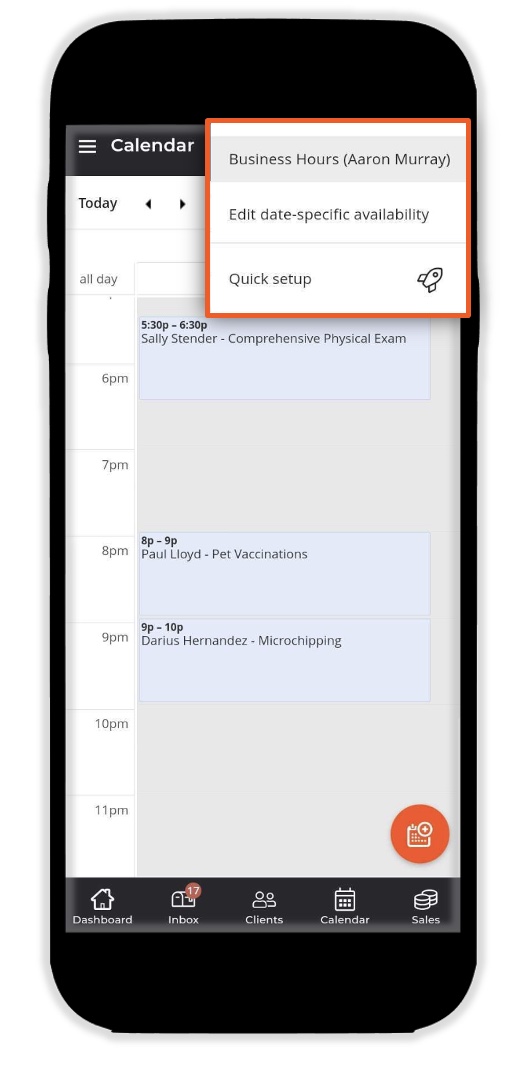
Business Hours
Next, click on Business Hours
Last but not least, you can edit your availability.
Turn on or off your entire availability for that day by using the toggle
- To change your availability time, tap the pencil icon.
- Create a second availability window by tapping Add Time Slot.
- Typical hours: 9 a.m. –12 p.m., closed one hour for lunch, 1 p.m. — 5 p.m.
- To delete a time slot, click on the X
- Afterward, tap the back arrow to return to the previous screen.
John Rampton
John’s goal in life is to make people’s lives much more productive. Upping productivity allows us to spend more time doing the things we enjoy most. John was recently recognized by Entrepreneur Magazine as being one of the top marketers in the World. John is co-founder of Calendar.