
Microsoft’s Outlook is a fairly complex piece of software. While Google Calendar and Apple’s calendar app assume that users will be individual customers who want to keep track of their friends’ birthdays, their dentist appointments, and their PTA meetings, Microsoft assumes that its users will sitting in their offices. Users don’t just create events. They also have a special button for scheduling meetings and can even use those features to book meeting rooms.
Outlook Calendar is also embedded in Outlook itself, which was originally designed to manage emails. That can make using it even more complicated. Although Google Calendar and Gmail are connected—so the details on a plane ticket that arrives in your Gmail inbox will be added automatically to your Google Calendar—they’re reached on separate apps and on separate websites. The two services look unrelated.
The combination of email and calendar means that you have to work a little harder to setup Outlook Calendar.
How To Setup Outlook Calendar
When you use it for the first time, you’ll be asked to enter an email address and its password.
And that’s where you might run into your first bit of trouble.
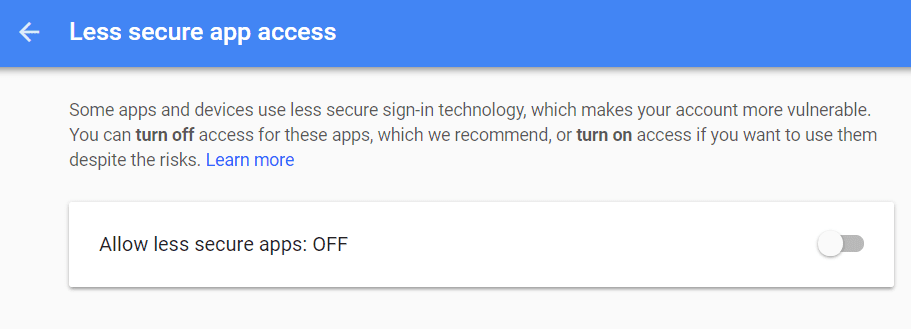
If you’re entering a Gmail address, you could find that “the ability to allow less-secure applications is turned off for your account.” Google doesn’t think that Outlook is secure enough. The company recommends that you use a different email client—its own, for example. But if you do want to use Outlook, you can go to the Less secure app access page, which is hidden away in your Google account, and toggle the switch to allow “Less secure apps.”
Once you’ve entered your password, you should find that Google lets you through the front door of Outlook.
The Outlook calendar details lie under the Home tab. The first buttons allow you to set a “New Appointment” which is an event just for you. The second allows you to create a “New Meeting” which is an appointment with other people. You’ll be able to share it with others, and you can add all sorts of details about the nature of the meeting and its location. And the third button lets you create other items, such as new contacts, tasks, and groups, which you’re likely to use less often.
Much of the rest of the ribbon is for navigation. You can use the “Go To” section to zip quickly through the calendar and back to the current day, and you can use the “Arrange” section to adjust how you view the calendar: by day, work week, week, month, or by schedule.
The next sections are where things start to get more advanced. Instead of piling events from different calendars onto the same timesheet, Outlook lets you see multiple calendars side by side. The “Manage Calendars” section lets you choose a calendar to open, and provides a way to create groups of calendars. Finally, the last section lets you share calendars with other people, email them, and publish them online.
There’s a lot there, but start at the beginning. Click a time slot to create an appointment or an event, and start setting up your Outlook Calendar.


Deanna Ritchie
Editor-in-Chief at Calendar. Former Editor-in-Chief, ReadWrite, Former Editor-in-Chief and writer at Startup Grind. Freelance editor at Entrepreneur.com. Deanna loves to help build startups, and guide them to discover their business value and the "how to" of their online content and social media marketing.