
First released in 2008 for Windows, Google’s web browser known as Chrome has become the most used browser in most of the world. In fact, as of October 2018, Chrome is used by almost 70 percent of desktop users worldwide. It’s also captured close to 57 percent of the mobile browser market share.
Besides being used by a majority of users, Chrome has some pretty cool features that Android, Windows, and Mac users can use. This includes the ability to synchronize your history, bookmarks, and setting across all of the devices you use, automatic web page translation, and download scanning protection.
Chrome also has a built-in spell-checker. This means that Chrome will detect any words incorrectly spelled words and then send back either the correct version or suggestions. It just makes the web browsing experience a little more enjoyable.
But, what happens when your Google Chrome spell-checker isn’t working? It may be because of the following issues.
Spell Check Hasn’t Been Enabled
By default, spell-check is turned-off. The reason why it’s not working is that it was never turned on in the first place.
The good news is that this is an incredibly quick fix so that you can go back to being a productive individual.
First, open Google Chrome and look for those three dots in the upper right corner of the browser. Scroll down and click on Settings.
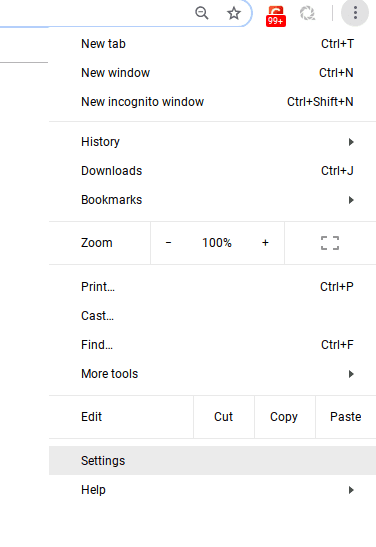
When in Settings, scroll all the way down until you come to Advanced Settings.
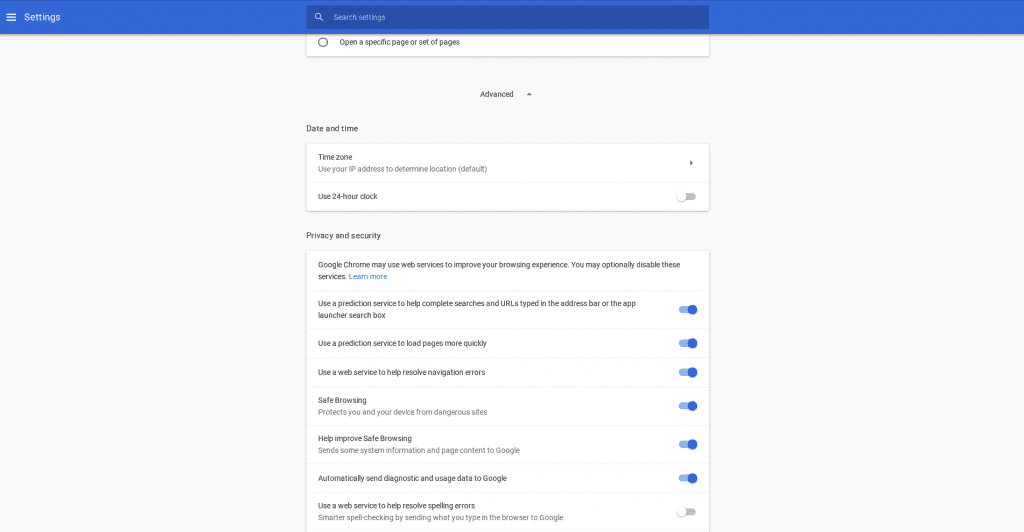
See the option for Use a web service to help resolve spelling errors at the bottom? Go ahead and enable that by clicking the button to right. If it’s blue, then it’s been enabled.
While you’re here, scroll down a little further until you get to Language and input to make sure that it’s set to your preferred language.

If this needs to be changed, just click the button to the right of the language to change it.
The Alternative Method.
This method didn’t work? Then there may be a bug with Chrome. Fortunately, you can still enable spell-check by doing the following;
Don’t open Chrome. Instead, go to https://www.google.com.

Right-click in the search field in the center of the window and select Spellcheck.
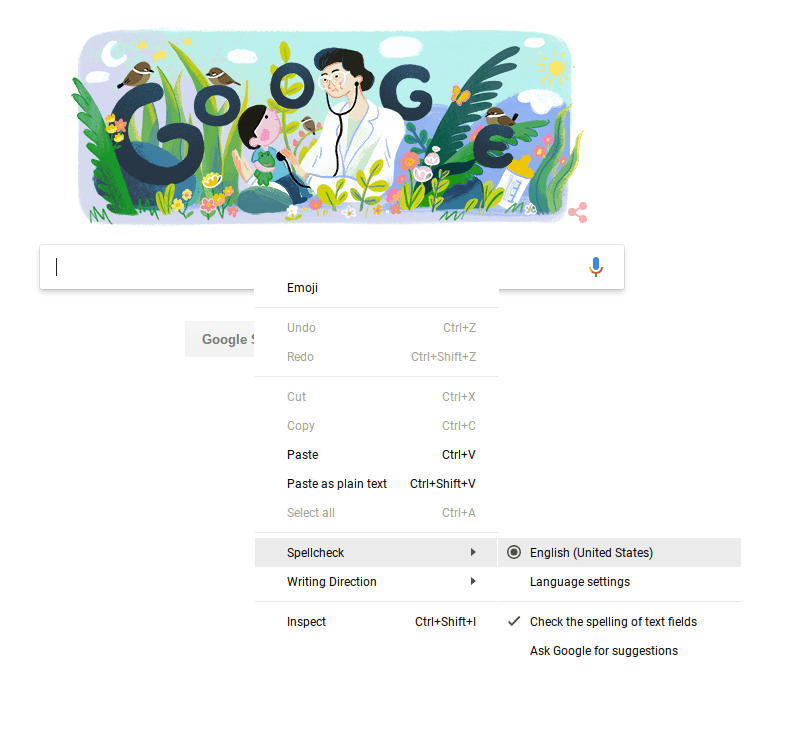
Select All your languages and Check the spelling of text field options. That’s it. You should be good to go.
Google Chrome Spell Checker Still Isn’t Working
If you’ve enabled spell check, and it still isn’t working, then you’ll want to try the following;
Go Incognito.
Google Chrome has this cool feature called Incognito Mode. This doesn’t mean that it protects you from getting caught going to some NSFW websites while at work. It basically “pauses” your search history and protects you from unsecured sites. It’s really meant for those who share a computer.
So, let’s say that you were looking for anniversary presents for your spouse. You go into Incognito Mode so that they can’t see what ideas you had in mind.
Going back to spell-check, check to see if it works in Incognito Mode. You can do this by clicking those three-dots in the upper, right corner. Then select, New incognito window.
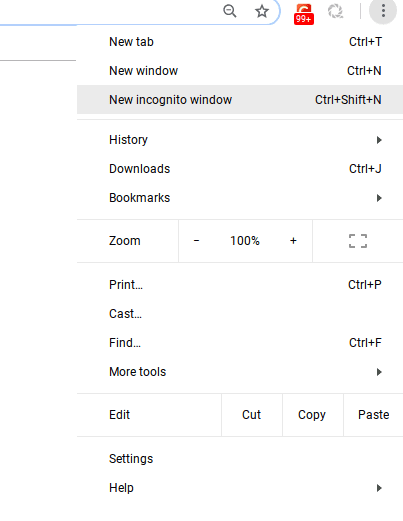
When you click on this, a new window will appear. It will look like this;
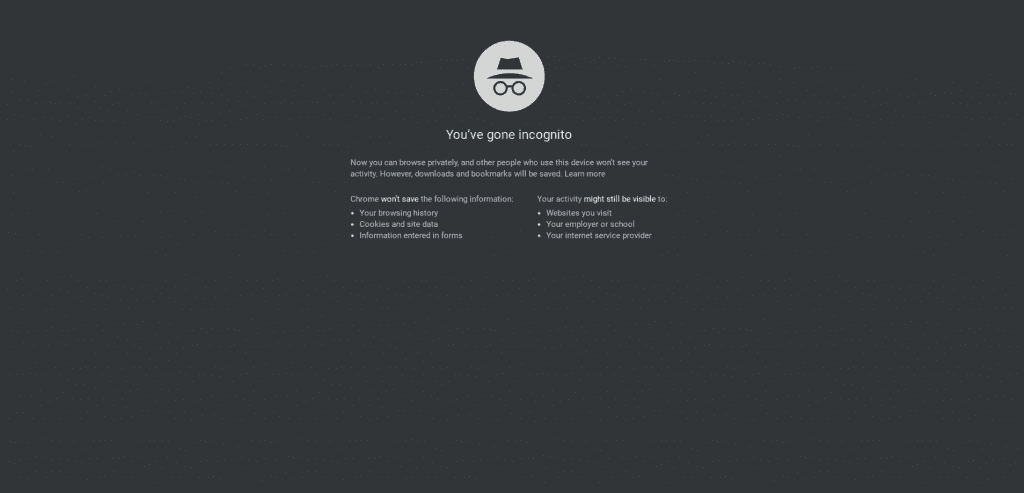
If spell-check doesn’t work while in Incognito Mode, it could be because spell-checking hasn’t been enabled or the manager of the account has set privacy settings. You can now either go back and enable spell-check or keep using Incognito Mode if that’s not permitted in your workplace.
Clear cache and cookies.
Another quick fix could be to simply clear the caches and cookies on your device.
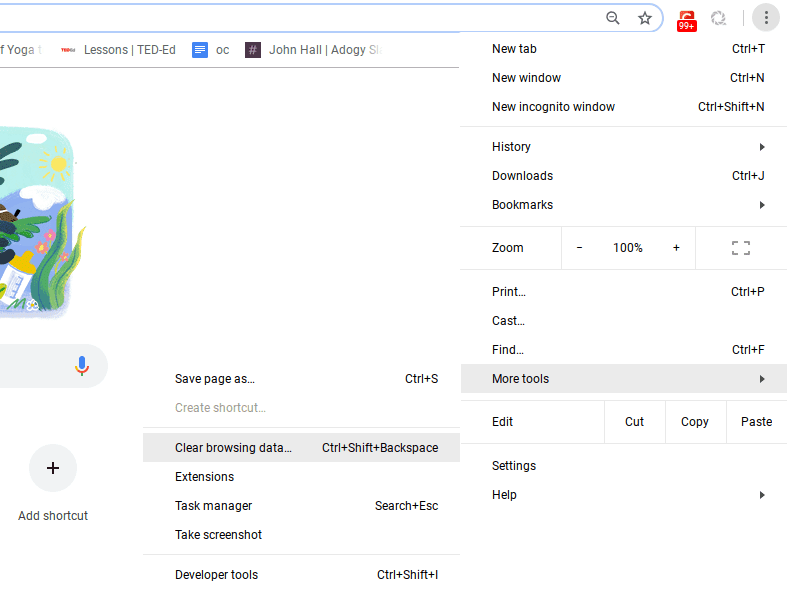
Relocate those three-dots again, scroll down to More tools, and select Clear browsing data.
After you click on it, this window will appear.
![]()
You then have the option to choose a time frame, such as Last hour or All time. After that, select the type of information you want to remove and click Clear data.
Reset Chrome settings to default.
You could also reset your Chrome settings. The reason? An app or extension you installed changed your settings. This won’t remove any saved passwords or bookmarks, but it may solve the spell-check issue.
Open Chrome and go into Settings. Scroll down to the bottom and click on Advanced. At the very bottom, click on click Restore settings. This will restore your settings to their original default setting.
If all of that works, then you may want to download and run Chrome Canary or contact the Big G.
Those who viewed this article also searched for:
How To Create A Calendar in Microsoft Word
How To Backup Emails to Your Hard Drive
How To Import an Outlook Calendar into Google
How To Setup Outlook Calendar
How To Fix Sync Problems With Google Calendar
How To Delete A Google CalendarHow to Create a Calendar in Google Docs
How To Export a Google Calendar to Outlook or Apple
How To Create Calendars on Your iPhone and iPad
How To Set An Out Of Office Message In Google Calendar
How To Set an Out of Office Message in Outlook
How To Merge Microsoft Outlook Calendars
How To See Google Calendar Events on an Apple Calendar
How To Create a Calendar in Excel
The Ultimate Guide To Google Calendar


Albert Costill
My name is Albert Costill and I'm a content marketer at Calendar. If I can help people become more productive in my journey, even better. If you ever have a question about your Calendar or how you can use it - - don't hesitate to reach out. I'm a Calendar Pro.